Friday, November 30, 2012

VOTE! Which Palette should we get for the BH Cosmetics Giveaway?


BH Cosmetics has VERY kindly agreed to sponsor an eye shadow palette for a lucky reader of The Makeup Box. (Someone's going to end up with a ton of new shadows for Christmas this year...)
Just to make it more fun, I'm not going to decide for you. I'm letting YOU decide which one it will be!

POLL
Go to this link to click your answer quickly! Poll closes in 24 hours. (I'm trying to get a weekend extension, but just in case they're not able to, do go make your choice as soon as possible.)


The options:

120 Color Eyeshadow Palette 1st Edition

120 Color Palette 2nd Edition

120 Color Palette 3rd Edition

120 Color Palette 4th Edition

E. 120 Color Palette 5th Edition (pictured above)
120 Color Palette 5th Edition

F. 15 Color Eyeshadow Pro (pick and build your own set of 15 26mm MAC-sized pans)


Salivating yet? I'm not going to tell you which one I prefer. It's not for me!
Just vote based on what YOU like, and we can kick this contest off ASAP next week.
Contest is open to ALL readers.

Monday, November 26, 2012

Driftwood: Seafoam Green and Rich Bronze Look for Day (88 Warm Palette)


Straightforward does not need to be boring. Here's a look that you can easily wear for day because I matched a soft seafoam green with a rich brown and soft champagne. The green is almost "faded" in tone so it's definitely a bit more fun, but not too loud for work or school.

The first shade is located near the bottom left corner of the 88 Warm palette. (You can get this from both Coastalscents.com as well as BHcosmetics.com. I don't detect any difference in the quality and they're likely to come from the same manufacturers.)

The Neutrals are near the central column. The first is a deeper cocoa bronze right at the bottom, right of the middle. The champagne comes higher up to the left of the center, a little above the maroon shade near the center of the palette. Both of the neutrals are shimmery, so if you prefer mattes, you can always replace the ones I used with similar shades on the palette.


Step 1: Start by buffing the seafoam green onto the inner half of the lids.


Step 2: Now, buff the rich bronze-brown onto the outer half of the lids. (This shade looks quite similar to MAC Bronze shadow, but is slightly lighter.)


Step 3: Now, pack some pale champagne gold onto your brush and then spritz it with a little water, eye drops or Fix+. THEN pat it gently down the center of your lid, going over and building up as needed, until you get a nice gold sheen.


Step 4: For definition, I ran a bronze pencil along the inner corner of the lower lid (Sephora Flashy Liner in Flashy Copper) and a dark navy blue to the outer half of the upper lid. I used a discontinued MAC pencil called Blooz, but as with all pencils, you can use ANY similar shade from any brand you choose. As long as the pencil has good color payoff, the brand doesn't matter.
Then just finish by curling lashes and applying mascara or falsies as needed!

Sunday, November 18, 2012

Painted Lady (Retro China Glam Makeup)


Was inspired by a recent campaign by Majolica Majorca to do a retro Chinese glam look featuring pale skin, winged liner, very intense pink cheeks and red-tinted lips. To update the look and keep it modern, an intense reddened pink liner was created using pigments and the lips were kept juicy and sheer with a clear red gloss.
  • Black pencil
  • Red pigment with a touch of pink (try MAC Bright Fuchsia pigment)
  • Mascara
  • A matte, bright, red-pink blush (I used Shu Uemura P Red 14)
  • Sheer red gloss (I used Lipstick Queen Shine Gloss in Red Sinner

Step 1: Begin by applying black liner along the upper lash line, and then gently smudging it out with your finger so it's just a smoky line. This just adds nice dark definition to the base of your lashes when you apply colored liner.


Step 2: I mixed some red pigments with a drop of liner sealant (use eye drops if you can't find any) and then apply it like a liner along the upper lash line from OUTSIDE-INWARDS. This makes sure you deposit the most color and thickness to the outer corners, and the line is fine on the inner corners.


Step 3: Finish the liner by extending the ends out into dramatic wings, following the angle of your lower lid. Then apply black mascara on the upper lashes to finish.


Step 4: For the cheeks, you want to use a soft brush so you don't get streaks. Then pick up some blush and run it very high up on your cheekbones. Then spread/buff upwards right under your eyes, and downwards to the hollows of your cheeks. It should be most intense right along the cheekbones.
Avoid bringing the blush too far inwards toward your nose or it could look really odd.


Step 5: For the lips, keep it simple since the rest of the face is pretty dramatic. Just apply a clear red gloss. Look for one that looks bright red because it will take on a slight pink cast over your lips.


Extra: As a final fun step, I dotted black liner near my lip, and then set it with matte brown shadow so it looks like a real beauty mark.


Saturday, November 10, 2012

Jazzed-Up Classic: Charcoal and Gold Eye with Scarlet Lips


If you're looking at a few posh dinners or parties (as we enter the holiday season) and want something that will be noticeable but not too typical or outlandish either, it's quite easy to just add a shot of gold to a more classic red lip look.
Instead of chunky glitter, which can look a little tacky, you want to go for something that is very fine-grained, and almost like large pigment particles. The alternatives are
  • super fine micro-glitter (.04 micron and below)
  • MAC Reflects pigment in Gold
  • glittery gold liquid liner like Lime Crime Rhyme, which is made up of little gold flecks like MAC Reflects
Other things you'll need include: 
  1. A dark almost-matte black shadow. I used the purple-black shade in the Rimmel Precious Crown quad for contrast with the gold.
  2. Black liner or kajal.
  3. Matte bronzer. I used MAC Mineralize Skinfinish in Comfort.
  4. Gold shimmery highlighter for the cheeks. My pick was Guerlain's Attrape Soleil but that is expensive and might be hard to locate, so any champagne gold highlighter you can find would work.
  5. A favorite scarlet lipstick like MAC's Ruby Woo, which will more likely last through drinks and snacks. You don't want this shade to be too dark or brown. It should be RED.

 
Step 1: Just begin by applying the dark charcoal shade over your entire lid from lashes up to the socket line, right above your eye ball. Run a little along the outer halves of your lower lash line with a firm brush as well.


Step 2: Apply the gold sparkle. If you're using a loose pigment, you might want to mix a little with eye drops or some mixing medium (MAC Fix+, or liner sealant) before dabbing it on with your finger, over the inner half of the lids. 
It WILL dilute and make the charcoal shade you applied earlier a bit faded, but that's fine since you're creating a bit of a gradation from light to dark, inside-out anyway.

Step 3: For definition and contrast, run black liner along the inner rims of your eyes. This makes the gold really pop and look more vibrant.
Then finish by curling lashes and applying mascara or false lashes. I wouldn't go for dramatic lashes since they'll just detract from the whole eye look, but it's no harm if you want to wear them.

After everything sets, you might need to go back and apply a second layer of gold onto the inner corners at the lower lash line just to intensify the color further.

 
Step 4: On the cheeks, I applied bronzer for warmth and contouring, and then topped my cheekbones and brow bones with shimmery gold. This gives a beautiful sheen when the light hits and it looks even better up close.


Step 5: Finish by apply a scarlet lipstick. If you're going to be eating and drinking, then make sure you blot and reapply to prolong the wear. For a super-detailed tutorial on how to apply a perfect red mouth, watch Lisa Eldridge's video here!

Tuesday, November 6, 2012

Sexy "Stacked" Cat Eye (Plus a Twist for Evening)


Long time no post on Blogspot!
I just got back from my honeymoon to NYC (left just ahead of Hurricane Sandy) and have been trying to catch up on things at work, etc. But I'm back doing tutorials, although I've only been able to update my Tumblr in the past week.
I thought it was time for something that was neutral and relatively easy to do, but still packed a bit of drama, AND converted quickly into a more colorful fun look for the evening.
This follows a dramatic cat-eye liner shape that is quite typical of Italian screen stars like Sophia Loren, but instead of using very harsh and strong black liner, it's created using black shadow instead.
You will need only:
  • A matte black or charcoal (any brand will do)
  • A soft brown (I used Coastal Scents Hot Pot in Southern Wood, which is similar to MAC Satin Taupe)
  • A soft neutral flesh-tone (Coastal Scents S29 Hot Pot)
  • [Optiona] A "converter" color that's bright and colorful; I chose Maybelline's Color Tattoo Eye shadow in 40 Tenacious Teal

Step 1: For this look, I used a single brush; a pointed pencil brush with a pointed tip. I prefer this shape because it actually allows me to apply shadow in an angular shape just by dragging the brush diagonally downward to the center of the eye.
Fill in the outer corners of the eye in a thick angular triangle using the black shadow.


Step 2: Dust off the brush on a piece of clean napkin and then pick up the soft medium brown. You want to stack this on top of the black earlier, overlapping it a bit so there is no harsh line between the 2 shades.
This time, angle the shadow down almost to the inner corner of the eyes.


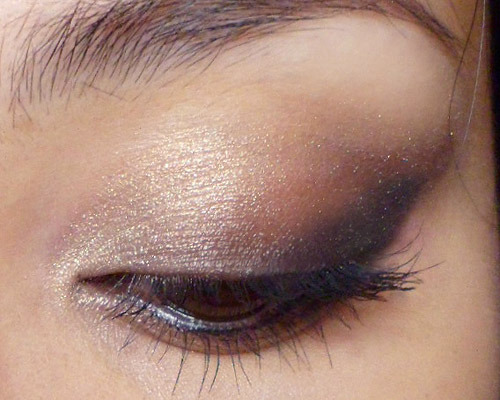
Step 3: The last step on the lids is just applying the softest beige shade  from the inner corner outwards. The only difference is that instead of going straight up in a triangle like the other 2 colors, this shade curves in an arc along the socket line before straightening outwards at the outer corners.
Again, the color should fade into the medium brown without any harsh lines in-between. This shape visually elongates the eye and emphasises an almond shape.


 Step 4: Finish by lining the lower waterline with black pencil, and then applying mascara or false lashes. The final look is subtly-dramatic and goes easily with both a soft or a dramatic lip.


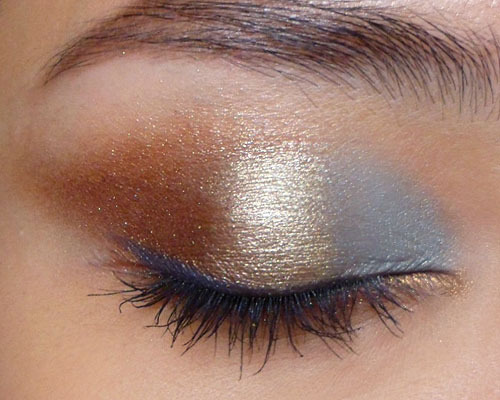
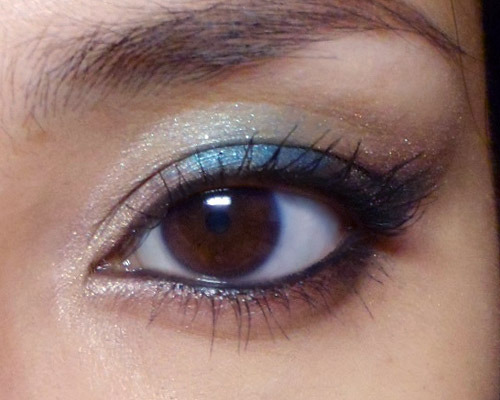
Step 5: The optional step for converting the neutral eye into a play-time look. I dabbed a bright turquoise cream shadow down the center of my lids using my ring-finger. Don't smudge back and forth; just tap to blend a bit. You want the color to be distinct and not muddy.
This just gives a nice pop of texture and unexpected color on the center of the lids.