It struck me during a conversation with some friends today that some people are literally just getting started with makeup, and not necessarily comfortable with eye liner, contouring, crease-cutting, etc.
So I'm distilling this tutorial down to 2 EXTREMELY basic ways to get started with eye makeup. This can be done with different color combinations, but the general rule is;
1 pale shade: this is your highlight, and should typically be as light or lighter than your skin tone. Easy-to-wear highlight shades have a shimmer that is beige, gold, peach, or pink, but a matte off-white or light beige like MAC Shroom would be great as well.
1 medium/bright/smoky shade: this is your main lid shade and will be the color people notice about your look. You can go for anything but I always recommend something that is deeper and stronger than your skin tone, or your lids can look a bit puffy otherwise. If you have hooded eyes, mono-lids, puffy lids, then it's better to stick with a matte shade.
1 dark shade - this is your definer color. It's what is going to add darkness to your lash line and a little contour where needed. Typically, this shade will be a dark brown, charcoal or black regardless of what lid color and highlight you chose. If you want to avoid emphasizing lines, then go for a matte shade.
If you want something simple and neutral that can be worn anywhere without being too loud or dramatic, go for a trio or pick 3 shades that are similar to these:

Wet n Wild Silent Treatment Palette, above

POP Beauty Park Avenue palette, above
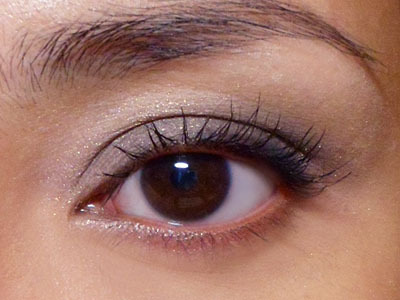
LOOK 1: The horizontal wash (using POP Beauty Park Avenue)

Step 1: Apply the palest shade all the way from the base of your lashes up to the brown bones. This pale shade should not be too shimmery or metallic if you don't want an overly dramatic look.

Step 2: Apply the main lid color just across the lids from inner to outer corners. The color can stay very close to the lash line or go up to the hollow of your socket line.

Step 3: Finish by wiggling a flat brush along your lash line to deposit the darkest shade. This helps to add definition back to your lash line and serves as your liner, without having to use a separate product.
Finish with mascara.
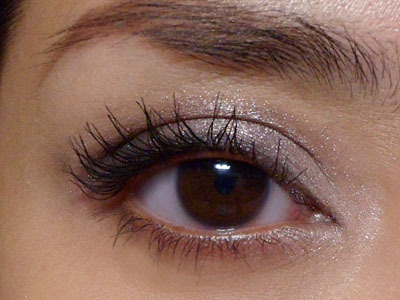
LOOK 2: Vertical Blocking (Wet n Wild Silent Treatment Trio)
This look emphasizes the outer corners and pulls the eyes apart sightly.

Step 1: Instead of the lightest shade, start with the medium and apply it generously to the center of the lids, leaving just the inner-most and outer-nost corners bare.

Step 2: Contouring. In the outer ends of your eyes, pack the DARKEST shade on next. Just lay your shadow brush flat on the lid with the tips of the bristles tucked into the hollow point of your eye socket. Then wiggle it on the spot.
Step 3: Then on the inner corners, do the same using the pale shade.

Step 4: Finish with the same step as in the first look. Run the darkest shade along your upper lash line. Then finish with black mascara.
Thank you for posting, breaking it down and showing pics helps out! :D
ReplyDelete