Showing posts with label simple makeup. Show all posts

Friday, June 12, 2015

By Terry Eye Designer Palette 1 - Smoky Nude Review, Swatches, Demo


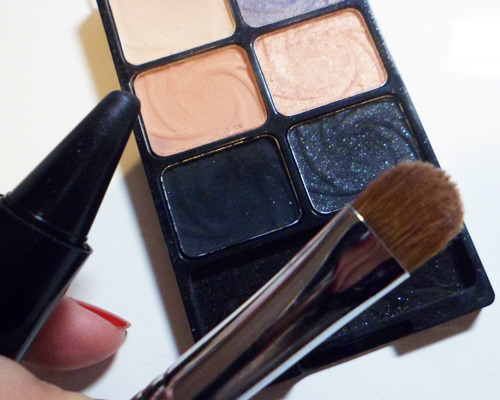
If you ask me what are some of the best luxe neutral palettes to invest in this season, one of them would definitely be By Terry's Eye Designer Palette No 1 in Smoky Nude.

I mean - just look at it!

It's expensive; let's get that out of the way. In Singapore this is $145. But let's not forget that you get 10 full-size shadows (1.4g each); more than 9 MAC shadows. And these colors are idiot-proof. I can find very little that is wrong with this palette other than the fact that I don't like the applicator inside, and I don't particularly love the rubbery purple case, which in my opinion actually doesn't look as posh and luxe as the brand is. 

That's a minor problem, but when you're paying this much, I think you deserve to get the best and most beautiful packaging.


Still, the product more than redeems itself. 
I don't really need to say much besides showing you the swatches. 


  1. It is very pigmented. You hardly need to rub to get fantastic payoff.
  2. Some chalky shadows can come up pigmented on your fingers, but do not adhere or transfer well onto the lids. That's not the case with this. The color transfers and builds beautifully onto the lids.
  3. The colors are mostly matte or satin, but all the textures are consistently smooth to the point of feeling almost buttery. They are incredibly easy to blend, so even if you don't have mad makeup skills, you would probably still be able to get a great look with this.
  4. There is a great mix of dark and light shades, spread between warm, cool, and rosy neutral tones.

By Terry Eye Designer Palette 1 - Smoky Nude; top row

By Terry Eye Designer Palette 1 - Smoky Nude; bottom row
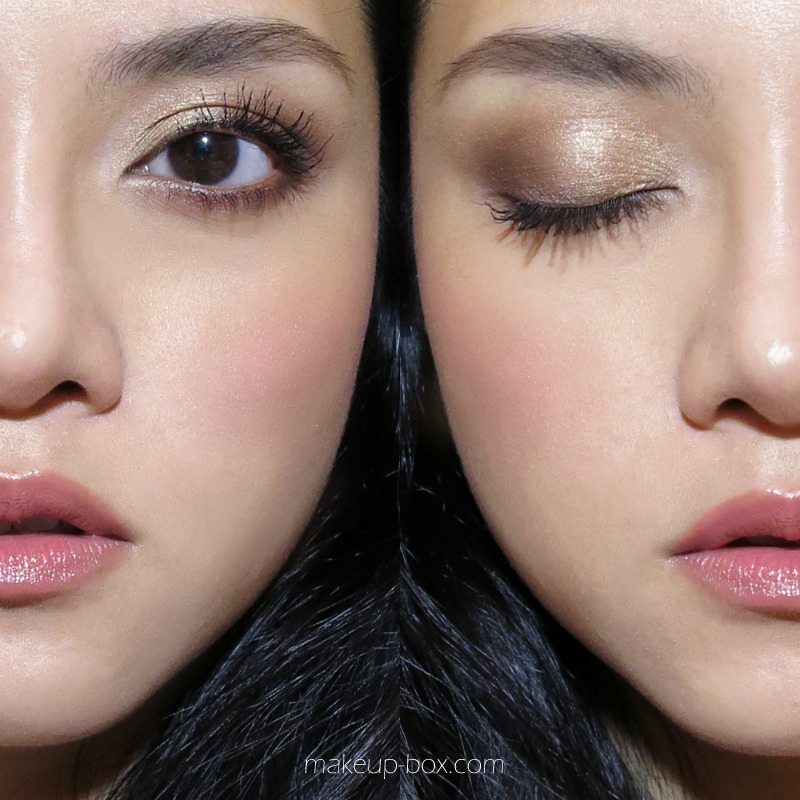
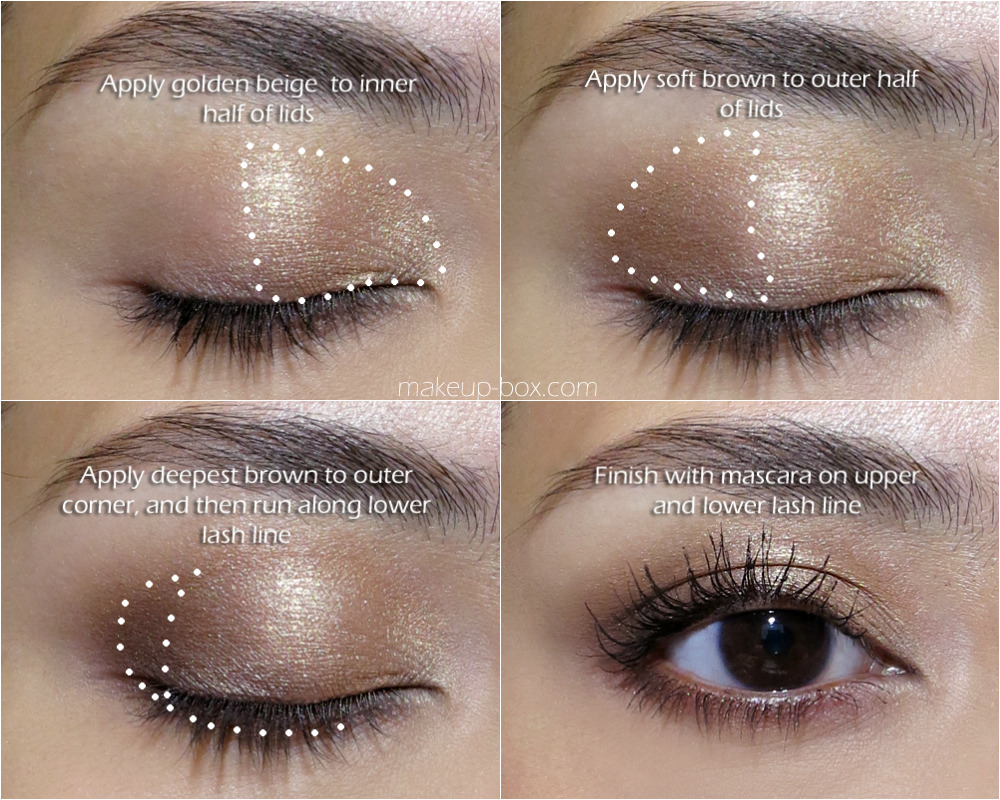
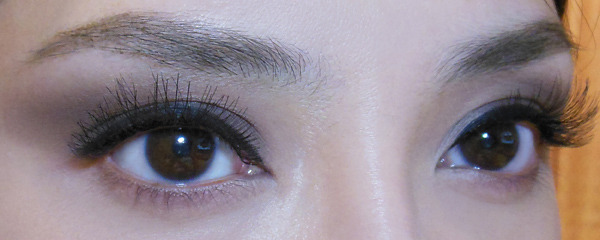
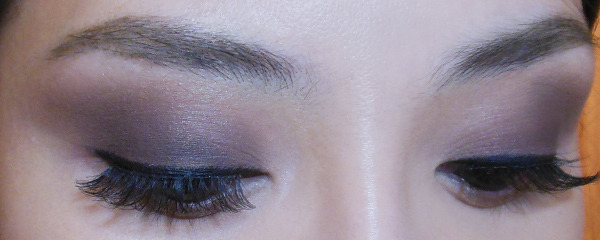
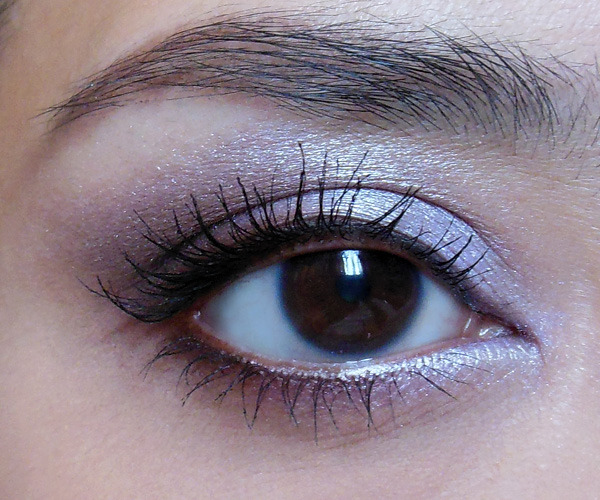
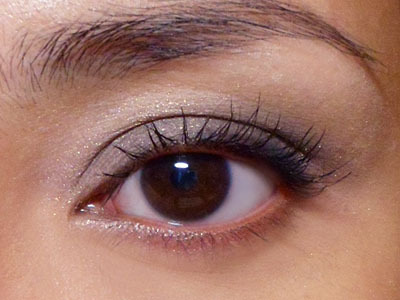
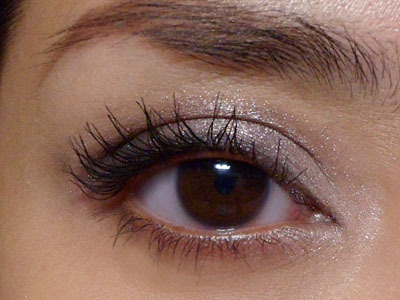
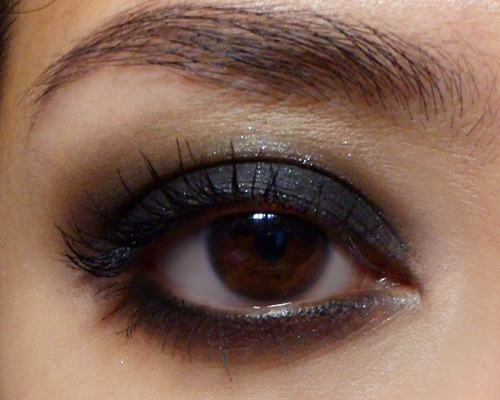
And now I'm going to show you a demo, using 4 of the shades for a quick look. Not a dark look, but with enough definition and drama still.

Monday, December 9, 2013

Holiday Look #3: Longwearing Soft and Glowy (feat. Benefit Groovy Kind-a Love Kit)

Benefit Groovy Kind-a Love kit contents

Not everyone’s into a smoky eye or red lips and winged liner. If you prefer the subtle enhancement of a low maintenance “girl-next-door” look that will last the night, this one’s for you!

I used a nifty little limited edition kit from Benefit, “Groovy Kind-a Love”, which includes minis of Porefessional balm, Benetint, 4 neutral brown shadows, a mini They’re Real mascara, and mini dandelion/gimme fever duo. Everything you need for an ultra-natural and flattering look.


Products: everything in the kit except for the concealer, lip liner and lipbalm.

  1. Concealer - Make Up For Ever Lift Concealer #2
  2. Lip liner - Givenchy Lip Pencil #3
  3. Lipbalm - use any pot balm you have that gives a slight sheen!
  4. Tips:
  5. Layering blush is a way to make it last the whole day, but be careful not to go overboard or you could end up with overly red cheeks. The thinnest layer of both will go a long way.
  6. Try Stay Flawless 15 Hour Primer on the lids as an eyeshadow primer!
  7. To avoid a stain wearing away unevenly on the lips, use a thin layer of nude liner as a base first.

Tuesday, October 29, 2013

[Requested] Basic Nude Lip Smoky Eye Makeup Look: Diorshow Aventure and MAC Blankety


Classic nude lips and smoky eyes in a few easy steps!

One of the easiest and most flattering looks to pull off a nude lip. Here is an easy step-by-step, and some tips to making it more wearable, and quick options for a day-appropriate version!

Try:
Rich browns, charcoal and grey, or even deep jewel tone on the lids
A pink or peach blush that isn't too neutral or deep in color; a soft wash of radiant color balances out the overall look. (Don't keep trying to match your blush to your lip color when you're wearing nude.)
To avoid the "concealer lip", which can be quite unflattering for many people, try a nude lip pencil that matches your lip color closely as a base
For this look, I'm using a charcoal grey cream shadow.


Sunday, July 14, 2013

Simple and Polished: Basic Everyday Neutral Eyes and Warm Bright-pink Lips


Just because you have a quad or palette with 4, 5, 6, shades doesn't mean you need to think of how to incorporate every color every time. It can be extremely overwhelming. For daily wear, 2-3 shadow shades is plenty.


Here's a very simple look that I very often wear when I want to look polished but don't want to spend too much time. You can recreate it whether you own the same eyeshadow palette I used (Lancôme Hypnôse Star Palette in Brun Adoré), or a neutral eye palette that you already own.

Tutorial

Monday, May 20, 2013

[Requested] 88 Matte Palette Smoky Brown Evening/Prom Eye (a la Bruno Mars "Just The Way You Are" Music Video)


Perfect opportunity for me to combine 2 requests; one for a dark brown prom-makeup done using the 88 Matte Palette (the Warm palette has the same shades needed), and one for the smoky eye look worn by the gorgeous model in Bruno Mars' Just The Way You Are video.

Dissecting the Look


The lighting in the video is extremely orange/yellow and the moving images aren't crisp and clear (you can click on the images for a closer look at my screen grabs). From what I can tell, she is wearing:
  • a matte chocolate brown smoky eye
  • a very flared and winged-out eyeshadow shape that emphasizes the outer halves of her socket line, quite similar to the classic smoky wing Pam Anderson might wear
  • very defined and thick black liner but it's not a very hard and precise line (i.e. does not look like liquid liner)
  • full false lashes that are a "rounded" shape, longer in the center instead of at the outsides
It's a very straightforward and flattering look as long as you can get the shadow shape correct, and it doesn't matter if you had mono-lids, hooded eyes or double lids; blue, green brown, hazel or grey eyes. But in real life, it probably works better for an evening out clubbing or at the prom than to school.

Thursday, April 18, 2013

Lavender-Chocolate: Soft luminous purple andbrown eyeshadow look that goes with pretty much any Lip color


This is a color combination that is not a typical beige-toned neutral, but still goes with pretty much any lip color you want to wear. It's also soft enough that you can use a light hand (skip step 3) and just wear it in the day for work or school.
I used just 2 shadows:
  • A pale lavender (Coastal Scents Hot Pot in Ice Ballet)
  • A deep rich brown (Coastal Scents Hot Pot in Rich Walnut)
Other than this, I had a chocolate brown pencil and black mascara.

Wednesday, July 4, 2012

BACK TO BASICS: Dummies' Guide to 2 Easy Shadow Applications

It struck me during a conversation with some friends today that some people are literally just getting started with makeup, and not necessarily comfortable with eye liner, contouring, crease-cutting, etc.

So I'm distilling this tutorial down to 2 EXTREMELY basic ways to get started with eye makeup. This can be done with different color combinations, but the general rule is;

1 pale shade: this is  your highlight, and should typically be as light or lighter than your skin tone. Easy-to-wear highlight shades have a shimmer that is beige, gold, peach, or pink, but a matte off-white or light beige like MAC Shroom would be great as well. 

1 medium/bright/smoky shade: this is your main lid shade and will be the color people notice about your look. You can go for anything but I always recommend something that is deeper and stronger than your skin tone, or your lids can look a bit puffy otherwise. If you have hooded eyes, mono-lids, puffy lids, then it's better to stick with a matte shade.

1 dark shade - this is your definer color. It's what is going to add darkness to your lash line and a little contour where needed. Typically, this shade will be a dark brown, charcoal or black regardless of what lid color and highlight you chose. If you want to avoid emphasizing lines, then go for a matte shade.

If you want something simple and neutral that can be worn anywhere without being too loud or dramatic, go for a trio or pick 3 shades that are similar to these:

 Wet n Wild Silent Treatment Palette, above

POP Beauty Park Avenue palette, above


LOOK 1: The horizontal wash (using POP Beauty Park Avenue)


 Step 1: Apply the palest shade all the way from the base of your lashes up to the brown bones. This pale shade should not be too shimmery or metallic if you don't want an overly dramatic look.


Step 2: Apply the main lid color just across the lids from inner to outer corners. The color can stay very close to the lash line or go up to the hollow of your socket line.


Step 3: Finish by wiggling a flat brush along your lash line to deposit the darkest shade. This helps to add definition back to your lash line and serves as your liner, without having to use a separate product.
Finish with mascara.


LOOK 2: Vertical Blocking (Wet n Wild Silent Treatment Trio)

This look emphasizes the outer corners and pulls the eyes apart sightly.


Step 1: Instead of the lightest shade, start with the medium and apply it generously to the center of the lids, leaving just the inner-most and outer-nost corners bare.


Step 2: Contouring. In the outer ends of your eyes, pack the DARKEST shade on next. Just lay your shadow brush flat on the lid with the tips of the bristles tucked into the hollow point of your eye socket. Then wiggle it on the spot. 

Step 3: Then on the inner corners, do the same using the pale shade.


Step 4: Finish with the same step as in the first look. Run the darkest shade along your upper lash line. Then finish with black mascara.


Saturday, March 24, 2012

How to Apply Black Shadow

Black smoky eyes with just one single shade in the Wet n Wild Coloricon Greed Palette

Anonymous:
How do apply black eye shadow? I know this sounds stupid but everytime i apply it, it either creases within 5 min, or applying it gets super messy, and it gets all over my cheeks. any tips? Mabe i'm using the wrong brand?


Essential tools for applying black shadow

It helps to use a good eye shadow brand, but even high end shadows from Urban Decay and MAC would crease and give you a lot of fall-out if you do it wrong. The thing to remember about black shadows is that they are primarily made up of matte pigments. Even the ones with sparkly bits are actually matte shadows with sparkly bits thrown in, and the texture is still that of a matte shadow.

Matte shadows tend to be chalkier, more powdery, and go on less evenly than shimmery/pearlescent shadows, which means they have poorer adherance ("stickiness") to your skin and brush, and you get more fallout and creasing in general. 

Always use:

1. A shadow primer to grab and hold on to your black shadow -
  • If your eye shadow is very pigmented, you can use a skin colored primer like Urban Decay Shadow Insurance (the matte one) or Lime Crime's Eyeshadow Helper
  • If your shadow is chalkier and less intense, then make sure you use a black base. If your lids are oily, use a silicone based cream/gel shadow like MAC Blackground Paint Pot. If your lids are normal or dry, use a black pencil and smudge it out to a thin smoky layer with your finger. (Kajals and kohls are better because they are softer and easier to blend.)
  • If you are applying shadow to your lower lash line, make sure you apply base or pencil there as well.
2. Flat brush to pack on the color with minimal fallout - 
  • Pat on in sections. Don't drag, buff, or sweep back and forth. This is because you are pressing the shadow pigments down into your base so that they stick and don't come off easily. If you use a soft, fluffy brush, you will not get intense color because the powder pigments will be dusting off all over your face (which you don't want).
3. As a last step, go in with a soft fluffy brush to blend the edges of your shadow so you don't have any messy, hard lines. Then you can finish with more liner and mascara.


Monday, December 12, 2011

The Weekend Face: Barry M 146 Dolly Pink Lip Paint


If you've ever wondered about the fate of that gorgeous tube of bright, candy pink lipstick, you'll be glad to know it's been well-loved. It's no longer summer, but I still can't help whipping it out from time to time. There's nothing like a standout lipstick for looking "done" without spending a whole lot of time on your face.

Barry M 146 Dolly Pink Lip Paint
Dressed-up Face in 5 Minutes:
  • Dior Nude Foundation #21
  • MAC Studio Finish Concealer NC25 + NC30
  • Make Up For Ever HD Powder 
  • MAC Well Dressed blush
  • Wet n Wild Greed Palette: peach-gold shimmer shade on lids, black along lash line
  • Bourjois Volumizer Mascara

Wednesday, December 7, 2011

Lazy Face: The 5 Minute Makeup Routine

There are days when you just DON'T have any time to spend 20 minutes getting your full face on.

Here are the essential steps and tips (for me) to get out the door looking put-together:

Step 1: Pick a good medium-coverage foundation (Dior Nude and Bourjois Healthy Mix are my favorites for being lightweight+good-coverage) with a great skin-like finish. This will even out your skin and minimize time needed for your concealer application later. Dab it on around the areas where you need the most evening out, as the coverage will be thickest in that spot.
For me thats under my eyes, and around my nose. 
And - IMPORTANT - use your clean hands! This is the fastest way to get foundation well-blended into your skin.

Step 2: Conceal any redness, discolorations, spots.
A wax based concealer (pots or sticks) will be easier to spot apply and build up than liquids. I'm trying out Revlon Photoready Concealer but MAC Studiofinish is my staple on most days. If you have really dark pigmentation or circles, get something with peach undertones. Apply with a brush, but press with your ring finger until it blends seamlessly into your foundation.
Don't rub or it will take you forever to build up precise coverage, and DON'T try to erase every single flaw you have. It's too much work and never really hides anything that well.

Step 3: Set with a powder. If you need something with a little more color, try something like MAC Mineralize Skinfinish Natural, because if you've got the shade that matches your skin tone, this is a powder that gives extra coverage without taking the glow away from your skin.

Step 4: Blush. Go for something that's a nice fresh pink (or stronger if you have a deeper skin tone) like MAC Well-Dressed if you're fair, and NYX Pinky if you're medium-toned. (I mixed both here!) Very lightly dab on with a loose, soft kabuki to add the base layer of color first. Then check to see if you need more, before buffing lightly to build up a bit of color.
If you tend to be heavy-handed, my suggestion is to go for a lighter shade than you would normally wear.

Step 5: Set your brows with pencil or powder (or brow mascara), and move on to your eyes. You need 2 basic shades. A deeper, matte shade, and a lighter (shimmer is optional) which can be neutral or otherwise.
With your ring finger, pick up some dark shadow (MAC Concrete) and smear it firmly along the lash line from OUTSIDE-IN so it's darkest near the roots. Don't worry about precision or blending.

Step 6: Next trick; pick up the lighter shade (MAC Mineralize Eye shadow in Snow Season) and use a clean finger to smear it INSIDE-OUT from the inner corners, until it slightly overlaps the darker shade in a sheer wash. That's your eye shadow done!

Step 7: Apply mascara (Bourjois Volume Glamour Max) and comb out if you need to.

Step 8: On the lips, pick your favorite everyday lip color (MAC Faux for me), apply straight from the tube, then kiss the back of your hand to remove excess. Lip gloss (DiorAddict Ultra Gloss #557 is a sheer candy pink with blue reflects) is optional!

And finally, a more presentable face in 5 minutes!


Monday, November 7, 2011

Easy Bronze-Liner Look: Feat. MAC Snow Season (Glitter and Ice Collection)

I didn't go crazy over MAC's Snow Season collection. I do think there are some really nice products (the Paint Pots and the shadows are all beautiful, but I don't think they are spectacular or particularly unique unless you don't have anything similar to those.)

I have to say I think Shimmermint is a gorgeous shadow, but I can mix up something similar with some pigments and micas, so I didn't get that. The only thing I did pick up was the Mineralize Eye Shadow in Snow Season, which is the most "neutral" shade out of the eye shadows I saw. 

In the pan, MAC Snow Season looks like an opalescent pink-silver, swirled through with bronze and tiny pale gold flecks. Rubbed on, it softens out to a very soft glimmery beige with ivory-mauve tones (below). As always, the camera does not do these Mineralize products justice, so do keep in mind that they tend not to do too well in photography. 

Swatches (L-to-R): MAC Retrospeck, MAC Da Bling, MAC Ricepaper, MAC Snow Season, and Stage Makeup Irish Cream

Texture-wise, Snow Season is (and most of the other Mineralize shadows are) very similar to Luster shadows in that they are filled with lots of fine-grained mineral flakes that give it that translucent, glittery effect. In terms of opacity and true payoff they are seldom as strong as the regular shadows, unless used wet. The bad thing is that if you want intensity, you need to use a good base or mixing medium. The good thing is, you can get a soft glimmering wash without worrying about over-applying. 
---
For this weekend eye, I wanted to keep things very clean and bright, but still get a defined eye without having to do a lot of contouring and layering of colors.
All I used was:
  • Sephora Flashy Liner in 07 Flashy Copper
  • MAC Snow Season Mineralize Shadow
  • Bourjois Liner Pinceau 16Hr in black
  • Bourjois Volume Glamour Max Mascara in black


Step 1: Use the copper liner to draw a simple line along the upper lash line, keeping it thick enough to be visible. At the outer corners, thicken up just a bit and then pull upwards in a flick, like a normal kitten eye.

Step 2: With the pencil, draw a line from the center of the SOCKET line outwards, to connect with the end of the flick. (Find it by feeling for the deepest part of your socket, between your eyes and your brows.) With a finger, gently smudge away the innermost portion of that socket liner so it looks like it "fades" into your crease, instead of ending abruptly.
Line your waterline as well.

Step 3: Apply a simple wash of pale shimmer to the lids, blending into the socket liner (but not covering the outer ends of the bronze liner. If you want to keep the look strong, reapply bronze pencil.

The finished look at this point should be a defined crease liner in a beautiful shade of coppery-bronze, with a soft wash of beige on the lids.

Step 4: Finish with black mascara (curl your lashes first), and black liquid liner on the tide line (under your upper lashes) for definition.

And you're done!