Tuesday, August 28, 2012

Coastal Scents Blue-Red Chrome Mica: MAC Cornflower Pigment Dupe?

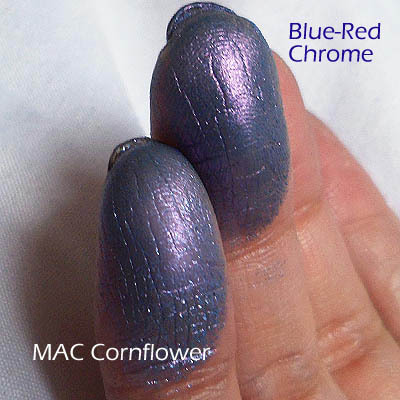
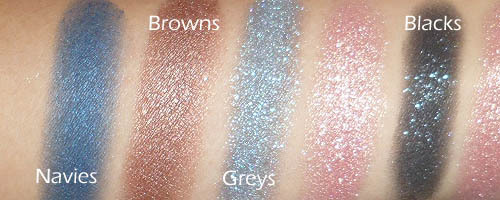
As you can see from the swatches, not really. BUT if you've ever wished that MAC's Cornflower was a little stronger, finer-grained, and looked as duochrome on the lid as it does in the bottle, then this actually performs better for a whole lot less.

The only thing you need to watch out for is to wear a good base or primer on your lids, because pure micas don't stick very well and can fade or dust off quickly. This shade is no different.

Here's a close-up of the 2 swatches over a clear base. (Both pigments don't stick all that well.) As you can see, MAC Cornflower goes on blue with just the faintest trace of violet overtone, but once it's swatched next to Blue-Red Chrome, it looks flat-out periwinkle blue. Blue-Red Chrome on the other hand, shifts very beautifully between blue and a mauve-violet. If you apply it without a base, it goes on very sheer with a violet sheen. 

For about $1 a sample baggie, this is again something I would recommend you check out OVER a MAC pigment. 


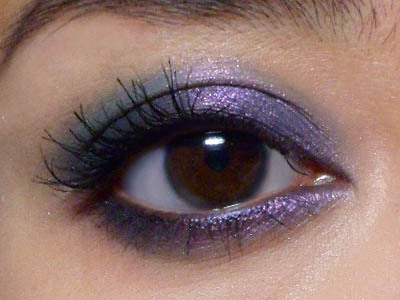
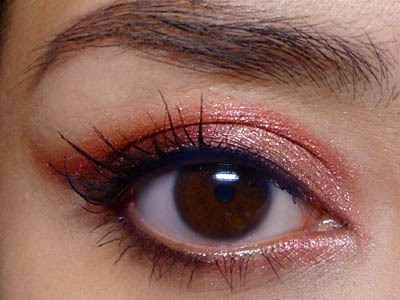
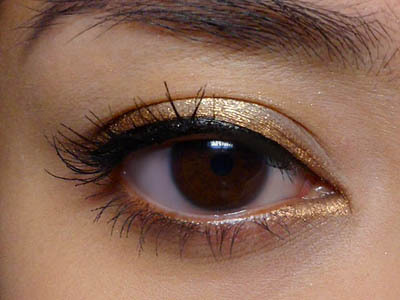
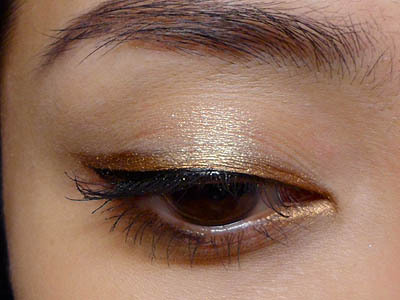
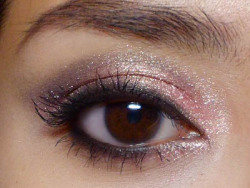
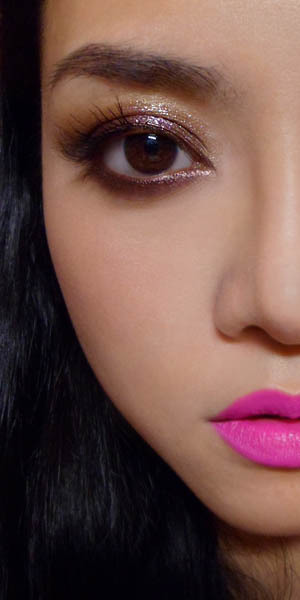
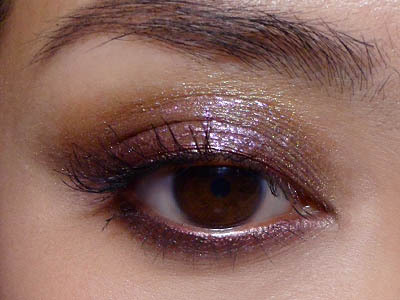
Step 1: I applied a dark blue pencil (MAC Blooz Kohl) along the lash line and diagonally up across the upper lid almost like a wing, but not extending much past the outer corners. This will serve as a dark base, which is ALWAYS a great way to bring out duochrome colors.


Step 2: Use your fingers to just lightly smudge and smoke the outer edges.


Step 3: Using a flat shadow brush so I can minimize fallout, I packed the pigment over the entire lid, from inner to outer corners, up to the socket line. Then I ran the brush along the lower lash line as well.


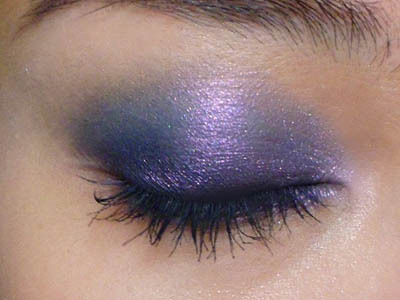
Step 4: Just curl lashes and apply mascara to finish!

Sunday, August 26, 2012

Product Highlight: Coastal Scents Paradise Rose Sky Mica


Pure Micas don't tend to work as well as some pressed shadows and pigments from brands like MAC, because they don't adhere very well to the skin. Under most circumstances, I wouldn't recommend buying micas for use straight-up as a shadow since they don't perform that well.
BUT - that said - Coastal Scents' Paradise micas are actually blended with cetyl dimethicone and metals to give them that incredible sheen and intensity on the skin, similar to pigments like MAC's Tan. (Although you should still wear a primer on your lid to minimize fallout and fading.)


The shade I'm featuring today is Paradise Rose Sky (a sample costs only $1 right now), a gorgeous burnished wine-red with rose undertones and a coppery sheen. This would contrast very well with blue and green eyes, but as I always remind everyone; don't limit your shade choices based on your eye color because eye makeup is NOT JUST about having max contrast with your eyes shade.


Step 1: For definition and that cat-eyed wing, I'm using a plum colored pencil first. To create the shape I did, you just run the pencil from the center of the lower lid outwards along the lash line, and then extend straight up at the same angle.


Step 2: Draw a line from the outer end of the line you drew earlier, and pull it diagonally in and down, until it touches the inner corners of our eye. As you draw the line, it will be quite straight. It just appears curved in the image due to the contour of my eyes.
Finish by coloring in the space within the wing.


Step 3: Using a flat brush, I packed Paradise Rose Sky pigment onto the lid from outside in, first filling in the mobile lid area, within the socket line (hollow curve arching above your eye ball).
I colored higher than the upper edge of the penciled wing earlier and only covered the upper portions of the purple pencil. This is to give the color a slight gradient effect, from defined plum below to smoky red at the top. 
Leave the inner corner of the lids bare.


Step 4: To lighten up the look a little, I packed a softer peach-pink (L'oreal Infallible in Forever Pink) onto the inner corners of the lid, smoothing into the coppery-red.


Step 5: Finish with black mascara!

Wednesday, August 22, 2012

Simple Double-Lining Tutorial


Colorful eye pencils are a fun way to add color to your eyes without worrying about shadows and blending, etc, but sometimes using medium- to light-colored pencils can cause your eye line to look very undefined. 


This is where double-lining comes in use. This typically means stacking two lines in different shades. When you use this technique for definition, the lower line tends to be a dark brown or black shade. This application method (layering one shade over another) is also a lot easier for beginners than the non-overlapping method used for two colored lines.


Step 1: First, apply the colored liner along your upper lash line. Anytime you do double-lining, the upper line should be thicker than you usually apply it because half of it is going to be "covered" by a second liner. 
I prefer to apply the pencil diagonally up and out, making it thicker at the outer corners.


Step 2: Now, fill in the area under the initial line, making it a thick, solid swatch. If the shade you chose is quite light (like the bronze I chose; Sephora Flashy Liner in Flashy Copper), go ahead and apply it in the inner corners of the lower lash line as well.


Step 3: Double-lining. Using a liquid allows you to get the most opaque line with minimal fuss. If you're not comfortable using liquid liner, I suggest using a gel liner instead, as a regular pencil is not likely to give you a very precise line when layered over another pencil.
Run it along the lash line, leaving no gap above the lashes. At the outer corners, follow the slight flick drawn by the pencil, so that both lines end at the same point.


Step 4: Apply black mascara to finish. Then as a finishing touch, to add a bit of a subtle glow to the lids, add a touch of pale gold or bronze to the center of the eye, overlapping the colored liner, but not the black. 

This shadow you choose should coordinate with whatever color liner you choose. (Pale pink for pink, pale lilac for purple, etc.)


Sunday, August 19, 2012

Tips for Wearing Pink Shadows

Wearing pink (especially any shimmery pink) around the eye area can sometimes end up making you look like you have pink eye or swollen eyes. It's not the easiest color to wear, and I tend to avoid it mostly.

But ironically, pink CAN be flattering on just about ALL skin tones because it's a color that is naturally occurring on our bodies.
There are just a few tips to wearing it well.
  1. Pair it with a slightly deeper shade in the crease or socket line. Think neutrals like greys, browns, navys, blacks. Many softer pinks are too light to give you any definition around the eyes, so you need to add a bit of contouring back into your socket mostly. 
  2. Always keep your lash line dark. Without some black or brown at the lash line, and dark lashes, you can look like you have rabbit-eyes when you wear pink.


Good pinks: Softer pinks with a peachy-gold sheen are universally flattering on most skin tones. The gold keeps it from looking like discoloration or broken capillaries. Cooler-based pinks and magentas can be nice too, but they don't go with as many looks and lip colors as a golden-toned pink.
  • L'oreal Infallible 004 Forever Pink is a beautiful pink with a peach-gold tint
  • MAC Swish, Da Bling, are nice light pearlescent pinks
Mattes are fine as well; in fact mattes are vibrant without looking flat. Locating a good matte pink is harder than applying it well. Avoid any pink that is too plummy or brown. You can look like you haven't slept for 3 days.


Quick Tutorial on a basic defined-crease look
Step 1: Important thing to do is to always set a nice darkness around your lash line first. Your pink shadow is going to go on top of it, but having some black below keeps things smokier. Make the black thicker on the upper lash line, and very light and only halfway inwards along the lower lash line. 
(Leave the inner lower corners clean.)


Step 2: Pack on the pink. Nothing complicated here. Just go up to the hollow of your socket line, but don't  go to far up.


Step 3: Reapply the black at the lash line. Keep things smoky and soft. Don't try to get any thin precise line there.


Step 4: Use a small pointed brush to lightly run the black shadow along the hollow of the socket line. (If you have hooded eyes, small lids or monolids, make sure you follow along the deep line right above your eyeball, NOT the fold of your eye lid.)


Step 5: Finish with black liner along the inner rims of the eyes (option) and black mascara.


Regarding Colors:
You can replace the black shadow with greys, browns, charcoals, navy blues. The only thing is to make sure the other shade you use is deep enough to give some definition. 
Whatever contouring color you use, stick with black liner and mascara.

Tuesday, August 14, 2012

Glossy Burgundy Lids with Neon Magenta Lips (NYX Matte Lipstick in Shocking Pink)


One more look I posted on Instagram (makeup_box) a couple of days ago. This is a very simple look to recreate. The only thing about it that is different from a regular look is just the gloss on the lids and a neon pink lip.


I used
  • a plum colored metallic pencil from Bourjois (Khol & Contour 07 Praline Inventif - any one you can find would do.)
  • a deep cool brown shadow (Coastal Scents Hot Pot in Southern Wood)
  • a soft medium-light taupe (Coastal Scents Hot Pot in Goldmine - MAC Patina would be a prettier alternative)
  • Any clear gloss and a bit of pale purple micro-glitter (optional)
  • soft pink blush (any of your choice; I used my Bourjois Little Round Pot shadow #15)
  • Bright magenta-pink lipstick that is deeper than a neon fuchsia (NYX Matte Lipstick in Shocking Pink)

Step 1: Begin by shading in your lids, then lining both the upper and lower lash line.  Then use your finger to gently blend out the edges so there are no hard lines, and then touch up the pencil

Step 2: With the deep smoky brown, lightly run along the lid near the lash line and gently extend your brush past the outer corners into a slight wing. This sets the color around the lash line. If you want to, you can skip this step, but I like a bit more dimension and depth I get by layering the shadows.


Step 3: Apply a soft taupe brown to the upper portions of the lids, leaving just a small margin of skin above the lash line. If you want 


Step 4: Go back over your upper lash line with the plum pencil.
IMPORTANT: Curl your lashes now because you'll be applying clear gloss next. You can't curl your lashes once you coat your lids as you'll smear everything off.


Step 5: With a flat brush, mix a little violet glitter (this is optional; it's only visible when someone is quite close to you and looking directly at your eyes) into a dab of clear gloss, and then gently PAT that onto your lids. If you stroke your brush back and forth, you will end up smearing the shadow beneath.


Step 6: Finish by applying black mascara. IF you are using false lashes instead, then you will need to apply them BEFORE you apply the gloss. Otherwise, the latex will have problem sticking to your skin if there is any gloss there.

Friday, August 10, 2012

Low-cost Burnished Bronze Look for Work/Schoool: Coastal Scents Bungalow Gold

The entire look was done using extremely affordable products. I'm featuring some of my favorite products today. The images on the site aren't often accurate so I swatched them above for viewing.


  • Coastal Scents Hot Pot in Bungalow Gold - this is one of the newer Hot Pots, a beautiful shimmery metallic-bronze shade
  • Coastal Scents Hot Pot in Chocolate Brown - also known previously as S35, this is a deep taupe shade with a faintest hint of plum; often compared to MAC Satin Taupe, although this is deeper and has more grey
  • I also used Maybelline's Gel Liner in 02, which is a shimmery chocolate.

Step 1:  Begin by first using a flat angled brush to line the upper lash line from outside in using a deep taupe shadow, angling diagonally downward so there is a slight wing. Run in along the outer half of the lower lash line as well.


Step 2: Use a soft blending brush to buff a rich bronze shadow over the entire lid. Blend up beyond the socket line. Then use the angled brush to run the bronze shade all along the lower lash line as well. 


Step 3: Now for the liner. Since you've already laid down an angled line earlier using the dark brown shadow, it should be a piece of cake going over it with the brown gel liner now. 

This should give you a very neat but not-too-harsh line.


Step 4: Finish by curling your lashes and applying black mascara. I'm using Maybelline Great Lash Black. Any black mascara you like will do.


Sunday, August 5, 2012

Marina and The Diamonds Nude Lip Look: Retro with a Twist


This is a rather Classic look which would suit anybody. 


You would just need to adjust the colors you use depending on how pale or deep your skin tone is. You would need:
  • 2 matte shadows: a pale beige (you can use a pressed powder) and a dark brown (Revlon Rich Sable)
  • black gel liner (Maybelline is a good option)
  • 2 sets of false lashes; a natural-looking full-strip for the top lashes, and a strip of separated clusters on a clear strip, like below
  • a soft beige-pink blush (NYX Angel) or anything that doesn't really stand out too much on your skin
  • a nude lipstick (I used Lime Crime Coquette)
  • a pale mauve-pink glass (Revlon Colorburst in Crystal Lilac)

Step 1: Apply the pale beige all over the entire lid from lash line to brown bone.


Step 2: Apply the deep brown shadow along the hollow of the socket line. 


Step 3: Smoke the brown upwards towards the brow. Leave just the brown bone clean. Wing it out slightly at the outer corners. If the beige on the mobile lid (near the lashes) has been muddied, simply reapply the pale shade again.


Step 4: Apply your gel liner along the upper lash line and end it in a flick. Follow the lashes all the way, down and then out in a soft curve at the outer corners. Marina's flick starts quite low so the look is more retro and isn't that "catty".


Step 5: Marina doesn't have any skin showing below her lashes, which means you will need to run the gel liner along the tightline, under the upper lashes. Make sure you don't see any skin there.
Then run a matte beige (Nars Rue Bonaparte) or white liner along the lower lash line.


Step 6: Apply full strip lashes to the upper lash line. (I used Ardell 120 Demis, as usual.)


Step 7: The fun bit is the lower lashes. You can buy a box of clusters, but it is far easier (and looks nicer) to cut up the full strip of cluster lashes above, so you have individual chunks with a wide, flat base rather than a point or a knot.
Begin from the outside and work your way in, pasting the lash clusters top-down over your natural lash line. If you need to shift any clusters so they're spaced evenly, just reapply glue and place them back on. Don't paste them them on the waterline itself.


Step 8: Apply a nude lipstick to your lips and then blot lightly.


Step 9: Top your lips with a pale pink-mauve gloss just for a bit of a cool-toned sheen.


Step 10: Using your liner brush and the gel liner again, draw a V to place the base of Marina's signature "heart"-shaped beauty mark on the left side of your face. It's easier that trying to draw a heart from the bow shape at the top.


Step 11: Simply fill in, and you're done! If you need to edit any mistakes, use a tiny lip brush dipped in a little oil-free makeup remover and gently clean up the edges.