Showing posts with label makeup tutorial. Show all posts

Sunday, September 2, 2018

Maybelline Total Temptation Shadow + Highlight Palette and Mascara


Maybelline just released their Total Temptation Shadow + Highlight palette along with Total Temptation Mascara this weekend. Retailing at a reasonable S$26.90 for the palette and $21.90 for both waterproof and regular mascaras, I wanted to try them out on camera to see if these were as value-for-money as they seemed.

The palette contains a warm half with 4 shadows and a highlighter, and a cooler half with the same. No reason you can't mix and match, but I just wanted to see how they'd look separately.

VERDICT:
I'll just say I like the palette, and I love the mascara (non-waterproof formula).
The palette's formula is velvety and amazing - very good quality and the colors are gorgeous.

Saturday, February 14, 2015

Bobbi Brown Hot Collection Lip Color Swatches and Makeup LookPictorial/Tutorial


Bobbi Brown's Spring 2015 Hot Collection features soft neutral eyes and lots of strong vibrant colors on the lips. My favorite kinda combination for most days. 

I've got a quick makeup look here for you using items from the collection!

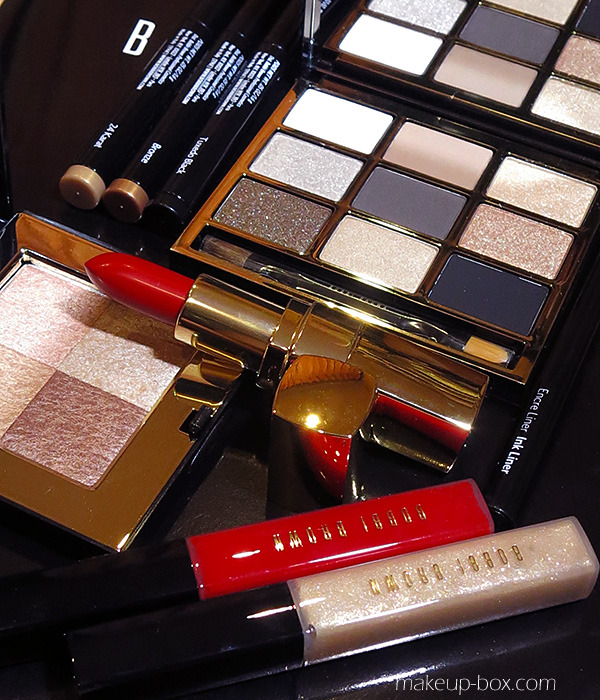
The main star of the show is one of the amazing Art Sticks. Now I haven't tried any of these before now, and I'm quite blown-away, even though I usually find Bobbi Brown's lip products to be among some of the best on the market. 


Bobbi Brown Art Sticks in (from left) Hot Orange, Hot Berry, and Hot Pink
Bobbi Brown Art Stick swatches

The pigmentation is completely opaque, and you get very vibrant intense color once the product goes on. They aren't dry like liners, so I wouldn't recommend them for that purpose. They're more of a rich satin texture. Not quite matte.

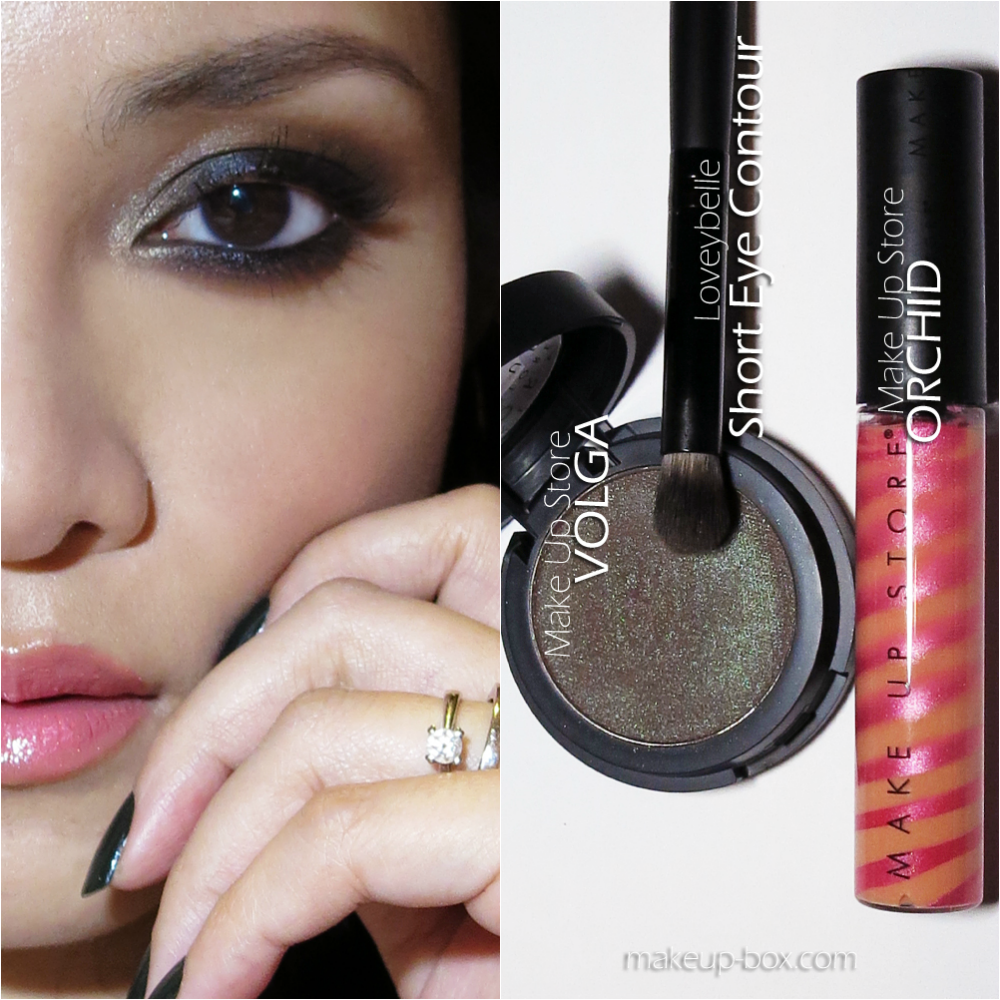
For this particular look, I used Hot Berry, which is a gorgeous deep magenta.


If you're not sure about such an intense color, go with the Sheer Lip Colors.

These are cushy glossy bright colors in softer shades than the Art Sticks so you can have bright lips without all that intensity.


To complement the cool magenta lips, I went with a cool pink blush. These Cheek Palettes from the collection are just GORGEOUS. I was so excited to see them. You get 3 colors, one a soft shade to apply as a base color, one a stronger shade to apply as a pop in the center of your cheeks, then finally, you use the center highlight shade along your cheekbones.

But there is nothing stopping you from using these as 3 separate cheek products.


These blushes look soft but believe me they can build up quickly to very intense colors, so use a light hand - and a soft brush. 

Because my lips are the focus for the look, I kept the blush very soft and subtle, using only Pale Pink blush and then Pink highlighter for a bit of a glow. 


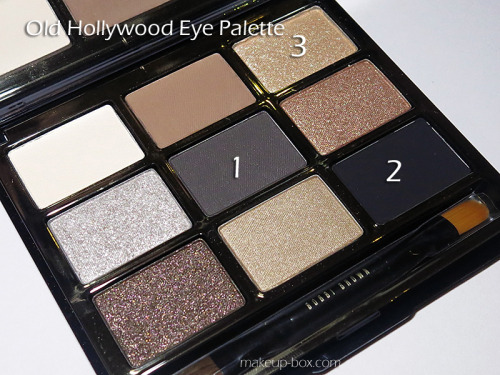
On the eyes, I used the amazing Hot Nudes palette, which I swatched yesterday. This palette has 8 shades, and I wanted a glowy lid, but nothing too dramatic so it wouldn't fight for attention with the lips.

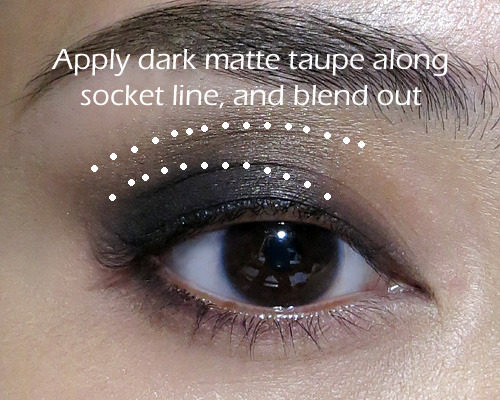
So I picked 2 of the shimmer shades in the palette, Nude Glow, and Bronzed Beige, for the lids. Then I used Nude Petal in the socket to blend out any edges, and Smoke as a soft brown liner shade. 


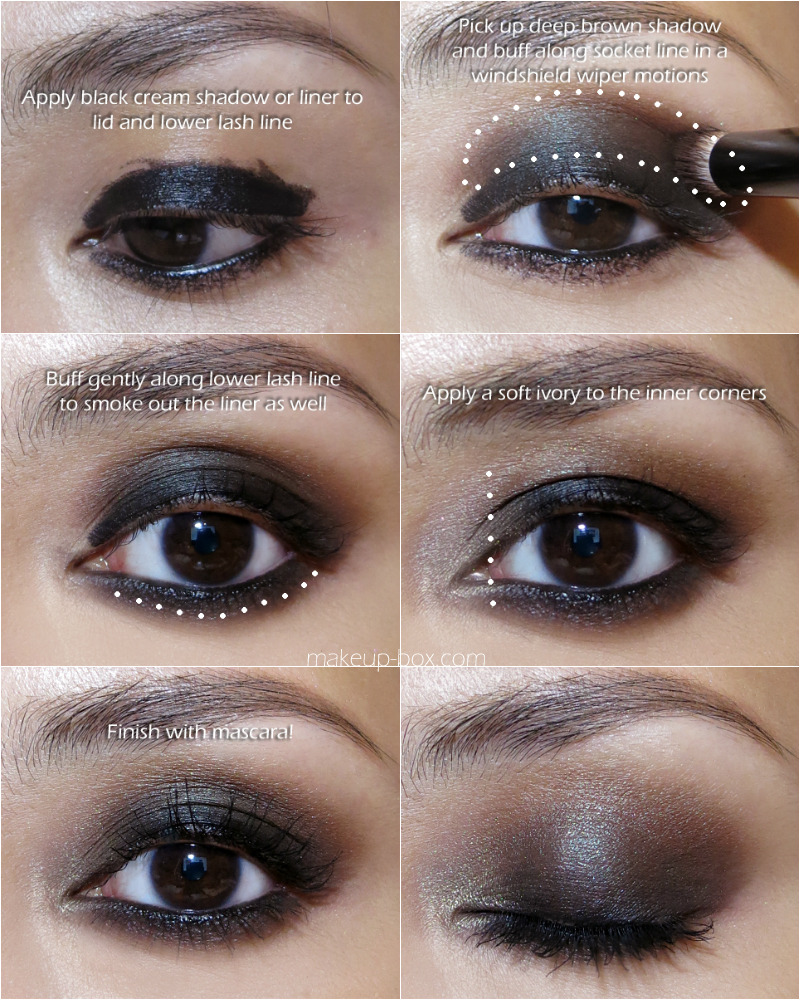
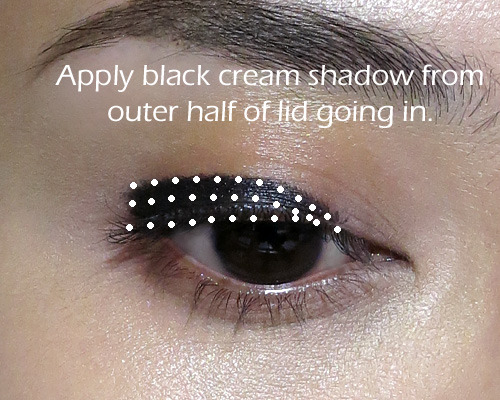
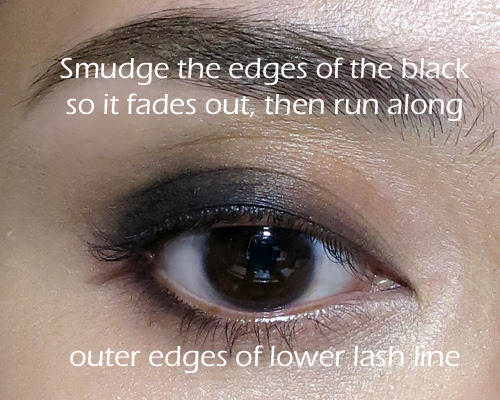
The step by step look is below!


The finished eye, after applying mascara, should look dewy and defined, but not take too much attention away from the lips.


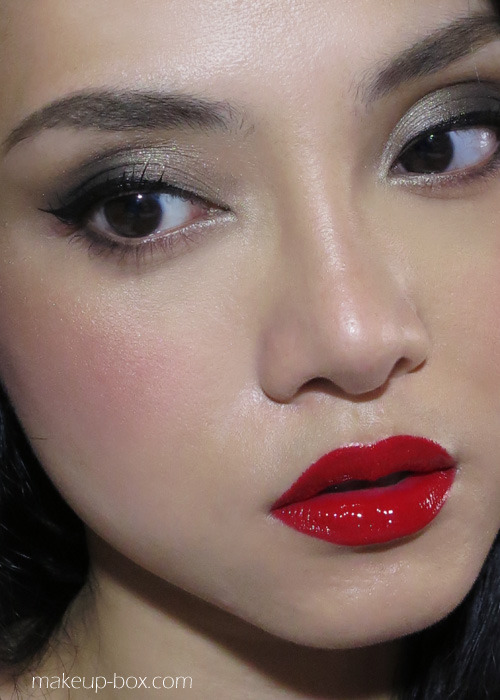
And here's the final look!
The Bobbi Brown Hot Collection launches 6 March in Singapore at Isetan Scotts, 13 March island-wide. 


P.S. To win an SGD200 hamper from Bobbi Brown Singapore, or 1 of 5 pairs of passes (worth 2 x $100) to their Look of The Season workshop in early March, hop on over to fb.com/bobbibrownsg, Like the page if you haven't, and comment and say which of the 3 products used in this look is your personal favorite. 

Winners will need to be in Singapore to receive the hamper and attend the course!


Wednesday, January 28, 2015

Chilli Red Lips and Soft Winged Eyes: Armani Lip Maestro 402 and NARS Cordura + Kalahari tutorial


Haven't put a tutorial on here in awhile, so here's a very quick breakdown of a go-to "dressed up" look that I often do when I'm going out. It's not all hard edges and precise dramatic lines though. In fact, it's kept deliberately soft around the edges, so that you can wear a stronger lip with a stronger eye, if you choose.

To give you options, I broke the look down into 2 parts. The eye, and the lip. You can wear them separately or together like I did. 

Products used: Shiseido Maquillage Long Stay Eyeliner N, Etude House Play 101 Pencil in 59, NARS Cordura (darker shade), and NARS Kalahari (warmer bronze shade used)

Firstly, a note about products. You absolutely do NOT have to use the exact same things I did. Most of us have black and brown liners, and many of us have a dark brown and a medium brown shadow. Just dig around and look for what you already own. Or if you absolutely LOVE one of the particular shades here, then go for it.

Step by step: Smoky winged eye
This eye look is so straightforward. There is no precision required because everything is hazy and smudged out. That's why I do it so often. It takes only a few minutes.

Now on to lips! I only discovered Lip Maestros from Armani in December last year. Very slow and late of me I know. But I fell for them in a BIG way. These things are incredible. Of all the lip creams that were launched last year, this is probably my favorite texture. They aren't as gel-like and glossy as Dior's, not as sheer as YSL's, and aren't as intense as Shu's (although these 2 brands have the closest textures). 

To me, it's like Baby Bear's bed to Goldilocks. Just right.

Lip products used: No7 Precision Lip Liner in Nude, Armani Lip Maestro in 402
I have a rather specific way of applying these.
Obviously I don't want them to bleed and smear quickly so I don't just wear them straight from the tube without liner.
BUT, I also don't want to ruin that semi-glossy texture or change the consistency and opacity by wearing a layer of liner all over my lips. 

So this is what I do.

My lip application procedure for Lip Maestros
What I end up doing is create a border that is mid-way between red and nude. It melds with the red so it doesn't look like an obvious line, and at the same time, it also protects the lipstick from bleeding quickly, AND it works as a border and helps bright colors from looking too hard and harsh against the skin.

The lip is neat, but it's not overly defined. You will never see a dark lip line when your lip color wears off after a drink or a  meal. And it's never harsh-looking or like "stick on" lips.


Wednesday, December 31, 2014

Pastel Makeup: Givenchy Le Prisme Yeux Quatuor 73 Pastel Model

I asked you guys on Instagram which of the 6 Givenchy eye quads you wanted a tutorial for, and a majority of you guys - unsurprisingly - voted for the toughest one. 73 Pastel Model.


It's gorgeous. 
But as someone with dark eyes and dark hair, I tend to avoid all-pastel palettes because they tend to look better on the pale and fair-haired, with light eyes. 
But you guys chose, so I'm going to show you how I'd work with a palette like this!

First, some tips for working with pastel shadows:
  • Clean up your lower waterline with a light pencil. Pale shadows can make your eyes look less white. This helps to reverse it.
  • If your eye contours are not very defined, shimmery pastels can make your lids look puffy and swollen. Don't apply these pale colors any higher than the hollow of the socket line. The best thing is to add a matte dark definer shade (like dark grey in this case) to the socket line to add some definition back.
  • Apply LOTS of mascara or wear wispy false lashes that aren't too heavy and dense. Pale shadows work well when paired with long lashes, but if you apply too heavy a set of falsies, you just weigh the entire look down.

Givenchy Le Prisme Yeux Quatuor 73 Pastel Model swatches

Texture:
The shades in this palette are very pale and translucent, as you can see in the swatch image. So it's best to apply them over a base so the color holds and intensifies.


Givenchy Magic Khol 7

I used a nice beige-brown metallic pencil (Givenchy No 7) as a base and that worked beautifully. Use any matte or metallic neutral beige-toned base. 


Instead of just applying the shadows directly, it helps to start with a nice soft neutral beige-brown base. The brown will not show up under the shadows but it helps to anchor the pigments.


Green pencil used was a Catrice pencil 060 Don't Be Mean To Green


For the pale green shade, do the reverse and concentrate most of the pigments on the inner corners, fading out along the lash line. This creates a nice ombre-green effect from light to dark.


Make sure you curl your lashes well. the higher and more doll-like they are, the better!

You can keep things as is if you like the softer look, but I personally want more definition along the socket, so I added a dark charcoal grey shadow very lightly.


Instead of applying it heavily into the outer corners of the eyes, I started slightly inside along the socket. The grey doesn't touch the outer corners, which keeps the overall look light and the eye shape more rounded and doll-like. Make sure the color fades away as you move inwards.


On the rest of the face, I kept the colors very soft and marshmallowy as well. 
This is not the sort of look that goes too nicely with a bright red lip, etc. The colors are soft, but the contrasting multi-colored hues are still the main focus, so keep the rest of your makeup soft or they will overpower all the pretty pastels.

Givenchy Le Rouge 102 Beige Plume

Instead of going too matchy-matchy with pink cheeks, lids, AND lips, I used a warmer pink blush and kept the lips a warm nude, and the peach-pink undertone still ties in nicely with the eye colors.
Pastel makeup look

Givenchy Products Used:
  1. Teint Couture foundation
  2. Le Prisme Visage Mat powder in 83 Peach Plumetis
  3. Magic Kohl 7
  4. Le Prisme Yeux Quatuor 73 Pastel Model
  5. Le Rouge 102 Beige Plume
  6. Noir Couture Mascara in black


Other Products Used:
  1. Concealer where needed. I used Benefit Fake Up.
  2. I cleaned up my waterline with a matte beige pencil from Nars called Rue Bonaparte. This helps to brighten up the eyes and balance out the lower lids with the pale colors on the upper ones.
  3. The key things I used for this eye look included a medium green pencil 060 from Catrice.
  4. For more definition or to transform the look from Day to Night, you can add a darker matte grey shade to the socket line using a small pointed pencil brush. I used Coastal Scents Burnished Brunette. It looks a bit like MAC Print.
  5. Physicians Formula Sexy Booster Blush for a light warm-pink cheek glow.

Wednesday, December 11, 2013

Holiday Look #4: The “Dense brown smoky” (Make Up Store Volga Shadow)


Trust me when I say this is one of the most intense - AND the quickest - smoky eye looks ever. In fact it’s slightly slapdash, and you can swop out the brown shadow for pretty much any color you want as long as it’s not pale.

The trick is not to cover the entire black base with shadow, but to leave just a bit at the lash line so there’s a natural gradation from black to brown as you smoke the shadow outwards.
The star here is the rich brown duochrome shadow, Volga. This MAC Club lookalike is less red-toned, so if Club makes you look like someone’s socked you in the eye while you were partying, this is a fantastic alternative.

You need only:

  1. 1 brush - a rounded synthetic eye buffing/contouring brush like the Loveybelle small eye contour brush, which I used here
  2. 1 matte black khol or cream liner - anything very soft and intense and creamy
  3. 1 deep brown shadow - I used a satiny duochrome from Make Up Store called Volga - which is like a less red version of MAC Club shadow - for a bit of dimension (the black base will deepen and make it more matte, so choose something slightly brighter or more metallic than you intend)
  4. 1 pale ivory/beige shadow [optional; I used an ivory shade in my Tarte Call of The Wild palette]
  5. Mascara
  6. A soft pink-toned blush - I used Benefit Rockateur, which is my go-to daily blush when I’m lazy to think!
  7. A soft pink shimmery lipgloss - Make Up Store’s Orchid is a frikkin’ gorgeous beige-pink that isn’t too sheer or too frosty.


P.S. On nails, I am wearing Erik from Make Up Store, a blackened-green creme that looks like Japanese kombu (dried seaweed).


Friday, November 1, 2013

Mocha tones: Coffee lids and cocoa lips (plus a softer alternative)


Products used:

  • Laura Mercier Eye Color Duet in Chocolate/Cashmere
  • NYX Studio Liquid Liner in Extreme Coffee
  • Tightline Cake Eye Liner in Violet Asphalt
  • Maybelline Great Lash mascara in Blackest Black
  • Sephora Precious Gold Luminizer
  • Laura Mercier Matte Radiance Baked Powder in Bronze-03
  • OCC Lip Tar in Sybil

For the day look, just skip the gold sparkles and the dark lips! I used
No7 Precision Lip Liner in Nude
Lipstick Queen gloss in Red Sinner


Tuesday, October 29, 2013

[Requested] Basic Nude Lip Smoky Eye Makeup Look: Diorshow Aventure and MAC Blankety


Classic nude lips and smoky eyes in a few easy steps!

One of the easiest and most flattering looks to pull off a nude lip. Here is an easy step-by-step, and some tips to making it more wearable, and quick options for a day-appropriate version!

Try:
Rich browns, charcoal and grey, or even deep jewel tone on the lids
A pink or peach blush that isn't too neutral or deep in color; a soft wash of radiant color balances out the overall look. (Don't keep trying to match your blush to your lip color when you're wearing nude.)
To avoid the "concealer lip", which can be quite unflattering for many people, try a nude lip pencil that matches your lip color closely as a base
For this look, I'm using a charcoal grey cream shadow.


Tuesday, October 22, 2013

Bobbi Brown Old Hollywood Soft Gold Smoke Tutorial

Simple evening look with Bobbi Brown's Old Hollywood collection, Old Hollywood Lipstick, and Siren Red lipgloss.
Took a shot at the Bobbi Brown Old Hollywood collection, and instead of doing a typical 40s-50s look, I kept with the flicked eyeliner, flushed cheeks and red lips, but updated it with a shimmery smoky lid in a “cat-eye” shape instead of a “kitten eye”, dewy skin, and dripping-wet lacquered lips.

Bobbi Brown Old Hollywood Eyeshadow palette: chockfull of subtle neutral shades. It's not extremely pigmented, just so you know!

image
One thing I’ve fallen for is the Long-wear Cream Shadow Stick. They’re all incredibly smooth and pigmented, plus you get plenty of time to blend and smudge them out before they set. Here I used Tuxedo Black. If you’re not able to get hold of it, use a creamy black pencil.

image
This bit of black along the lower lash line makes the “cat eye” look. The main difference between “kitten” and “cat” eye is whether you bring liner down along the lower lash line. Traditional kitten liner runs only along the upper lashes. Liner along the lower lash line creates an exaggerated almond shape which is more sultry and catty.

image

See the rest of the tutorial here or click the image below to see the swatches of the Old Hollywood collection!

Key pieces and shades in the Bobbi Brown Old Hollywood Holiday 2013 collection.