Thursday, June 28, 2012

Avant Garde Baby Blue: Smoky-Blue Eyes with Pop of Pastel Liner

I think I seldom do anything that's really against the grain in terms of makeup looks, so I just felt like exploring for once. 

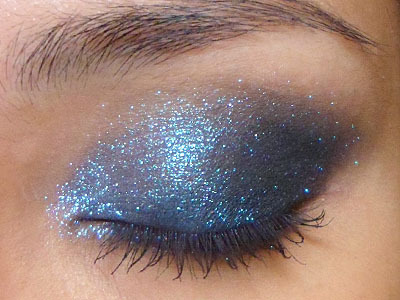
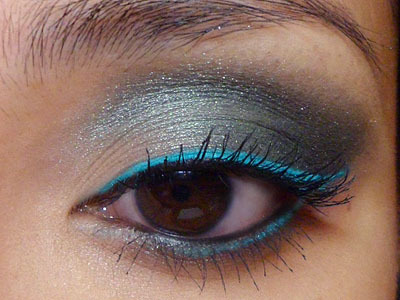
I paired a pale sky blue with a dark smoky eye, for those of you who want a little kick to your usual evening routine.

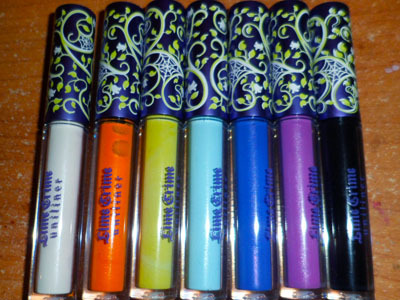
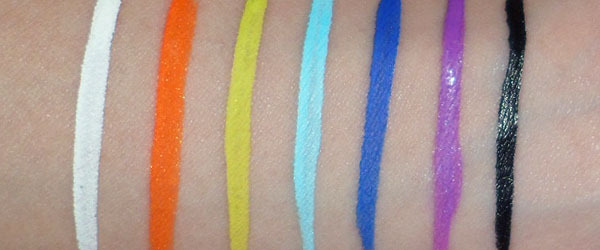
Do note that the liner I used (Lime Crime Uniliner in Blue Milk) is quite an expensive option, and I'm not aware of any dupe at this point, so if you want a similar effect on a budget, I recommend a matte baby-blue pencil or using a liner sealant to apply a matte baby-blue pigment or shadow as a liner.


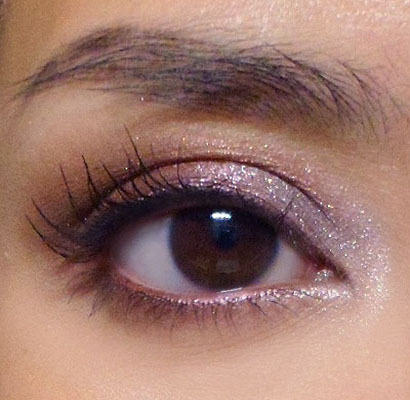
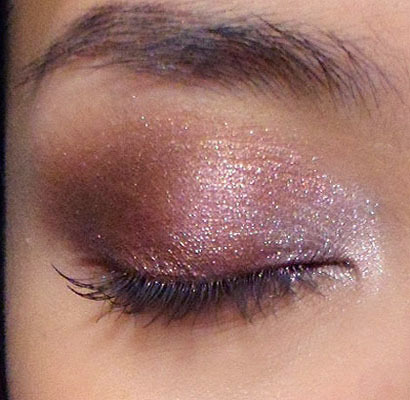
Step 1: Apply a deep, rich metallic blue over your lids, leaving just the center clean. It's best to use a good primer beneath so the pigments will show up really strong and dimensional. Make sure to go under the eyes, alone the lower lash line as well.
I used a limited edition MAC Shadow called Motorhead but there are PLENTY of beautiful deep blues around from brands like NYX, etc.


Step 2: In the center, pack on a soft pastel blue and gently blend the edges outward into the deeper blue so there are no harsh lines. This should give a really beautiful contoured gleam.


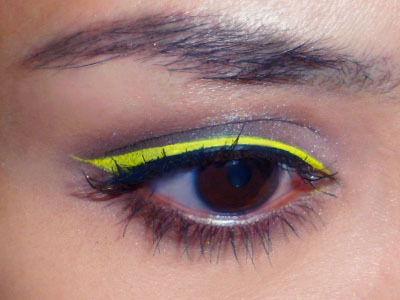
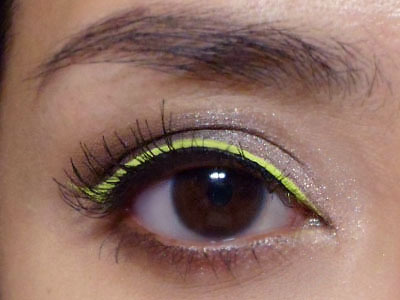
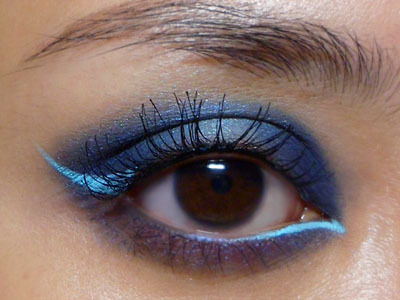
Step 3: You can finish off with black mascara and leave it be, or you can do what I did (for a kick) and apply a bright, matte baby blue liquid liner along the inner corners of lower lash line, and as a flick at the outer corners. For the lower lashes, to prevent smudging and smearing or general eye irritation, take care to apply to your tightline (where the lashes go into the flesh) rather than directly in the center of the inner rims.

For the flick at the outer corners, as always, follow the angle of your lower lash line. This is the best angle as the flick will work with your natural contours and never look like it is "off". When your eye is open, the lower and upper lines should look beautiful together.

Tuesday, June 26, 2012

3 Reasons To Get The Too Faced Eye Shadow Insurance Policy Collection from beflurt.com


Who says splurges need to cost an arm and a leg?

This is by no means a new product or collection. It's a staple in Too Faced's range, and for good reason. If you get it from beflurt.com, I can't describe it as anything other than a REALLY good deal, and if you need me to spell it out for you, here's why.


1. You get 6 high-quality, high-impact shadow shades spanning a pretty good color spectrum. 

If you're just building up your color collection and want a little of everything, this palette gives you 2 of each family; from neutrals like Glamazon (sparkly ash-beige) and Full Frontal (rich chocolate), to warm tones like Boy Toy (candy-pink) and Socialite (coppery-russet), and cool/deep tones like Lucky Charms (deep emerald green) and Skinny Dip (satiny navy).

I've been a long-time fan of Too Faced shadows because they are finely-grained and very pigmented so you don't need to really load it onto your brush to get good color pay-off. This means you use less. At the same time, they aren't so soft and crumbly that you need to worry about tons of fallout on your cheeks.

The only thing is that these do not come in any matte shades so if you don't like metallic/pearl finishes, this will not be for you.

  • Shade-wise, I love Glamazon and Socialite.
  • Lucky Charms is a dupe of the much-coveted and long-discontinued MAC Pigment "Green".
  • Skinny Dip is the least pigmented of the bunch but pretty nonetheless.


2. It comes with a full-size Eye Shadow Insurance, which retails for US$18.

This is one of the most popular eye primers in the world, so if you're in the market to invest in a good quality product that doesn't change the texture or color of your shadows, and can help them to go on stronger and stay on longer, you'll be happy to know it's included in this set.


3. It's incredible value for money. 

A MAC shadow costs $15 for 1.5g of product. Too Faced Single shadows cost $16 each.
In this palette, it might not look like it, but you're actually getting 6 full-sized pans of shadow (1.8g of each shade; more than a MAC pan) PLUS a full-size primer for $38, which works out to about $5.40 per product. 

Throw in the beflurt discount on top of that, and you just got 6 full-sized high-end shadows and primer for under $3.90 each.

That's for products that cost $16-18 individually.


P.S. You get an additional 10% off when you enter MAKEUPBOX in the coupon code box during checkout. Whether you're looking for a birthday gift or just a splurge for yourself, you don't need to look further.

Need I say more?

Note: Too Faced products are "tested on celebrities, not animals".

Saturday, June 23, 2012

5 Minute Eye: Sparkly Colored Smoky Eye


I recently got some requests for smoky eyes that weren't the traditional grey, brown, or black. 
Instead of just doing the typical colored smoky look by replacing the black/grey/brown with a green, blue, violet, etc, I wanted to shake it up a bit and give you a fun option that has maximum impact and takes about 5 minutes to do, and can be re-created with just black shadow and any sparkly shadow or pigment.
If you've ever looked at sparkly, dramatic shadows like MAC Sketch, NARS Night shadows, etc but wished the sparkles were visible in real life, this is a way to get that effect.

You will need to look for 3 products:
  • A dark/black base
  • A matte black shadow
  • A translucent, high-sparkle pigment or shadow (something like MAC Reflects pigments or Lustre shadows give the right amount of drama without requiring glitter glue or sealants)


Step 1: Apply a black base and blend/fade up past your socket line. Extend outwards slightly past the outer corners into a short wing as well. This is important because matte, black shadows can go on a bit uneven and patchy otherwise.


Step 2: Apply the matte black shadow alongh the lash line, thickening and angling upwards as you reach the outer corners, until you end right at the socket line.
Then run the remainder along the lower lash line from outside fading in.


Step 3: The fast, fun way to jazz everything up. This is especially fun because it can make you look as if you spent an hour on your eyes instead of 5 minutes. Gently pat a translucent sparkle/shimmer from the inner corners out, so the color is more concentrated on the inner corners. (Try something like MAC Reflects Transparent Teal.)
Run the remainder along the lower lash line from inside out.


Step 4: Finish with black mascara.
Because of the sparkly colored shadow "floating" over the very dark base, you transform the shadow into an extremely unique shade and texture that you can't replicate using a single product. The best thing is you can swop out the sparkle to pink, purple, gold, blue, whatever you like!

Sunday, June 17, 2012

Pop Rose: Pink Makeup with Metallic Stacked Liner

We don't often wear pinks on the eyes, lips, nails AND cheeks all at the same time, but I thought the Summer Season might be a good time to give it a go.


The trick is NOT to try and match all the pinks. I used a mauve (pink-purple) shadow, with a magenta toned liner, and a bright pink lipstick. For the nails, I used a hot Barbie pink.
On the lids, I also reined it in and used warm/neutral shades for highlights and contour, instead of more gradations of pink.


Step 1: Apply a soft mauve shadow on the lids. This can be matte or slightly satin-y, but should not be full-on metallic if you can help it. I used a limited edition shade from Urban Decay, but if you don't own the 15 Anniversary palette, you can use one of the lighter shades from the Wet n Wild Petal Pusher palette.


Step 2: Use a pale gold on the inner corners of the eyes (I also used Urban Decay's limited edition color but it's an exact dupe of MAC Vanilla pigment and Coastal Scent's Elven Gold Hot Pot which is super-cheap.)


Step 3: I don't own any metallic pink liners, so I used a pigment mixed with a drop or two of liner sealant. You can use eye drops with MAC Fuchsia Pigment or any electric pink pencil to get a similar effect.
Make sure the flick is parallel to the outer corners of your lower lash line (see dotted line).


Step 4: Probably the most tricky part. Trace over your lash line with a black liquid liner. This is what will pull the whole look together without letting the pink overpower everything. If you don't have a steady hand, use a felt tip liner for more control.


Step 5: Finish off with black mascara.


Step 6: For the cheeks, I just used a very matte pink blush, and then applied Pink Nouveau (my absolute favorite summer pink) lipstick from MAC. Barry M and Wet n Wild have some really good bright pinks as well if you're on a budget.

Thursday, June 14, 2012

Soft Pink and Purple Evening Look


So many women love purples and pinks in the day, but we often forget it's possible to get it quite dramatic for an evening out as well. The general rule of thumb is, the greater the difference between the darker and lighter shade you choose, the more dramatic it can look.


(I paired a dark bruised purple with a pale, almost-silver pink here.)

The shape of the eye is also more dramatic than usual, with a more angular and elongated wing than I would normally wear. The good news is, it's actually very simple to do and doesn't require many products.

All that's left is to keep the lips and cheeks soft and complementary.

Brush suggestion:


Step 1: Apply a deep purple to the outer 2/3 of the lower lash line, then apply it to the outer half of the upper lids. Following your socket line, extend the outer corners into a wing.


Step 2: With a soft silvery-pink, fill in the inner half of the lids, blending the pale shade into the purple you applied earlier. 


Step 3: The finishing touch is applying a plum metallic pencil (plum works better than pure purple because it's a little more red/pink toned, which works with the purple and pink you applied) to the upper and lower lash lines. 
If you need, re-assess the shape and decide if you might need to extend your wing a bit more at the outer corners. 
When you're satisfied with the shape, curl your lashes and apply lots of mascara to finish! (This look works with false lashes of course.)


Step 4:  For the cheeks and lips, I kept it simple with a Lip and Cheek cream (MAC Casual Color in Weekend Getaway) in a soft pink. I apply it to the center of the lips with a finger first, and then distribute the remainder onto my cheeks. You need very little on the cheeks, so if you start by applying the product there, you're likely to end up with too much.


I Nuovi and MAC are cruelty-free brands. Visit PETA.org for more information regarding animal testing and brands.

Saturday, June 9, 2012

Lime Crime Uniliner Swatches and Tips!

Lime Crime Uniliners

Swatches (L-to-R): Lunar White (liquid-paper white), 6th Element (true orange), Citreuse (lime), Blue Milk (baby-blue), Lazuli (cobalt), Orchidaceous (bright violet) and Quill (straight black)


The team at Lime Crime very kindly sent me a set of their brand-new, uber-bright Uniliners, so I'm swatching them here and throwing in a few tips on application if you happen to like matte, intense liquid liners as much as I do.
(To see a previous tutorial using a matte liquid/cake liner, click here!)


It's easy to find liquid liners in neutral shades (black, brown, grey, navy), and metallic finishes, but much less common to get hold of them in matte, BRIGHT shades, hence my previous post raving about the colors in this range.

Lime Crime Uniliner in Citreuse

The Good News:
These do go on the way they look in images and swatches. I'm actually surprised by just how nice the paler shades are; particularly Blue Milk and Citreuse. They look like they might have a bit of shimmer in the tubes, but go on matte.
These come with long-ish, fine brush tips, so you can get maximum intensity (as compared to felt tips which tend to deposit less product.
The colors are actually quite wearable in real life despite how bright they look in images. They also don't smear off when rubbed, and don't crack after drying, unless you really coat on layer after layer.

The Bad News?
They're a good bit smaller than they look in pictures (1.3ml or 0.04 oz as compared to the typical 2ml or so in the average liquid liner). This isn't too much of a problem in the sense that most liquid liners dry out before they're finished, but at $13.99, bear in mind that these are definitely higher-end.
The fact that they come with a fine brush also means they might not be the best option for liquid-liner novices or those with shaky hands. 


Tips for Use
  1. Instead of trying to apply your liner in one single stroke, you'll get more control and a more intense line if you apply it in sections. Center, outer, and then inner corners when you have the least amount of liquid left on your brush.
  2. Take care not to apply too many coats of liner or your liner will crease and crack after drying.
  3. If you're going to do what I do and stack liners (black and lime shown here), apply the paler color first in a thick swatch along or close to your lash line. THEN apply the darker or black shade thinly along the base. Doing it the other way round (black first then colored) would be a whole lot messier and harder to control.
  4. Arm yourself with Q-tips and a disposable mascara brush. All that liquid liner that you get on places like your skin and your lashes is going to show up instantly. After applying, clean up any smudges with the the Q-tip or by briskly running the mascara wand through your lashes.
  5. You can wear it neat without shadow, but always add a little dark color around the lashes or wear tons of mascara. Your lash line can disappear otherwise.
  6. Wearing a full strip along the entire upper lash line creates the optical illusion of a smaller but more defined double-lid
  7. If you have a very steady hand, wear it along your lower lash line!
  8. These, like most liquid liners, are made to last. They won't come off properly with just soap and water. Use a makeup remover.
  9. Apply it thick over the entire lid and gently smooth out with your finger tip for a dramatic eye shadow look!

--
Lime Crime products are vegan and cruelty-free.


Friday, June 1, 2012

Multi-faceted Silver-Wine Eye Tutorial (feat. Body Shop Shimmer Bricks 07)


This is a softer smoky eye that is quite subtle but multi-faceted so there are nuances of shimmery color, but nothing too loud, too contrasting, or too overpowering for your face.


As always, you don't need to use the same product if you can't get hold of The Body Shop where you are. I swatched all 4 shadows so you can look for similar tones as substitutes. 
You need 4 shimmery shades:
  • Bronze brown
  • Petal pink
  • Dark eggplant
  • Pale silver/platinum


Step 1: I used a brown pencil all around my upper lid and smudged it out with a finger to fill in the lids. This will be your base.


Step 2: Apply the rich bronze-brown along the center of the lids, leaving only the inner corners bare.


Step 3: Apply the petal pink shade from the inner corner outwards, overlapping some of the brown, until you reach the center of the eye. 


Step 4: Finish the upper lash line with some dark aubergine to the outer part of the crease/socket line. Then run along the outer halves of the lower lash line with a flat angled brush as well.


Step 5: After you're done with the shadows, apply a plum metallic pencil to the top and bottom lash lines. (I used Rimmel Exaggerate Waterproof Eye Definer in 220 Perfect Plum.) Then apply mascara to finish!