Monday, February 28, 2011

My Eyeshadow Palette


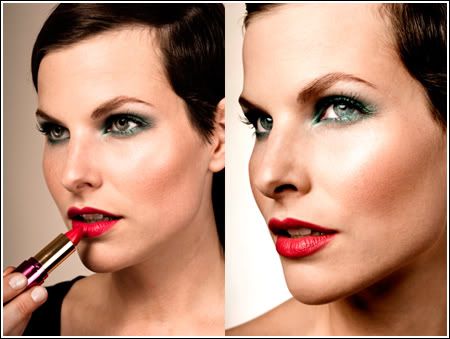
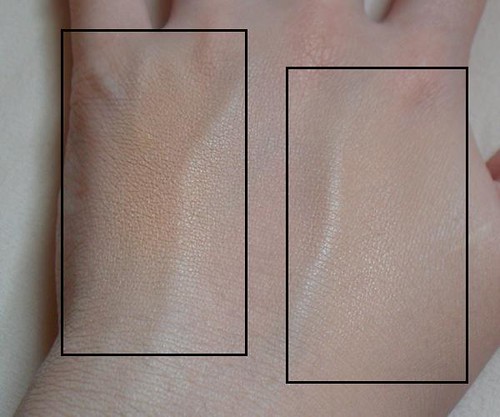
My I Nuovi Eyeshadow Palette is not your usual plastic palette. It's a lovely black "leather" magnetic palette with24 slots for 26mm eyeshadow pans.

And nope, it’s not filled with MAC. I don’t have access to MAC PRO stores where I live, and I really can’t bother getting crazy with wire cutters and heating contraptions in order to transfer the ones I own.

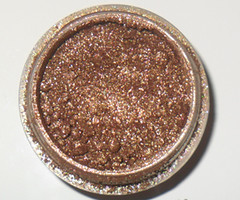
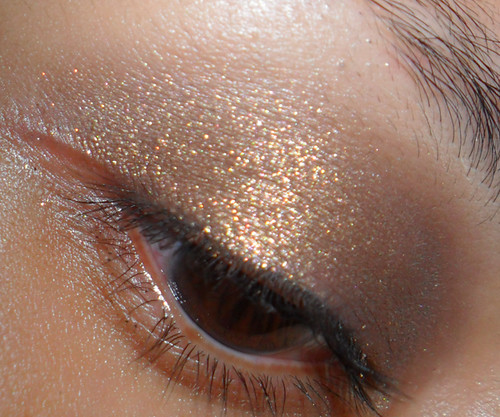
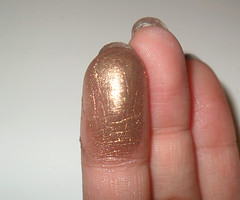
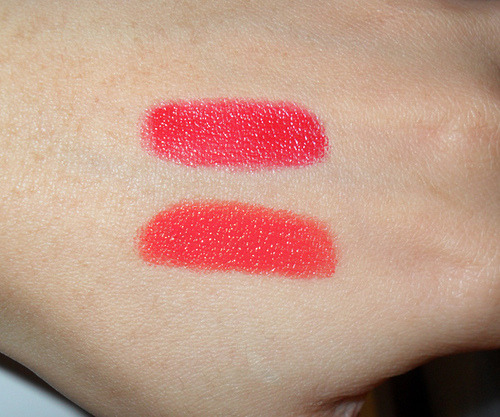
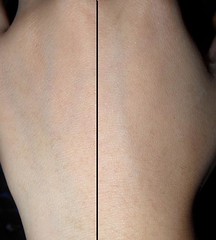
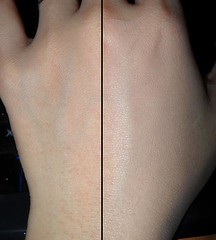
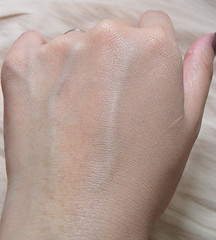
This baby is filled with eyeshadows I actually can depot without lethal weapons. The Body Shop and I Nuovi shadows are some of the best ones around, in my opinion. TBS is especially rich and creamy-feeling, so i you like soft shadows similar to Urban Decay's ion texture, go for them.

I Nuovi is similar to MAC in terms of cost, color range (a mix of vibrant metallics, pearls, glitters and matts), and quality, but not readily available outside of some Asian countries. The price on the web is also high compared to their retail stores, so I can't say I'd recommend rushing online to get them if you can access MAC shadows where you are.


This case though... the gorgeous case...
The only reason I don't have more than 1 is because I don't have enough de-potted eyeshadows to fill them.

What's in YOUR eyeshadow palette?

Home-brew: "Goddess" pigment


Who says brown is boring?


Meet my favorite custom-blend pigment, which I’ve named “Goddess”. It’s earthy, but it’s a strong, gold-flecked high-sheen metallic brown which is never boring to wear.


In fact, it’s not always appropriate for the day, especially if you work in a more formal corporate environment where too much sparkle is frowned upon.
Ah, well… I’ll look forward to the weekends.

I mixed this up on a whim and then realized I didn’t note down what pigments I used and in what proportion, so now I’d be very hard-pressed to replicate this ever again.
Woe, me.

Sunday, February 27, 2011

Love the Look of: Matte Fuschia lips


Creamy semi-matte skin, clean eyes, and subtly-flushed cheeks leave matte fuschia-rose lips the focus at the Mercedes-Benz Fashion Week Fall 2011. I always wished I had the guts to wear strong lip colors on a day-to-day basis, but my lips are a bit too small to pull it off.

Well, I managed to find a highly-respectable dupe of whatever shade they used.


Meet “Shocking Pink” (#220), from the Rimmel Colour Show Off collection. Although I’m not sure how many countries it is available in currently. They’ve been available at my local drugstores for quite awhile, and I was never drawn to them because I swatched them in the store and immediately concluded that they were:
  1. too matte
  2. too bright
It was only when I was browsing around 5 minutes before popping into the local YMCA for my evening class, when I saw what looked like it might just be the perfect fuschia.


I couldn’t find a really good representation of the shade online. All the pictures, including the one above, look too blue or too red.

There isn’t really anything that “shocking” about it in real life, despite the name. It’s a rich, rich demi-matte rose-fuschia with an underlying current of warmth and electric heat that never quite shows up until you’re caught in the camera flash.

The texture is demi-matte, but not uncomfortably so, even for Ms. Flaky Lips here. And as the name suggests, the pigmentation is EXTREMELY high. One swipe is enough to give you a rich swatch of color.
Be warned though. It does tend to stain everything it touches until you can get hold of an industrial strength makeup remover. Plus points for tenacity, minus for stubborn-ness.


Current: Nail Color (O.P.I. Over the Taupe)


This is the less-mentioned cousin of You Don’t Know Jacques. I love it. When I’m too lazy to think about what nail color is going to match every outfit for the week, I reach for this. It always looks just neat enough, subtle enough, smart enough and cool enough.
I love how it chips and cracks less than other nail polishes. I can’t say for sure if it’s the formula or just this particular one, but it always lasts a long time for me.

Above, how it looks after 3 days of wear.
Some scratches on the surface and the root has grown out a bit, but you can just apply top coat or another layer of polish, and extend it for another 3-4 days without any problem.
What’s YOUR current nail color?

Out of The Box: How to use Make Up For Ever HD Powder (Silica Powder)


There have been so many horror stories about getting a white cast from using this infamous, much-hated, and much-loved powder.
Well, I have to say that if you do, then you’re probably applying too much and not buffing out enough. That said, I think we do deserve to have products (especially ones that cost this much) work easily for us.
MUFE HD powder is 100% silica, which is a spherical mineral that gives a silky slip to your skin, absorbs oil, and helps to diffuse light, much like a silicone primer. Brands like MAC, E.L.F., Laura Mercier also carry similar products. However, while I do love how this feels, I can say that I will never buy this product from MUFE again. This is simply because 100% silica costs a mere fraction of the price they are charging; this is a common, cheap mineral ingredient in a lot of makeup products, and we’re being grossly overcharged.
That said, I probably have to thank MUFE for introducing me to silica powder, as I love it and will probably never stop using it for its ability to set products without changing their color, mattify skin and diminish lines.

HOW TO USE IT?
As a dry primer before powder products.
If you use wet/moist products as part of your routine (creams, sunblock, serums, foundations, concealers, cream blushes, moist highlighters), you probably apply them before you apply any powder ones (mineral powder, powder blush, powder highlighters).
 Now, as some of us know, applying powder right over wet or creamy products can cause them to really cake up and grab in areas, darkening what we want to lighten up in the first places.
BUT, if you set your creams/bases with silica BEFORE applying your blusher and face powder, etc, they will not only go on really evenly, but it gets rid of any white silica cast you may have.
Of course, if you’re heavy-handed with your powders in general, anything will give you an unnatural cast, so don’t blame the silica.
Below, I have a little experiment to demonstrate.
I’m applying concealer all over the back of my hand, then applying silica to set the right half.
Then I’m applying a patch of salmon-colored corrector powder (Everyday Minerals Abbott’s Perk Me Up) and buffing in with a soft fluffy eyeshadow blender.

What you’ll see in the series of pictures below is how the powder will grab on the concealer and darken in the patch (left side) that has not been set with silica.

Pic 1: Artificial light, with flash. 
See how the powder is already orange-looking. And see how the peach powder on the right side has not grabbed, and does NOT have the white silica cast that we are all so afraid of.

  Pic. 2: Natural Light, no flash. 
In natural light it’s worse. The cakiness comes out, the powder is obviously darkened, and skin texture is dull and dry-looking, which can be a disaster for the eye area and zits. (And this is right after application, before sweat and oxidation makes it worse.)
The right side, however, looks as perfect as before, regardless of lighting.


REMEMBER:
  1. Silica acts as a non-sticky surface which prevents powder from sucking up the moisture or oils in your skin and darkening in the process. This is especially important for areas where you tend to apply more products, such as zits and under the eyes. It also helps to prevent overly-strong blush as you’re forced to slowly build up.
  2. After you apply your powder foundation, etc, don’t forget to use a clean brush or powder puff to buff off any excess. Because you have a layer of silica, the excess will slip off easier, leaving you with just enough product. If you skip this step, it’s likely that there is too much powder in areas of your face, which will oxidize and cake over the day, and look horrid in photographs, regardless of what you use.

Saturday, February 26, 2011

Spotlight: Revlon Ravish Me Red Lipstick


Revlon Ravish Me Red is part of the Super Lustrous Lipstick line, and I’m not sure how close it is to the original Ravishing Red (above). Still, it’s a brilliant creme tomato-red (below) which should actually look good on many skin-tones.

Top-to-Bottom: Bourjois So Rouge #32 Fashion Rouge, Revlon Ravish Me Red
Swatches on hand are a comparison of Bourjois So Rouge #32 Fashion Rouge, a true red (above) and Revlon Ravish Me Red (below), which is more of a vermillion red with a coral tone.

This would look lovely on golden or uber-pale skins!

Review: Bourjois Healthy Mix Foundation and Concealer


1. Healthy Mix Foundation
VERDICT: BUY IT!
PROMISES: 16-hour, perfect coverage, semi-matte, oil-free, sensitivity tested, glowing and toned skin
This is a highly-rated foundation on MakeupAlley and Youtube, and I’ve been using it almost exclusively for a little over 2 months, in both de-humidified chilly air-conditioned environments, and sweltering, rainy tropical weather.
I’m pleased to say that this IS a great foundation, but there are a few things that you need to note before you take the plunge.
  • What I think it is? This is semi-matte, oil-free, caused zero breakouts and sensitivities for my slightly-reactive skin, and does not clog pores.
  • What I think it’s not? Full coverage, 16-hour, or toning in any discernible way.
  • Best Applied With? Fingers. Really work it in for the most natural look.
This is the best foundation if you have skin that borders on either side of normal on most days, and want a nice matte-but-glowing complexion. (By glowing, I mean like you have more even-toned and clear skin which light bounces off of.) If you are looking for a moist or super-matte finish, want opaque coverage, or have extremely dry or oily skin, stop reading this post. 
Do note the below images are taken with flash, and the foundation will be less visible in natural light.

Above, without.
This is one of those foundations that you can wear without powder for a natural look, as it sets and does not slip and slide for the most part.The coverage feels light and uncomfortable, but it does do a pretty good job of evening out skin tone while looking and feeling natural.

Above, with 1 coat, using flash. (Note: My hand is darker than my face, so excuse the color.)
It has not oxidized on me throughout the day, but I don’t find it to be particularly build-able. If you layer on more and then blend, I found that it just spreads out to about the same coverage as before (see image below).

Above, 2 coats.
It does start to sink more into your lines if you apply too much, so I’ve found that one coat is the best amount. If you need concealing, use concealer. Don’t layer on more foundation. Only some cream formulas work well that way.
Best thing? This looks good in natural light (below), where so many foundations tend to look unnatural. See how the darker “spots” (which are my hair follicles) are no longer visible?


________________________________

2. Healthy Mix Concealer

VERDICT: Ok if you your circles aren’t too bad,
PROMISES: Radiance, anti-fatigue, activates micro-circulation
  • What I think it is? This is powdery, medium coverage undereye concealer that does a fair job, but is only slightly build-able. Like the foundation, the powdery silicone-based formula just spreads and sheers out if you try to apply more.
  • What I think it’s not? A good cover-up for zits and serious dark circles.
  • Best Applied With? Fingers.
That said, it IS a nice feeling concealer if you don’t like sticky, creamy or heavy things under your eyes. This does not crease as much as heavier formulations tend to, and I like how it doesn’t feel like you have much on your face.
Do note that the concealer is ever so slightly lighter in shade than its coordinating foundation, and like the foundation, I experienced no oxidization over time, so don’t buy anything too much lighter than your skin-tone unless yo need to neutralize dark spots.
Recommended for those with normal to oily skin and mild to medium dark circles, as it is a matte finish concealer, medium-opacity, and is not peach enough to correct significant blue or purple undertones in the skin.

Lazy Face: Defined brown eyes

This is a quick and easy look for day, which does not require a lot of time, effort, or products.
What you’ll need:
  • Base, Powder, Primer
  • Soft brown shadow [MAC Patina]
  • Black liner [Any smudgy black liner will do]
  • Mascara [Canmake Gokunobi mascara]
  • Contour shade [MAC Mineralized Skin Finish Natural in Medium Dark] and Coral blush [TheBalm Hot Mama]
  • Nude-coral creme lipstick [Maybelline Watershine Pure #B32]
1. Apply primer to lids to minimize discolorations.

2. Trace black liner along lashlines, keeping color intense at the base of your lashes.

3. Apply soft brown onto your lids. I like to go just above the crease (eyes open), and not winged out.

4.With a smudger brush, apply the soft brown to lower lashline as well.

5. Use a matte black eyeshadow and the smudger brush to push a line of black into the base of your lashes as a liner.

6. Curl lashes and apply mascara.

7. Apply a shimmery coral blusher for a subtle flush. I use a light, light hand, to keep shimmery blushers from looking too scary.

8. Apply lipstick a coral-nude lipstick. [Maybelline Water Shine Pure B32 is actually lighter than the picture shows.]

Under-rated: The Body Shop Eye Color #45

The best silver shadow I’ve ever found is the creamiest, densest molten metal. And it does not break the bank. 

Meet The Body Shop’s Single Eye Color #45. 
These nondescript little pans are limited in color range, but extremely pigmented and silky to apply, due to the marula nut oil.I don’t know if this will make them go rancid with time, but they’re economical enough to repurchase. I just hope they never discontinue this range.

Their other shadows are a bit “iffy” to me. The quality isn’t consistent (yes, Shimmer Bricks, you know I’m talking about you…), though the colors are cuter. The Singles, however, are just gorgeous. I just wish they came in more colors.

 Above, The Body Shop #45 (left) vs Bourjois Eyeshadow #25 Argent (right)

Friday, February 18, 2011

Love the Look: Top Shop Campaign 2010 Visuals


Topshop A/W 2010 campaign visuals. I love the the smudgy black kohl liner and wet flash of glitter under the eyes and down to the cheekbones, while the lids are a soft cashmere brown. Very grungy but pretty at the same time.

INs/OUTs: Jan 2011

Things I've been reaching for, and things I've stopped reaching for.
For now.

IN:

  1. Oil-based makeup removers: Like removes like. Nothing else removes makeup and post-workout grime quite as well as massaging with an oil-based cleanser. Just make sure to follow with a normal foaming cleanser to remove all traces of residue. I’m using DHC Cleansing Oil. Cheaper and just as effective as Shu Uemura’s, which I previously used for a couple of years.
  2. Browns: Am rediscovering all the warmer browns in my eyeshadow collection. I like gold browns that aren’t too coppery or brassy. Current faves include L’oreal Chrome Intensity “Magic Amber” Quad (wear an equal blend of all 4 shades) and Make Up Store “Savanna” Microshadow
  3. TheBalm Hot Mama: I don’t know if I’d call this “sexy” but it does give a healthy coral glow to the cheeks.
  4. Revlon Pink Pursuit Super Lustrous Lipglosses: Just discovered these gems. They are not too sticky, don’t leave an odd taste at the back of the throat, come in a nice range of shades (although I wish more shared were carried here). My favorite is “Pink Pursuit” (left), a soft neutral pink that is not too shimmery, not too sheer, not to sticky, not too runny, not too deep and not too pale to go with most things.
  5. Elizabeth Arden 8 Hour Cream: It might be over-priced petroleum jelly for some, but this remains the best intensive under-eye treatment which never causes milia or breakouts for me.


OUT:

  1. Everyday Minerals Compact in Golden Medium: I gave up trying to make the gritty, lumpy texture and dull texture work for me. Stick with the loose, matte version, which is great.
  2. Using a stippling brush for foundation: You end up using more and getting less coverage. And it does still look mildly streaky if you’re not careful. It’s still my favorite tool for applying liquid and cream foundations, but it can’t beat your fingers.
  3. I Nuovi Undercover concealer #3Y: It’s still one of the best concealers around in terms of giving good correction for under-eye circles without settling into lines or caking, but the shade I have is a tad too deep at the moment. I’ve just been reaching for my Bourjois Healthy Mix more lately.
  4. MAC Taupe Brow Pencil: I love the shade still. But the darned tip keeps breaking off when I’m sharpening - I don’t know how much of the pencil I’ve wasted. It’s just as well that the local MACs don’t seem to carry it anymore. I’ll be switching to the automatic Eye Brows in Fling.
  5. Lip-liners: I don’t like how they change the consistency and opacity of glosses, somehow. I prefer just applying a lip primer to mute my lipcolor and keep my lip-line clean, without altering the lipgloss over it.

Thoughts: Sun Protection


Early Years:

I’ve always known myself as one of the “tanned ones”. I sunned myself prodigiously as a kid, swimming and playing and roasting myself to a deep bronze with nary an ounce of sun protection.

When I hit my teen years, I became more intensely aware of how highly-prized unblemished, alabaster skin was in Asia. All the sunblocks I ever applied in those days were a sticky, greasy mess that left a streaky-white cast and clogged reactive teenage pores to boot. Plus, no matter how much you applied, you still got tan.

It was something to be avoided unless absolutely necessary. And needless to say, I never did get any fairer.

I still remember the very moment when I realized there were different grades of sunblock. I was 14, and my best friend at the time was a Taiwanese-Vietnamese girl with the sort of translucent, porcelain skin that I would have sold an organ for. We were hanging out at her place before a 3.2km phys-ed run, and her mother threw us a small cyan-blue bottle of Shiseido SPF30 sunblock to apply.

I remember the lack of greasiness, and how amazing it was that after about an hour sweating and exercising in the searing afternoon sun, I stripped off my exercise shorts to shower and found no tan lines.


Bad Years:

Me and my circle of friends spent our share of time basting ourselves in the sun with tanning oil. I’ve always tanned very easily, so in place of tanning oil, I had to slather SPF50 all over my body just to control how dark I got. Since I couldn’t be fair, I might as well just get very tan.


Transition Years:

It wasn’t until some time later, when I really got into skincare, that I realized just how much long-term photodamage I was doing.

I began to buy daily moisturizers with some measure of sun protection (usually SPF 15-19 since higher SPFs in those days still gave you a white cast). Two of my favorites in those days were Olay White Radiance lotion SPF19, and the first incarnation of Estee Lauder’s Daywear Cream SPF15. These did not leave my skin feeling heavy or greasy, and I could apply makeup over them.


Now:

Due to general availability of information and technology advancements now, my routine has been fine-tuned to a degree.

I now know that:

  • Your sun protection must contain UVA filters as UVB blocks (Titanium Dioxide) are inadequate to prevent dna damage
  • Common UVA filters deteriorate very quickly, so photo-stable UVA filters like Mexoryl and Helioplex are necessary for real protection
  • Sunblocks prevent damage but, not 100%
  • UV rays can penetrate curtains and windows
  • Antioxidants are necessary to repair the damage caused by the rays that make it past your sunblock

My current anti-UV routine:

  1. Avoid long periods of direct sun-exposure
  2. Wear an antioxidant serum or lotion daily to prevent damage from stray rays: I like Estee Lauder Advanced Night Repair on hot days as a light humectant in place of moisturizer
  3. Wear a sunblock of SPF30-50: I have a range, from La Roche Posay Tinted Creme to L’oreal UV Perfect Mat SPF30, and Neutrogena Fine Fairness Lotion SPF50
  4. Apply a second dose of antioxidants to your face at the end of the day: I usually apply a richer antioxidant or repair cream like Egyptian Magic, or NIA24. If I’ve been in the sun, then I will use a stronger repair serum like Prevage, or Advanced Night Repair Intensive before the cream.

My obsessions aired out in the open.