Sunday, January 29, 2012

Rock Romance: Soft winged pink eye and rose-petal lips

I got a request to do a sort of "rock"-inspired look that was a bit more delicate and pretty, using pink on the lips, as well as one regarding how to do winged/flared shadow, so I thought I'd combine these into one tutorial!


The main products you will need:
  1. A very black glossy kajal or pencil. If you're in the EU and can get hold of Essence products, I highly recommend the "I <3 Rock" Gloss Eye pencil. It comes in only one shade that I know of - the most perfect, lustrous jet black.
  2. A deep magenta pink shadow. I just used the 88 Matte palette that you can get from either Coastal Scents, BH Cosmetics or Sedona Lace.
  3. An opal pink iridescent shadow. MAC Pink Opal pigment, or The Body Shop Eye Shimmer #04 are the 2 I know of. They are an ivory/white but go on as a soft pink shimmer.
  4. Soft pink blush. I used Essence Blush Souffle in 01 Prima Ballerina. (I love this. It's like a mousse version of MAC's Well Dressed, at about 1/6 the price.)
  5. Pale peachy-pink lipstick. If you have medium to slightly deeper skin tones, try Barry M Peachy Pink or MAC Creme Cup. If you're very dark-skinned, try a sheerer finish or a gloss instead. You don't want to overpower the eyes with a very loud, pale mouth. If you are pale to fair, read on for what I mixed to get the perfect petal pout!

Essence Gloss Eye Pencil for perfect glossy-black lines.
Click for the step-by-step!

Saturday, January 28, 2012

Tips and Tricks: Wearing dark berry-brown-plum lipsticks

Swatch flower: Revlon Raisin Rage against different eye shadow alternatives

Someone messaged me to ask about how to wear dark berry/plum/purple-toned lipsticks, specifically NYX Very Berry and NYX Eggplant. NYX Eggplant is quite an odd and unique shade (pearlescent deep purple with grey tones), so I'll break this post into 3 parts.
1. Eyeshadows to wear with a dark creme berry/brown (NYX Very Berry)
2. Eyeshadows to wear with a dusky grey purple (NYX Eggplant)
3. General Application options
---
Eyeshadows
Since most people will usually go for a rich prune shade like Very Berry, I did a "swatch flower" using Revlon Raisin Rage, which is very similar to Very Berry which I don't own. (I'm not going to list neutral beige-browns and black because those go with pretty much any lip color, so I'm going to just list alternatives to those.)
Starting from the top, and running clock-wise.
  1. A pale duochrome ivory-gold: This looks beautiful contrasted with a dark lip. It brigtens up your eye area without overpowering or taking attention away from the lip. Options: MAC Vanilla pigment (not shadow), Lime CrimeNymph, The Body Shop Eye Shimmer #02 Gold.
  2. A soft champagne beige: Slightly less low-key. This is the kind of shade that will allow you to rock that dark lip in more conservative environments. (Well, I would anyway.) You can get this color ANYWHERE, so just run down to the nearest drugstore. If you want to check out alternatives, try: I Nuovi Metallogy in Champagne, NYX Champagne, or MAC Jest
  3. Rich copper sparkle: I don't like wearing bright coppers usually because I feel it makes my eyes look swollen, but this is the one product that I DO like. MAC Copper Sparkle pigment is not really an eyeshadow pigment. It comes in tiny flecks like crushed metal foil, so you need to use a base and clean off any fallouts, but once it's on, it's gorgeous.
  4. Soft Silver/Ash: A touch more dramatic than a pale yellow gold, because silver contrasts more with the deep prune-brown. Good if you want a more noticeable look, but don't want to go overboard with the eyes. MAC Cyber from the Metal X Collection is a true silver, while Palladium (swatched here) will look good if silver is too stark on you and you want more warmth.
  5. True Purple: If you really want more drama, I personally prefer purple in combination with a dark brown/plum-toned lip. This in no way means you can't wear other bright colors, but it might feel like a bit too much for some people. Try Urban Decay Ecstasy (shimmery rich purple-plum), MAC Vibrant Grape (deeper low-sheen purple) or for max drama, Lime Crime Empress(strong, incandescent royal-purple)
Read the rest of the post here!

Thursday, January 26, 2012

Grey 2 Ways: Day and Night Looks


Day Look: A wearable and flattering way to wear grey without loading down your eyes is to add a touch of gold in the inner corner, and to add black to the lash line.


Night Look: Grey cannot go wrong paired with black. To keep things interesting, I went for a very defined shape instead of the typical smoked-out look.
Read on for the step-by-step!

Monday, January 23, 2012

Strong Brows: The How-To Guide

Quick and easy step-by-step created for a Follower who wanted to know how to beef up her brows.

Step 1: Brush all your brow hairs up diagonally and look for patches where it 's more sparser. Usually the outer halves will be much more sparse than the inner halves, and you may also have uneven patches in-between.

Step 2: With your brow pencil or the angled brush and dark powder, fill in the gaps and even out the color of your brows where needed. Don't worry too much about making the outer halves exactly as dark as the inner halves. If you over-do it at this point it's going to look like stick-on brows. Not sexy.
This is the point where you step back to assess your brows. For some people, it might be just enough to bring out strong brows (especially if you have a good strong shape but sparse hairs that don't show up well.) If it still needs a little beefing up, move on to Step 3.

Step 3: The secret! Use your angled brush to pick up a little brow powder and dust gently along the roots of the bottom hairs. This very subtly thickens up your brows without looking like a drawn-in hairline. Do just the inner halves and stop to take a look. If it looks fine, leave the outer half alone as this tends to look less natural there.

Step 4: Using a colored brow mascara, stroke your brow hairs diagonally upwards (See Step 1) to  lock the hairs in place. Brushing them upwards stretches the hairline at the top, so now you are really widening the thickness on both the tops and bottoms.

Step 5: The last bit of oomph - When the brow mascara has set, use your angled brush to dust the hairs with more brown powder. This actually hides the mascara and makes your brows look naturally much fuller. I'll paste the first image again below, so you can see the difference! (Note that you're applying powder onto the dried mascara on your hairs. Don't press your brow hairs down onto your skin or you could get them plastered down, which will look really odd and be very hard to correct.)

Just to show the difference, I copied the first image again.
In the last image, I did some light eye makeup. Just a little apricot shimmer on the lids and black mascara on the lashes. If you want your brows to be the focus, don't overdo the eye makeup. Of course, if your point is just to beef them up a little to frame your eyes a little better, then by all means do whatever eye makeup you want.

Sunday, January 22, 2012

5-Minute Work/School Eye Makeup for Dark Brown Eyes

Got the below question recently on my TUMBLR and figured it might be helpful for many people (since a majority of the world's population has brown eyes!)

"hey. i like my eyes, i have really long thick eyelashes, however they are a pretty boring chocolate color. what can i do for eye shadow that will make them stand out without being too dramatic or difficult for school?"


To see the quick step-by-step, click here!

More Barry M Lip Paints!

Barry M Lip Paints (L-to-R: 154 Pale Nude, 153 Pink Ribbon, and 145 Punky Pink)

My obsession with trying out more Barry M Lip Paints continues. (And aren't they gorgeous?!!)
I must say ordering online from Barry M is always a bit of a gamble, as you have no idea if what you see is what you'll get. It took lots of Googling to get a better idea of what each shade looked like. This time round, I picked out 3 shades when I placed an order for my Fuchsia Lip Pencils, and they are:


(Swatches L-to-R): Barry M Lip Paints in 145 Punky Pink, 153 Pink Ribbon, and 154 Pale Nude

154 Pale Nude (creme) - "Concealer-lips" nude with a slight peach base. Quite opaque, with a lot of white in the base so it may not be the easiest shade to wear unless you really like that sort of look.

153 Pink Ribbon (creme) - Bright peach/coral-pink; VERY similar to MAC Chatterbox and NYX Fig. Perfect bright pink for those who are looking for a warmer, more coral alternative to shades like Pink Nouveau.

145 Punky Pink (creme) - Rich, deep cyclamen-pink. Listed on dupe sites as a 100% match for MAC Girl About Town. This goes on a softer shade than it looks in the tube, so don't be scared by the color. It's not TOO magenta or blue-based, so it would be flattering on most people.

Each Barry M Lip Paint is £4.49.
As always, I'll be following up soon with more detailed posts on each of the 3 shades, swatched alongside other similar colors!

Thursday, January 19, 2012

Meet the Purrr-fect Barbie Pink Lip Pencil

My beloved MAC Pink Nouveau stub.
 You guys know I love my hot pinks and bright pinks. But just awhile back, it suddenly hit me that I couldn't find a good strong, bright medium pink liner to match these lipsticks.

Most pink lip liners on the market are either too pale, too nude, too beige, too red, too coral, or too deep.

MAC Pink Nouveau swatched beside liners (R-to-L): NYX Dolly Pink (pale blue-pink), Rimmel 018 Addiction (nude-pink),  Rimmel 005 Pure (coral), NYX Fuchsia (blue-based magenta), MAC Chromagraphic in Process Magenta (true fuchsia)
To illustrate it, I lined up the pink pencils I own and swatched them all beside Pink Nouveau. No go.

After searching high and low through high- and low-end brands, I was amazed that all these companies (MAC, Make Up Store, NYX, etc,) with huge color ranges didn't cater for this particular color tone when it was so popular.

And then I found it.

Barry M has a lip pencil called #12 Fuchsia, which I had dismissed time and time again because the color representation online was totally inaccurate, and because I associate the word "Fuchsia" with a much deeper pink.

Shown here: Barry M #12 Fuchsia Lip Pencil (and China Glaze Sea Spray Nail Polish)
Now let me tell you, this is not a perfect match. But it is the closest to perfect that I have EVER found.
Lip match: MAC Pink Nouveau lipstick swatched with Barry M #12 Fuchsia Lip Pencil

If you own Pink Nouveau, you will know it's a bright pink, but it's not quite neon. The real perfect matches with Barry M #12 Fuchsia Lip Pencil are the more fluorescent pinks such as Lime Crime Countessa Fluorescent and Barry M 62 Vibrant Pink. If you're wearing it with a slightly softer shade like Pink Nouveau or Dolly Pink, make sure to fill in your lips rather than just outlining them, as you don't want it to catch the light when a camera flashes and give you a neon ring around your mouth (tried and tested by yours truly).

Texture wise, it's smooth and pigmented to apply, and when you color in your lip with it, the color is not streaky or clumpy. It's also vegan-friendly, and costs a very fabulous £2.99. I totally stocked up on it.

Sunday, January 15, 2012

5 Days 5 Ways: MAC Blue Brown Pigment


I mentioned before that Blue Brown seems to be a shade that people either love or hate. The main problem associated with this pigment or type of color is that when it's sheered out, the brown fades into a soft wine-red, which can make some people look like they just did 10 rounds in the boxing ring. 

Since the reddish undertone is the main problem for many people, here are 5 ways to get around it. 

Day 1: Full-on wash. 
To get the true rich blue-brown shade you see in the jar, you need to be able to pack the pigment on intensely. Unfortunately, powders will tend to spread out and fade with blending and general movement even if you foil it, so to get it to stay looking great, make sure you apply a brown base. 
MAC Blue Brown applied over MAC Take Root Cream Color Base, with black kohl along the water line and black mascara.
---
Day 2: Sheered out mauve wash
Sometimes it's nice to bring out the red tones of the pigment instead of trying to fight it. Try loading your brush with a light silvery shade first, and then dipping it into Blue Brown before applying it to your skin. It will transform into a soft silvery mauve brown with pale teal highlights. 
An even more interesting color to mix in would be a white pigment with a blue sheen.
MAC Blue Brown mixed with MAC Frozen White pigment. Apply a navy liner , and dab a little more Frozen White in the inner corners so it's brightened up.
 ---
Day 3: As a liquid liner.
This is so simple I'm not sure why more people don't do it. Blue Brown is amazing as a liquid liner whether on its own or when paired with either aqua, teal or brown shadows. It blends in with those shades, but flashes a different color with the light.
You can use eye drops or a liner mixing medium for longer wear.
MAC Blue Brown worn as liner along the upper lash line, with MAC Concrete as a matte, dark cocoa wash.

---
Day 4: Oomphed-up and Contoured with Gunmetal Liner.
This is a more sultry look and plays with lighter and deeper tones circling Blue Brown. I used a silver and a dark matte brown. 
MAC Blue Brown as main lid color with Vex at the inner corners and Concrete at  along the crease. Gunmetal pencil (Bourjois 51 Noir Effet Miroir) applied along the lash lines for definition.
---
Day 5: Colorful Fantasy Glimmer.
 I armed myself with 2 other items that had the same answering teal/aqua gleam with Blue Brown. A soft aqua-teal shadow and a white duo-chrome glitter with aqua sheen. Apply Blue Brown as you would usually, over a good base, then run an aqua shadow along the lower lash line and finish by dampening a little aqua glitter and dabbing it onto the center of your upper lids.
MAC Blue Brown pigment paired with aqua shadow along the lower lash line and MAC Reflects Transparent Teal dabbed onto center of the lid.

---
Conclusion:
These are just 5 ways to wear it. There are definitely more.
If you like how Blue Brown looks in the jar, then it's simply a question of using the right methods to get it to look its best on your lids, and playing around with different color combinations to give yourself some variety.


IMPORTANT NOTE ON ALTERNATIVES/DUPES:
  • Bare Escentuals Bon Bon
  • L'oreal HIP Intrepid
  • Lime Crime Dragon Scales
  • MAC Club
  • Urban Decay Lounge
  • Wet n Wild Coloricon Palette in Comfort Zone (bottom-right shade)

Why do they all look so similar?
Because the "raw-ingredient" mica that gives the duo-chrome finish came like that; it's not an effect that cosmetic houses achieved by blended a dark brown and an aqua interference shade together.


It's important to know because the bad news is that you're going to find it really hard to accurately recreate or dupe this shade by blending brown and aqua shadows on your own.

The good news is that it's readily available to most cosmetic houses from their pigment suppliers, so the color is not at all rare. 

Saturday, January 14, 2012

MAC Pro Longwear Lip Pencil Swatches and Review: Kiss Me Quick and What A Blast!

Pro Longwear Lip Pencil swatches with matching lip colors
I've started to use lip liners more regularly just to keep the borders of my lip colors crisp and defined, and realized I didn't own a single good true-red and strong orange. On a recent getaway, I popped by the MAC counter near my hotel and happened to see a beautiful orange and it turned out to be the Pro Longwear pencil in What A Blast! (Yes, exclamation mark included.) 

The color was perfect, and since I hadn't tried any of the Pro Longwear pencils before, I decided to get my basic red pencil from the Pro Longwear line as well, instead of the regular line as well. The Pro Longwear Lip Pencil equivalent of a strong deep true-red is Kiss Me Quick. 


Nib close-up of Pro Longwear Lip Pencils in Kiss Me Quick (left) and What A Blast! (right)
These are regular pencils that require sharpening (not automatic), and when I swatched them in the store, I really wasn't expecting the texture to be just as soft and pigmented as any of the regular pencils. You'd think long wearing pencils would be harder and dryer, but these aren't. They don't drag on your lips and they do not darken and clump on the lips. The color goes on true, and you can definitely wear these on their own as super-matte velvety lips (see image below for a thicker filled-in swatches).

Daylight swatches of Pro Longwear Lip Pencils in Kiss Me Quick and What A Blast!
The lipsticks I'm personally using with these are swatched along with the pencils in the top image.

Kiss Me Quick, being a basic deep red, is extremely versatile and goes with just about any strong red lipstick. The flash brings out differences in tones, but the shades are extremely good matches in real life.

For the oranges, I had intended to match it to Lime Crime's My Beautiful Rocket (What A Blast! is just slightly deeper than My Beautiful Rocket, which makes it perfect as a definer for that lipstick), but it works with a more reddened coral like Barry M Sunset as well.

The drawback for me is that the Pro Longwear pencils (1.2g) are shorter than the regular MAC Pencils (1.36g), but cost more. Then pro is that you really do need to reapply these less throughout the day.

MAC Pro Longwear pencil lined up cap-to-cap with MAC Chromagraphic Pencil in  Process Magenta.


Why should you buy these?
They stay on incredibly well. For something that is so pigmented and soft, they really last. I'd actually swatched them and then left the store without purchasing anything. (I figured I could always order NYX liners from Beautyjoint for a fraction of the price.) The next afternoon, after showering and lots of hand-washing, I discovered that the liner swatches were still there (though more faded) on the back of my hand, and rubbing hard with a tissue couldn't remove the traces. It finally took an oil based remover and lots of vigorous rubbing to get these off completely.

 I was sold. I went right back to the nearest MAC store and got them.

Friday, January 13, 2012

Dramatic Metallic Lips: Making your own Lip Tars

Note: All images show D.I.Y. lip tars applied neat using a lip brush, without lip primer, liner or lipstick as a base!
Get your own metallic brown lips with a rich copper-brown pigment like MAC Chocolate Brown.

If you've spent some time being obsessed about OCC Lip Tars, you'll probably be interested to know that the formula is extremely simple. It consists mainly of oils and pigments. There's nothing really magical or all that hard to recreate aside from the color formulations, because matte pigments are harder to work with than metallic ones. 

Arm yourself with:
  • A light vegetable oil (avoid extra-virgin as these have a stronger smell and go rancid faster), jojoba oil, or silicone oil
  • a bunch of pigments in shades that you feel would make great lip colors
  • [Optional] skin-safe essential oils like rose, mint, etc. according to your preference
  • Clean plastic ziploc bag in the smallest size available
  • Small eye dropper bottle
  • Spatula/scoop


The steps are quite idiot-proof:
  1. Drop a scoop of pigment into a small ziploc bag and add about half the volume of oil
  2. Zip up and smoosh everything around, getting everything as smooth as possible. If the formula is too fluid, add more pigments. If there are lumps that refuse to dissipate, then slowly add a drop or two more oil. It's better to add too little oil at the start than too much, as you won't be able to go back if you've used all your pigment and the formula is too sheer.
  3. Test a tiny bit on the back of your hand. You should have a lotion like consistency and the formula can be as opaque or sheer as you want. If you're really going for the lip tar look, make sure it's opaque, but smooth to the touch.
  4. When you're done with the formula, cut the corner off the bottom of the ziploc bag and squeeze the mixture out into a small travel dropper bottle like you would pipe cake icing out of a bag.
And you're done!
Like lip tars, the pigments will settle to the bottom after awhile, so you will need to shake a bit before each use just to re-distribute the pigments.

It goes without saying these work better applied with a lip brush than applied with your fingers or from an applicator tube like actual lip glosses. 

Dark metallic purple home-made lip tar.
One thing to note whether you're using an OCC lip tar or a home-brew is that natural oils tend to absorb into the skin or dry up after a few hours, so the product will start to look less shiny and more matte. If you want a really sticky, high-shine finish, you will need to buy specialty ingredients like Versagel 750 ME, as lip balms and petroleum jelly won't quite cut it, although mineral-based or silicone oils tend to be shinier for longer than organic oils.

Metallic pigments tend to stay true to their finish and shade when suspended in a medium, but if you are working with matte pigments, you'll need to take note that they will always become darker once suspended. What looks like a bright neon pink powder will become a deep magenta once "wet".

To get it to look as light and bright as it does when dry, you will often need to slowly add in white pigment to slowly adjust and make the color "creamier", brighter and paler. If you're working with matte pigments, it's a good idea to have a digital micro-scale to weight how much of each pigment you added, or you will find it exactly hard to mix the exact same shade again once you run out of your current batch.

Electric pink creme-finish lip tar made with matte neon-pink and white pigments.


Thursday, January 12, 2012

MAKEUPBOX 1st Birthday Giveaway!!!

Get Interviewed and Win Beauty Goodies in the "10 Things About You" Project.

MAKEUPBOX has been up for almost a year now, and I've had so much fun discovering and rediscovering beauty products and trends, as well as pushing myself to challenge my beauty boundaries (hul-lo, false eyelashes).

What with close to a thousand people following my posts on TUMBLR and Blogspot, I feel it's time to start showcasing some of you.


Instructions 
  • Copy and answer the 10 questions below.
  • Include a picture of yourself, and no one else, in the post - you can embed it from an online link (please don't upload a 1200 px wallpaper of yourself, but we would also like the picture to be large enough for easy viewing)
  • Click the "SUBMISSIONS" link at the top of MAKEUPBOX's TUMBLR homepage when you have all your answers and fire away! (Please do not submit a post in the Message Me" page. Those will be deleted!)
  • If you are following me on Blogger rather than TUMBLR, do state that in your introduction! This will allow me to do a quick verification before entering you in the giveaway.
  • If you want to delete or withdraw a post you've submitted, drop me a message and let me know anytime. Your entry into the contest will be considered forfeit once removed.
  • You can opt to amend your post once, but repeat changes will not be entertained.
  • Above comment notwithstanding, do kindly try your best to use discernible English. If I am not able to understand what you are typing, I'm afraid I will not be able to publish it for others to read.


Winning Criteria
I'm looking for wit, heart, charm, humor... (sounds like a Lonely Hearts advert...) Well, just be your lovely selves.
  • I will post* submissions as they come along (depending on the response, I may post about 1-2 a week from now until end of Feb).
  • If response is overwhelming, I will pick the more outstanding posts for posting. Once posted, you are automatically in the running for the prize.
  • At the end of 29 Feb, GMT+8, I will pick and announce a winner, and message you privately to ask for your postage details.
*Do note I may amend the title slightly for some consistency before posting. I will as far as possible not touch the contents within the interview itself.


A Note on Etiquette:
(Well most of you already know this...) To make things pleasant for everyone, please kindly abide by the following, or else your submission will not be posted.
  • No obvious advertising and link-outs to sales, products, your own giveaways, etc. (You can include a link by way of a general introduction about you and your interest or work.) 
  • To readers: When viewing posts, please download or fill in anything on link-outs at your own discretion. I will do a basic check before publishing submissions, but neither I nor Tumblr can be held responsible for any loss of information or encounters with malware and phishing sites, etc should you choose to click on links.
  • No rude or racially/sexually/generally offensive content will be published.
  • Please don't spam me with repeat posts. As you will not be able to view or amend your post once it's submitted into my dashboard, please do a draft offline before submission so you can do all the necessary edits ahead of time.


The Prize:
It's still growing. I have a few choice "cult" items being thrown in. I'm trying to make sure it's an "international" package so that regardless of where the winner is from, there will be items that you might find hard to access.
The rule of thumb is quality, so I'm not restricting it to high/low-end items:

[Please copy the below questions and fill it in with your responses!]
The 10 Questions:
- Begin by giving us a very brief 1-2 liner describing yourself, what you do, general interest, etc.
- Please insert a picture of your lovely self!
1. How would you describe your makeup style? (i.e. classic 40's pin-up, etc.)
2. Lipstick or Lipgloss? Mascara or false lashes?
3. You are late for a hot date and you have not done your face. You have space for only 3 items in your purse and these are...
4. What is your biggest beauty challenge/hurdle? (e.g. applying blush without looking like a clown... applying liquid liner...etc)
5. What beauty product do you have way too many of?
6. What are your beauty pet peeves? (List 1-3.)
7. Who is/are your favorite beauty icon(s)?
8. What beauty product do you regret buying in the past half year? (List 1-3; hopefully you don't have too many...)
9. What (1-3) items is/are on your current Beauty Wishlist?
10. If you were an animal/creature, you would probably be a...

Tuesday, January 10, 2012

Most Worn Lipsticks of 2011

I can't believe I made this post and totally forgot to post it last month!!


Any makeup collector or fanatic will understand what I mean when I say that lipstick and mascara are probably the 2 things that I finish on a regular basis. Most of the time, I cycle through so many products that I can probably count the number of beauty items I have constantly used up and repurchased on one single hand.

Considering that half the time, I actually throw out mascaras when they are 3 months old or when they dry up and stop performing, and not because they are completely used up, that leaves lipstick as the sole surviving item that I use consistently.

This list is a run-down of some of my favorite and most-worn lipsticks this year. They tend to be a variation of pinks, nudes, and rosies as these are the shades I always wear. Click here for the TUMBLR post about my top 8, and let me know what yours were!


Sunday, January 8, 2012

Drugstore Fuchsias: Swatches and Tips for Application

Selection of  drugstore Fuchsia shades
Fuchsia is not a daily shade for most people, but there are some occasions when you want a strong lip and red is not always the easiest shade to get right. If you can't seem to get reds to work for your skin tone, or have the sort of face where reds just make you look a little aged or severe, a good alternative to try is a fun, deep, fuchsia pink.
Technically speaking, a fuchsia is a very strong and bright blue-based pink, maybe not so bright that it's highlighter-pink or so dark as to be called rose, but as we all know, what one person considers fuchsia can be very different from another's. I've chosen something of the middle ground where the shades are quite deep relative to other pinks, but still have a touch of bright blue tones to them.

Swatches L-to-R: Rimmel 220 Shocking Pink, Sephora R11, NYX Louisiana, L'oreal 288 Intense Fuchsia, and Revlon 330 Fuchsia
I own several of these deep, and the main difference between them are in the base tones (whether they lean more towards a hot red or towards a cooler magenta). Which to wear depends on your skin tone and preference. I am not one of those color nazis who will tell you that if you have "warm skin" you should wear "warm fuchsias". There's no such rule. 
Just note that a warmer red-fuchsia will tend to "fit in" better and look less bright, whereas a blue based one will tend to stick out more, regardless of whether you are warm or cool toned. This is regardless of your skin tone simply because a bright blue-pink is not a shade that occurs in nature and will provide more contrast. 

Of the shades I own, I probably wear Revlon Color Burst 030 Fuchsia most due to its good, creamy texture and the fact that it does not stain my lips. It's not the most opaque (L'oreal, Sephora, Rimmel and NYX matte are more pigmented) and it's an interesting blend between something with a rather warm red base tone, paired with a faint blue sheen which does not look like noticeable shimmer (thank goodness) but pulls the shade toward the cool side in some lights.

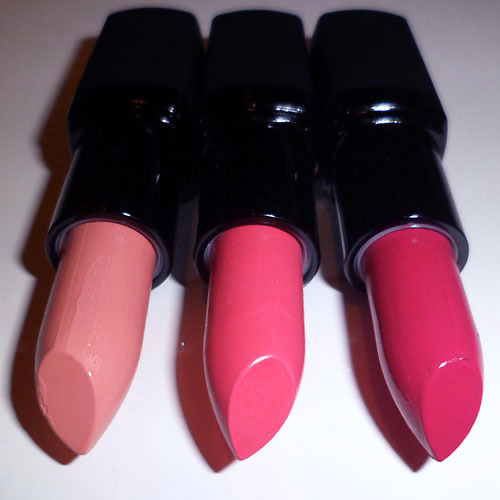
Revlon Colorburst in 030 Fuchsia
My latest acquisition is L'oreal's Intense Fuchsia, after I saw it on Gwen Stefani in the latest issue of InStyle magazine. But don't you hate how Photoshop and photography lies? It was nothing like the intensely blue-toned pink shown on the cover image. L'oreal Intense Fuchsia is more of a red-based strawberry fuchsia with a faint hot pink sheen (not too noticeable on the lips).
It's not that it isn't a nice shade, but you aren't going to get that glorious electric pink with a noticeable blue sheen that Gwen was sporting.
Texture-wise, there is nothing to complain about. I always found Colour Riche lipsticks to be very pigmented and lusciously creamy without being cheap and slippery. But beware that this lipstick stains big-time. This means that over the course of the day, your lipstick will start to look darker and more red, as the dyes color your lips more and more, and it starts to show up beneath the fuchsia. You'll end up with a bright strawberry rose, which is lovely, if that's the shade you're going for.

Rimmel Shocking Pink is similar to this deep red-pink shade, but is fully matte, and does not contain shimmer, so it will look a tad deeper when applied as there is no sheen or shine whatsoever.

L'oreal Colour Riche in 288 Intense Fuchsia
 NYX Louisiana is not technically a fuchsia by my book, but a lot of people describe it as a hot pink on review sites, so I thought I'd include it for comparison purposes, just to show you why I don't consider it so.
Compared to the other shades in the swatch image above, Louisiana is a lamb among wolves. It's softer, warmer, and has more noticeable deep-peach undertones although it's by no means a pale shade. If you're new to hot pinks or are afraid of going too over the top for work or school, this is a safe shade that will still stand out without being too electric.
The blend of pink, red and peach is also quite a flattering shade for most skin tones. Beware though, that the texture is the typical NYX texture which is not going to feel very rich and luscious. It's waxy and slippery, with a plastic taste, but at least for this particular shade, it doesn't look as cheap as it feels.
NYX Louisiana Round lipstick
 This brings me to one of my cooler fuchsias. Sephora's line of lipsticks are hits and misses for me. (Actually, more hits than misses.) It might not be considered a drugstore for most, but I included it as the price range is similar.
R11 (the case does not include the name... it's only labeled on the plastic seal, which is silly as you throw it out...) is a deep magenta pink which is probably closest to a true fuchsia tone. The coverage is opaque, the texture is very much like a high end lipstick, and the finish is creamy and moisturising. There is no shimmer whatsoever, so this is a true creme finish.
It also does not stain, so if you like cool toned shades, I highly recommend this.
Sephora Rouge R11
I had to throw in an honorable mention which I did not include in the swatches when I was taking the pictures.   I'm not sure why I forgot it when I was taking pictures in preparation for this post the day before. 
NYX matte lipstick in Sweet Pink is another true cool-toned magenta pink, even more blue than Sephora R11, but not electric bright.

It has a wonderful creamy-matte finish and is one of my favorite blue-based shades to wear, as it makes your skin glow and your teeth look whiter. If you're drawn to but still afraid of shades like Shocking Pink and Candy Yum Yum, you'll be happy to know that this shade is nowhere near as bright. And the opaque matte texture means it stays on very well.

The only minus to this affordable-but-expensive-looking shade is the scent, but hey, that's a small problem for a good lipstick.
NYX Sweet Pink Matte Lipstick
Application Tips:
The problem with wearing any bright lipstick for hours is the feathering and/or fading. It always look gorgeous when just applied, but after 3 hours of talking, drinking, or general wear and tear from pressing your lips together, etc, you will find the edges of the lipstick have smeared or feathered into an unflattering mess. 

Matte formulas can minimize the problem but they may not eliminate it unless the finish is very dry. And not everybody wants to wear a full matte lip.

This is what I do to keep everything under control when I wear a fuchsia lip (demo using Revlon Fuchsia) out for a full 12-hour day:

Step 1: Apply a lip primer over the lip line (I use POP Beauty's Lip Magnet, which is a very sheer beige that does not change the color of lipsticks), and rub with fingers to even out and remove access.

Step 2: Apply lipstick to the lip area, without going beyond your lip line. 

 Step 3: Gently kiss a sheet of tissue to remove the moisture and some of the excess pigments.

Step 4: Use a fuchsia lip pencil (NYX Fuchsia is great and affordable, but if you're particular about brands, MAC's Chromagraphic Pencil in Process Magenta is a great liner for most fuchsia shades), and lightly run in windshield wiper motions along your lip line. I say windshield wiper motion because you are not going to get a perfect line in a single stroke. You want to almost fill in the lip line with your pencil, so you create a thicker barrier around the edge of your lips.
NOTE: You can choose to fill in your entire lip with the pencil first, but I don't like to weigh down the color and texture of my lips that way, so I only fill in the outer edges.

Step 4: Reapply your lipstick as layering will intensify the color and shine, and lock it in.
Then with your finger, very lightly and gently dab along the outer edges of your lip line to remove any excess emollients. If you end up removing too much product, go back in and replace it with the fuchsia pencil. Not the lipstick.
Remember; the key is to keep the outer-most edges matte so the lipstick does not bleed over the course of the day. Dabbing just at the edges will help you to achieve that while keeping most of the lip looking glossy and moist.

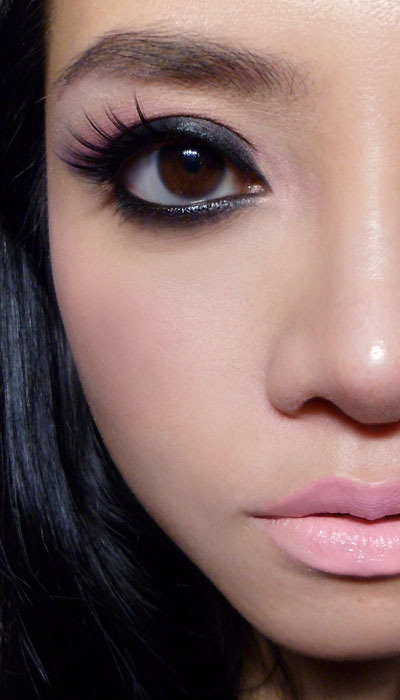
For a day-appropriate look, I like to pair it with very neutral eyes and a soft pink cheek to keep the whole face reined in. 


Wednesday, January 4, 2012

Easy Weekend Eye: Pink-Violet Duochrome

Get a Pink and Violet Duochrome Eye with MAC Stars n Rockets and Flashtrack shadows
Pink and Purple are right up there in many "Favorites" lists when it comes to makeup colors. But what about Purple-in-Pink?

This look features a bright magenta pink with a violet-blue duochrome shift. I'm not sure about you but I find this color to be just a little too dramatic and reminiscent of the 80's on most days, so I seldom touch it. But when you temper it with a little blue and black at the lash lines, and heaps of blending, the overall effect can be quite modern and smoldering even.

I used an old mica from I Nuovi called Amethyst (I believe they've discontinued this in their Dust collection), but this is not a hard color to find. Urban Decay Deluxe Shadow in Fishnet and MAC Stars n Rockets are pretty much identical to this.

The other 2 key componenets to this look are a strong, creamy black kohl or kajal, and navy blue shadow (I used MAC Flashtrack but any shimmery deep navy will do equally well.


Step 1: Apply the black gel or kohl liner very thickly to the upper and lower lash lines. Don't worry about getting it neat as it will be covered over later. Just make sure it is very black, very dense, and quite thick. You will likely need to reapply after you're done with your eye shadows.

Step 2: Run a deep navy blue shimmer along the lower lash line to get a smoky finish. Do not apply the blue shadow to the water line. You want to keep the liner very black there.

Step 3: Pack the star of the show, a bright duochrome magenta to the lids, up just past the socket line. As the pink goes over the black liner from earlier, it'll transform into a lovely dark blue sheen.

Step 4: Dab your brush into a blend of both the magenta duochrome and the navy shade from earlier, and very lightly buff it along the outermost section of your socket line to add a bit of depth and contour. At this point, you may want to touch up the black kohl or liner along the water line, as it would probably have shifted and faded a little. (A second layer also helps to keep it on better.)

Step 5: Finish with lashings of black mascara. I wanted to keep everything still looking smoldering by keeping all the darkness just to the inner rims of the eyes, so I skipped false lashes here, but if you really want to go to town with this, you can definitely pop on falsies.