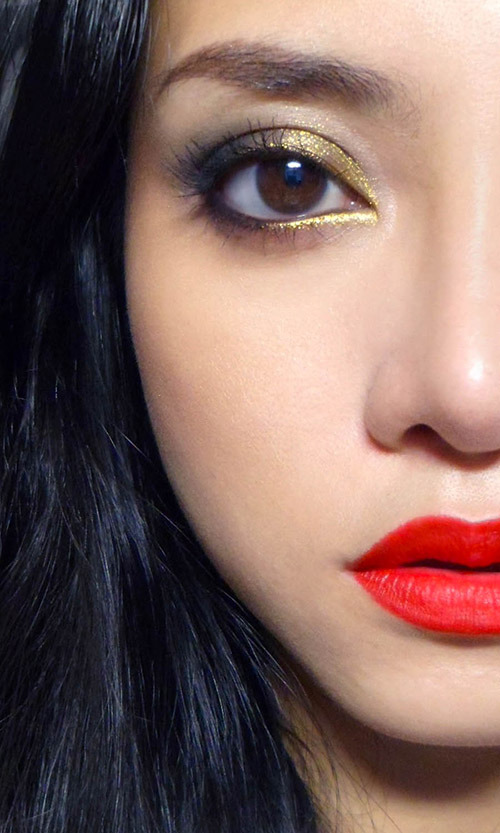
If you're looking at a few posh dinners or parties (as we enter the holiday season) and want something that will be noticeable but not too typical or outlandish either, it's quite easy to just add a shot of gold to a more classic red lip look.
Instead of chunky glitter, which can look a little tacky, you want to go for something that is very fine-grained, and almost like large pigment particles. The alternatives are
- super fine micro-glitter (.04 micron and below)
- MAC Reflects pigment in Gold
- glittery gold liquid liner like Lime Crime Rhyme, which is made up of little gold flecks like MAC Reflects

Other things you'll need include:
- A dark almost-matte black shadow. I used the purple-black shade in the Rimmel Precious Crown quad for contrast with the gold.
- Black liner or kajal.
- Matte bronzer. I used MAC Mineralize Skinfinish in Comfort.
- Gold shimmery highlighter for the cheeks. My pick was Guerlain's Attrape Soleil but that is expensive and might be hard to locate, so any champagne gold highlighter you can find would work.
- A favorite scarlet lipstick like MAC's Ruby Woo, which will more likely last through drinks and snacks. You don't want this shade to be too dark or brown. It should be RED.

Step 1: Just begin by applying the dark charcoal shade over your entire lid from lashes up to the socket line, right above your eye ball. Run a little along the outer halves of your lower lash line with a firm brush as well.

Step 2: Apply the gold sparkle. If you're using a loose pigment, you might want to mix a little with eye drops or some mixing medium (MAC Fix+, or liner sealant) before dabbing it on with your finger, over the inner half of the lids.
It WILL dilute and make the charcoal shade you applied earlier a bit faded, but that's fine since you're creating a bit of a gradation from light to dark, inside-out anyway.

Step 3: For definition and contrast, run black liner along the inner rims of your eyes. This makes the gold really pop and look more vibrant.
Then finish by curling lashes and applying mascara or false lashes. I wouldn't go for dramatic lashes since they'll just detract from the whole eye look, but it's no harm if you want to wear them.

After everything sets, you might need to go back and apply a second layer of gold onto the inner corners at the lower lash line just to intensify the color further.

Step 4: On the cheeks, I applied bronzer for warmth and contouring, and then topped my cheekbones and brow bones with shimmery gold. This gives a beautiful sheen when the light hits and it looks even better up close.

Step 5: Finish by apply a scarlet lipstick. If you're going to be eating and drinking, then make sure you blot and reapply to prolong the wear. For a super-detailed tutorial on how to apply a perfect red mouth, watch Lisa Eldridge's video here!
Beautiful look & great tutorial! :) Love the golden shimmer, the red lips and the glow on the cheekbones and brow bones. <3
ReplyDeleteHappy Sunday!
xx
Thanks so much Constanze; you have a great week ahead!
DeleteFinally a whole face of yours. Your face is amazingly flawless. I love it!
ReplyDeleteThank you for the lovely compliment Jenny, LOL.
Deletebeautiful look.. looks amazing on you!
ReplyDeleteThanks Chloe! I think the colors would look good on most women! :)
DeleteYou have the most amazing features :)
ReplyDeleteAww you're too kind, Linda, too kind... Thank you so much.
ReplyDeleteYou look absolutely stunning, thank you for this tutorial! What false eyelashes would you recommend, especially for a ball/prom?
ReplyDeleteThank you!
DeleteRegarding lashes for a ball or prom, I like soft wispy ones that add some glamorous flutteriness but aren't too shiny, dense and unnatural.
Check out designs like Ardell's 120 Demis or the Demi Wispies! (Added bonus: they have an invisible band instead of that thick black band.)
off white
ReplyDeletebalenciaga shoes
off white shoes
golden goose
yeezys
100% real jordans for cheap
yeezy
supreme clothing
calvin klein underwear
off white jordan 1