Showing posts with label smoky eyes. Show all posts

Wednesday, August 3, 2016

Green on Green Smoky Eyes


I wanted to play with a few green shadows that I haven't used for awhile, so I whipped up a green on green look today.


Base: Black kajal or black cream liner smudged over lids
Outer corners: Make Up Geek Envy (black with green shift)
Main lid shade: Top Shop U-Turn (you can also try Make Up Geek's duochrome shadow in Havoc)
Inner corners: MAC Shimmermoss
Lashes: Red Cherry #13
Cheeks: Tarte Celebrated
Lips: NYX Whipped Fouetté in Cocoa Bean


Top Shop's U-Turn is a more sparkly and transparent version of typical duochrome shadows like MUG Havoc, but if you don't have a duochrome, just go with a shimmery teal shadow and don't worry about it being duochrome.

The main thing is to go from dark to light, using a black-green on the outer corners, to a rich teal or emerald green in the center, and then a pale jade green around the tear ducts, so there is depth and richness with a nice gradient.


As for the cheeks, I was playing with my Laura Mercier Face Illuminator in Indiscretion, a soft rosy beige. This is an old fave, and I think LM has consistently been good with face highlighters. It's silky, fine-grained, buildable, not overly-metallic, and the colors are usually very multi-faceted. Never a flat  color like gold or pink.


Indiscretion is actually slightly too deep for my NC25 skin tone when swatched intensely, but when it's dusted on lightly, it just works like a subtler sheen on light skins. And it doesn't look too pale and stark or metallic. It's also perfect as a blush topper, to add glow along the tops of your blush.

Of course, if you own the other two lighter shades, you don't need to worry about this.


Thursday, December 17, 2015

The Body Shop Holiday 2015 Swinging Silver Palette (and Frosted Plum)


Whether you're into bath and body products or not, you have to hand it to The Body Shop for great holiday makeup.

I'm quite a fan of their eye-shadows which were reformulated about 2-3 years back. And Christmas is the season where they come up with annual limited edition eyeshadow quads that are perfect for the party season, and won't break the bank. If you're not sure how to use the shades, there are instructions and a diagram on the back of the package.

I received the Singing Silver eye palette (below) for review, and had to immediately dig in when I touched the shadows.


This is a cool-toned palette, but there is a little warmth (a peach pink) to add some soft, prettiness, and also prevents the look for being too harsh and cool. You get a warm peach pink, a soft grey, a blackened navy and an aluminium silver.

The swatches are done with fingers, but the eye look is done with brushes, so you can see the quality is pretty consistent. If I have to nit-pick, I would say the grey shade has a bit more fallout than the rest, and as is normal for most brands and formulas, the dark black-navy tends to come off more like charcoal than blue when applied sheer with a brush. But these are slight, and not major problems.
Tip: To get the deep sapphire blue tones to come out more, I would apply with a brush and blend first, then as a last step, dab on a little extra navy with a clean finger to intensify the color. But if you prefer a more neutral look, just use a brush and it will look like a smoky charcoal tone.
But really, the quality is great overall, and the peach and silver are fantastic.

The best part for me is probably the versatility. The peach shade itself can be used as a warm transition color in the socket if you have pale to medium skin. You can wear the peach and grey for a simple warm-neutral day look, just the navy and silver for a dramatic night look, or skip the peach if you want a very cool-toned Rock'n'Roll smoky eye with cool greys and blues.


The packaging is no-frills. Eco-friendly cardboard that won't weigh down your makeup bag. If you care about luxe packaging this won't be for you - but as a reasonably-priced gift for someone who just wants good quality makeup or step out of their neutral comfort zone and try different colors for the holidays, I recommend checking this palette out.

For the eye look here, I had
  1. peach all over the lid
  2. grey in the socket and blended up and out at the outer corners
  3. navy in the outer half of lids
  4. silver in inner corners and down the center of the eye

I used a metallic navy pencil from Urban Decay to accent the lash line, then used the sponge tip in the palette to run the navy shadow over the pencil. This sets the pencil and brings out more of the navy blue in the look. You can use any other navy liner you own. Or stick with black for a more neutral look. 


P.S. aside from the makeup, I do want to quickly show some products from the Frosted Plum body range as well because I really liked the scent a lot more than I would have expected. It is juicy and fruity, but also quite perfume-y and quite grown-up; you won't smell like candy or a can of juice if you know what I mean.

I wouldn't call it "fine fragrance" but if you enjoy fun girly scents from Bath and Body Works, Victoria's Secret etc, this would be perfect for you.

The range includes full-size body products like body butters and shower gels, but there are also fizzy bath melts and a shimmering perfumed body spray to "frost" your skin. But the cutest thing is probably the Frosted Plum Feel Good Tin. This big metallic reusable purple tin contains mini sizes of the shower gel, lotion, body butter, scrub, and lip balm.

Perfect for sampling the full range - or for making someone's eyes pop out when you gift it to them.


Saturday, October 24, 2015

Midnight Periwinkle: Metallic Sparkly Eye Look (feat Moonshot Jelly Pot P04)


Korean brand Moonshot has reached Singapore, and one of the star products I highly recommend are their Jelly Pots, metallic gel-cream shadows which set and lock on. 

They're not that different from liquid shadows that you get in squeeze tubes or gloss tubes, but they can be slightly messy because the gels will move round in the pots, so tap the bottom a few times before opening. The range comes in P (pearls) and M (matte) formulas. Also, they can be used as bases, but they're better as shadows in their own. Once they set, they don't grab powders all that well.

Which is fine if you want a more diffused and soft effect, not so good if you expect your bases to intensify your powder shadows.


For this look, I wanted a smoky but still luminous effect, so I paired Jelly Pot P04 (a medium metallic lavender) with Shu Uemura's Beauty Remix Smokey Eye & Cheek Palette in Indigo.


The final effect should be smoky and defined but still soft, with an emphasis on a blend of cloudy colors and sparkly texture.


 Getting the Look:


Tip: to get maximum shine and payoff with the Jelly Pots I recommend letting a thin layer set, then applying a second layer on top.


As for the lips, I used MAC Spice lip pencil and YSL Rouge Volupté Shine No 8.


Final note on the Jelly Pots:

The Jelly Pots last very well once set, and the sheen is beautiful with the P formula, so I totally don't recommend buying these to use as a base for powders. Use them as a shadow shade in their own right and just pair other powders and creams with them to bring out their color and texture.

There cost around SGD$34 at Sephora; not the cheapest compared to what you'd get buying it in Korea, but worth checking out nonetheless.


Sunday, August 16, 2015

Weekend Smoky Sparkle: Urban Decay Naked Smoky Look


There's a single glitter-infused shade in the Naked Smoky palette by Urban Decay, and the shade is gorgeous (Armor) but weekend is pretty much the only time I would wear it!

You have to be prepared for some fallout when you wear glitter smoky shades, so if you can, try to do your eye makeup first, and the rest after you clean up or you'll have tiny specks of glitter and black on your cheeks, your nose, etc.


The four shades I picked out today were:

  • Main lid shade: Armor - metallic taupe with platinum glitter
  • Socket and wings at outer corners: Smolder - deep prune
  • Lash line: Black Mail - satin charcoal
  • Inner Corners: High - pale champagne beige

I did also use a little of the 2 palest matte shades (Combust and Thirteen) on my browbone just to clean up and serve as contrast against the metallics on the lids.


Tip:
This is a smoky look, but I didn't smoke the color up too high above the socket. In fact I stopped right at the socket line. I wanted a more elongated catty effect, rather than a full-on rounded smoky eye, so when I was blending I concentrated on sweeping and diffusing the colors outwards from the outer corners instead of upwards.

I did try using the dual-ended blender/smudger brush included with the palette. I love the smudger tip for applying shadows along the upper and lower lash lines.  It's very precise but shaped just right for getting a soft smoky liner look.

The blender tip though, I'm not a huge fan of. Partly because UD's bristles are packed too stiff and not fluffy enough to really diffuse shadows. You CAN still use this to pack and buff on color but you will get tons of fall-out using this shape for that purpose. It's better used clean to blend out edges or to buff two colors together. Which means you might need a separate packer brush to apply shadows onto the lids, before going in with this to blend.


Other products used in this look:

  • Urban Decay 24/7 Pencil in Perversion - applied along the waterline and lash line, but smudged out a little so there is no hard defined line.
  • Eyeko Black Magic mascara
  • Afterglow Blush in Score - peachy-pink blush
  • Urban Decay Sheer Revolution Lipstick in Sheer Liar - rosy beige-brown my-lips-but-better color with a creamy semi-sheer texture


Saturday, March 21, 2015

Tarte Tartelette Amazonian Clay Matte Palette tutorial: Smoky Neutral Eye with Stacked Liner


I promised I would do some look tutorials using the Tarte Tartelette palette, but I've been having some computer troubles lately, so it's taken a lot longer for me to get to a station to edit all my photos. But here it is!

It's not hard to use this palette; the texures are extremely smooth. You just need to remember this tip:
All-matte looks can tend to go patchy and uneven, especially when you're trying to layer dark colors; to minimize this, dust on a light wash of a light beige shade all over your lid before beginning. Unlike with shimmery shadows, a creamy base can sometimes matte shades go on evenly.


The products I used for this eye look include:

  • Tarte Tartelette Amazonian Clay Matte Palette
  • Marc Jacobs Magic Marc'er Precision Liner in Black
  • Tarte Clay Pot Amazonian Clay Liner in Bronze
  • Benefit They're Real Mascara

The shades used from the palette are marked out below:


 If you want to keep things simple you don't have to do stacked eyeliner. I just love the look because you get the crisp definition of black at the lash line, while still enjoying the fun texture and shade of colored liner along the lid.

For a last step, just finish with black mascara!

Sunday, February 8, 2015

Tom Ford Spring 2015 Makeup Look and Swatches

Tom Ford Spring 2015 Makeup Look; photo credits: Style.com


Tom Ford's Spring 2015 Makeup Collection features a collection of deep velvety colors looks more like Fall makeup. But it's such a refreshing change that he's proposing a return to an almost grungy "anti no-makeup makeup" look in contrast with the usual pastel, flower-inspired Disney-tones of the typical Spring collections.

If you're more into smoky kohl-rimmed eyes and jewel-toned lids, get yourself to a Tom Ford counter come March 2015 (Singapore).


Aside from 2 colored mascaras (plum and teal), there are 3 nail lacquers and also 3 Eye Color Duos.

The Eye Color Duos look like a pairing of a dark shade and a white, but the whites are actually "interference" shades. Duochromes that look white, but go reflect back a different color.

Tom Ford Eye Color Duo in Crushed Indigo
To show you what I mean I've swatched all 3 duos, ombre-style, so you can see how they look blended together.

Tom Ford Spring 2015 Eye Color Duo Swatches: Raw Jade, Ripe Plum, and Crushed Indigo
The 3 duochromes come in coordinating tones to the shadows they are paired with. Icy blue with indigo, pink with a brown-plum, and a pale mint with the deep forest green.

 The nail polishes are worth checking out as well.
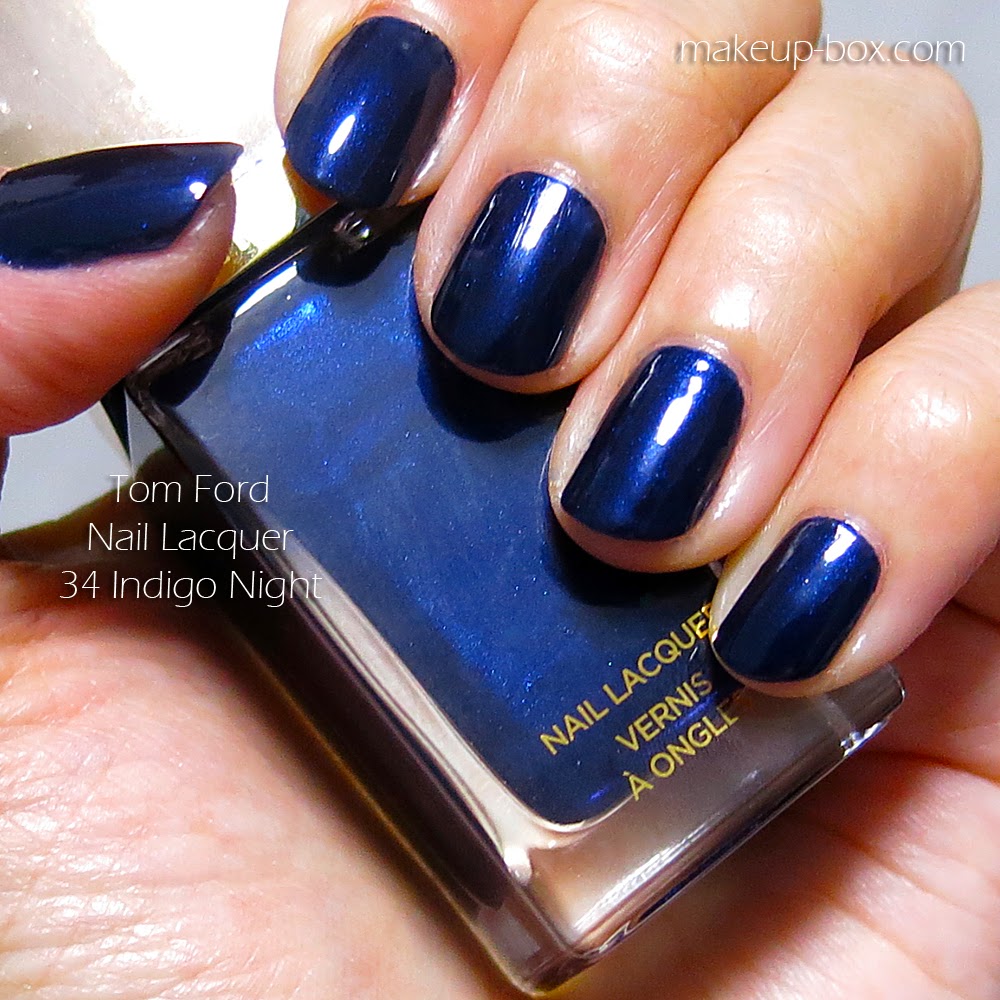
One of the shades, Bitter Bitch, is a permanent shade. But the other 2 are limited editions in dark sludgy midnight tones.


Tom Ford Nail Lacquer in 33 Black Jade

Tom Ford Nail Lacquer in 34 Indigo Night
 The colors are coordinated with the eye duos, but not too "matchy-matchy".


Wednesday, January 28, 2015

Chilli Red Lips and Soft Winged Eyes: Armani Lip Maestro 402 and NARS Cordura + Kalahari tutorial


Haven't put a tutorial on here in awhile, so here's a very quick breakdown of a go-to "dressed up" look that I often do when I'm going out. It's not all hard edges and precise dramatic lines though. In fact, it's kept deliberately soft around the edges, so that you can wear a stronger lip with a stronger eye, if you choose.

To give you options, I broke the look down into 2 parts. The eye, and the lip. You can wear them separately or together like I did. 

Products used: Shiseido Maquillage Long Stay Eyeliner N, Etude House Play 101 Pencil in 59, NARS Cordura (darker shade), and NARS Kalahari (warmer bronze shade used)

Firstly, a note about products. You absolutely do NOT have to use the exact same things I did. Most of us have black and brown liners, and many of us have a dark brown and a medium brown shadow. Just dig around and look for what you already own. Or if you absolutely LOVE one of the particular shades here, then go for it.

Step by step: Smoky winged eye
This eye look is so straightforward. There is no precision required because everything is hazy and smudged out. That's why I do it so often. It takes only a few minutes.

Now on to lips! I only discovered Lip Maestros from Armani in December last year. Very slow and late of me I know. But I fell for them in a BIG way. These things are incredible. Of all the lip creams that were launched last year, this is probably my favorite texture. They aren't as gel-like and glossy as Dior's, not as sheer as YSL's, and aren't as intense as Shu's (although these 2 brands have the closest textures). 

To me, it's like Baby Bear's bed to Goldilocks. Just right.

Lip products used: No7 Precision Lip Liner in Nude, Armani Lip Maestro in 402
I have a rather specific way of applying these.
Obviously I don't want them to bleed and smear quickly so I don't just wear them straight from the tube without liner.
BUT, I also don't want to ruin that semi-glossy texture or change the consistency and opacity by wearing a layer of liner all over my lips. 

So this is what I do.

My lip application procedure for Lip Maestros
What I end up doing is create a border that is mid-way between red and nude. It melds with the red so it doesn't look like an obvious line, and at the same time, it also protects the lipstick from bleeding quickly, AND it works as a border and helps bright colors from looking too hard and harsh against the skin.

The lip is neat, but it's not overly defined. You will never see a dark lip line when your lip color wears off after a drink or a  meal. And it's never harsh-looking or like "stick on" lips.