Always fun to dig around in the art supply store for things that you can use. My latest trip yielded black glitter emboss powder from ZIG.
Similar to caviar nails and velvet nails, it's really just coating your nails with a nail varnish in a matching shade, and then dipping it (while wet) into your embossing medium of choice.
Emboss nails usually stay nice-looking for about a couple of days and then most of the textured particles will wear or drop off, so having a very opaque polish beneath will help to hide that.

To get the exact same look, you can get plain black emboss powder and mix in a little multicolored glitter, or else just look for an emboss powder that is "sparkle black" or "glitter black".
You also want to get a piece of napkin and a soft brush that you can use to dust off excess emboss powder.
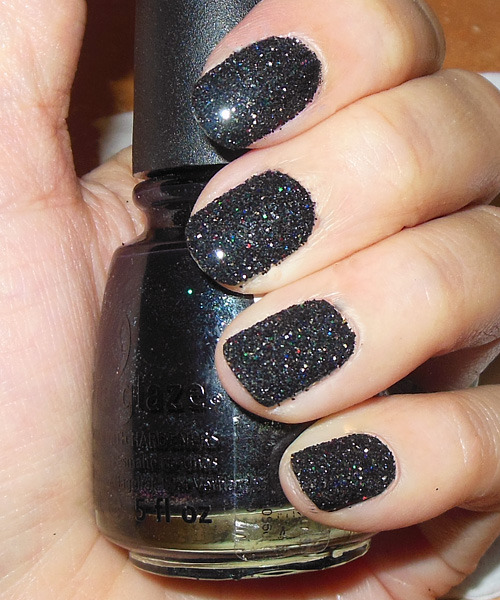
Step 1: After letting your base coat set, apply 1-2 coats of black polish (if it's opaque a single coat will be enough) onto your nail, working one finger at a time. I used China Glaze Smoke and Ashes.

Step 2: Quickly, while the polish is still damp, dip your nail into the emboss powder.


Step 3: Using a clean napkin, gently press over the nail to press the emboss powder and glitter into the polish. Emboss powder is going to fleck and rub off over the next 1-2 days, but you can reduce this and improve how it looks by doing this pressing step.

Step 4: There isn't much of a point to applying a topcoat because a lot of the powder will still come off even with topcoat over it, but if you really want to, just paint it on, wait for 10 seconds, and then press your napkin over your nail again to recreate that cool textured surface.
IMPORTANT: Be very careful if you have a habit of rubbing your eyes! You don't want emboss powder in there.
LOve it!
ReplyDeleteCheck out my AMAZING FASHION BLOG!
http://www.thefashioneldiary.com/
Thank you for your information, your blog is so informative and intresting.
ReplyDeleteNoida packers and movers
Delhi packers and movers
Gurgaon packers and movers
Faridabad packers and movers
Packers and movers Indirapuram Ghaziabad
Delhi movers and packers