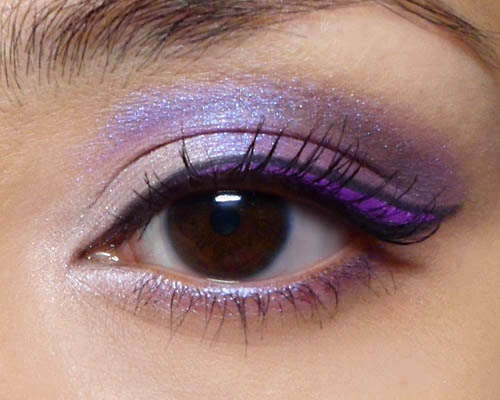
Disclaimer first: this is going to take a bit of practise if you're not used to working with liners.
Also, I used a really bright purple liner from Lime Crime, called Orchidaceous, and I haven't seen any dupes, so if anyone knows any similar alternatives, do reply to this post and let everyone know in case there are some who aren't looking at spending too much on a colored liner!
You'll need 3 shadows:
- Pale cotton-candy pink or beige (e.g. MAC Yogurt)
- A medium violet-blue duochrome. (I used a limited edition shade from Urban Decay called Omen, but you can also use more pink version like MAC Stars n Rockets or Coastal Scents mica Chameleon Violet, which is a great, cheap dupe of this shade.)
- A soft grey/charcoal (I'm not going to name any shades because you can use ANY deep grey.
For the liner, I used:
- A charcoal (grey-black) pencil from Bourjois, #51 Noir Effet Miroir
- Lime Crime Orchidaceous, as mentioned above
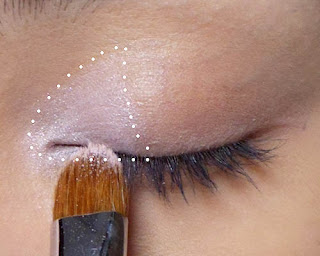
Step 1: First pack the pale pink/beige shade into the inner 1/3 of the lids.
Step 2: With the violet shadow, run along the lower lash line, and then pack onto the outer 2/3 of the lids, blending inwards slightly along the socket line.
Step 3: The defined crease. Use a dark grey and a small pencil brush, and run it along the outer halves of your socket line to emphasize it. This is not the fold of your crease. It's the hollow arc above your eye ball, where your eye contour is naturally. Feel for it with your fingers.
Step 4: Just use the brush you used earlier (to apply your purple shadow) to blend out and soften the grey line. It shouldn't look like a harsh stripe.
Step 5: Use your dark grey-black pencil to draw the outer end of your flick first. (If you don't have a charcoal color, a black would work perfectly well; a charcoal is just less dramatic.) Make sure it is parallel to your lower lash line.
Step 6: Thicken the line by drawing from the outer tip INWARDS towards the center of your lid. Then fill in the gap between the 2 lines and extend it to the inner corners.
Step 7: This is the trickiest step. Apply the bright violet liquid liner WITHIN the V of the black winged liner. The easiest way is to place the brush down with the tip pointing outwards. You'll actually be "stamping" your skin with the liquid on the length of the bristles.
Then, just drag it inwards gently like you would when painting your nails. The length of the brush should be against your skin the whole time. If you need to thicken the line, repeat the same movement, always moving in the same direction.
Then finish by letting the ink dry, curling your lashes and applying mascara. It's important to make sure you coat your lashes properly with black mascara, as there could be a lot of purple ink on them.


Thank you for this great tutorial! The look and effect are awesome, love it! ♥
ReplyDeletexx
My pleasure Constanze! It was quite fun to do, and not as complicated as it looks!
DeleteI'll try it the next days! :D
Deletelebron james shoes
ReplyDeletesupreme t shirt
longchamp outlet
yeezy
giannis shoes
moncler jackets
jordan shoes
golden goose sneakers
longchamp
yeezy boost 350