Showing posts with label eye shadow tutorial. Show all posts

Monday, November 26, 2012

Driftwood: Seafoam Green and Rich Bronze Look for Day (88 Warm Palette)


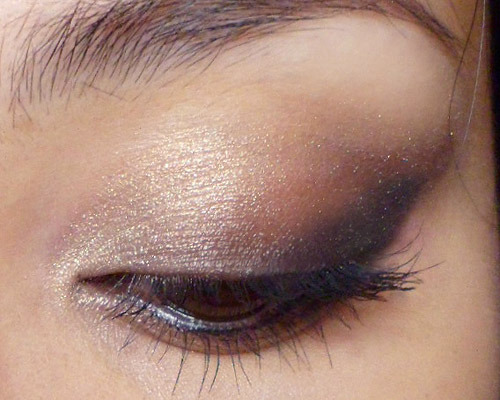
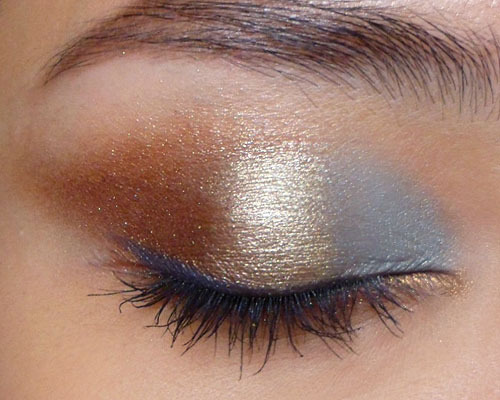
Straightforward does not need to be boring. Here's a look that you can easily wear for day because I matched a soft seafoam green with a rich brown and soft champagne. The green is almost "faded" in tone so it's definitely a bit more fun, but not too loud for work or school.

The first shade is located near the bottom left corner of the 88 Warm palette. (You can get this from both Coastalscents.com as well as BHcosmetics.com. I don't detect any difference in the quality and they're likely to come from the same manufacturers.)

The Neutrals are near the central column. The first is a deeper cocoa bronze right at the bottom, right of the middle. The champagne comes higher up to the left of the center, a little above the maroon shade near the center of the palette. Both of the neutrals are shimmery, so if you prefer mattes, you can always replace the ones I used with similar shades on the palette.


Step 1: Start by buffing the seafoam green onto the inner half of the lids.


Step 2: Now, buff the rich bronze-brown onto the outer half of the lids. (This shade looks quite similar to MAC Bronze shadow, but is slightly lighter.)


Step 3: Now, pack some pale champagne gold onto your brush and then spritz it with a little water, eye drops or Fix+. THEN pat it gently down the center of your lid, going over and building up as needed, until you get a nice gold sheen.


Step 4: For definition, I ran a bronze pencil along the inner corner of the lower lid (Sephora Flashy Liner in Flashy Copper) and a dark navy blue to the outer half of the upper lid. I used a discontinued MAC pencil called Blooz, but as with all pencils, you can use ANY similar shade from any brand you choose. As long as the pencil has good color payoff, the brand doesn't matter.
Then just finish by curling lashes and applying mascara or falsies as needed!

Tuesday, November 6, 2012

Sexy "Stacked" Cat Eye (Plus a Twist for Evening)


Long time no post on Blogspot!
I just got back from my honeymoon to NYC (left just ahead of Hurricane Sandy) and have been trying to catch up on things at work, etc. But I'm back doing tutorials, although I've only been able to update my Tumblr in the past week.
I thought it was time for something that was neutral and relatively easy to do, but still packed a bit of drama, AND converted quickly into a more colorful fun look for the evening.
This follows a dramatic cat-eye liner shape that is quite typical of Italian screen stars like Sophia Loren, but instead of using very harsh and strong black liner, it's created using black shadow instead.
You will need only:
  • A matte black or charcoal (any brand will do)
  • A soft brown (I used Coastal Scents Hot Pot in Southern Wood, which is similar to MAC Satin Taupe)
  • A soft neutral flesh-tone (Coastal Scents S29 Hot Pot)
  • [Optiona] A "converter" color that's bright and colorful; I chose Maybelline's Color Tattoo Eye shadow in 40 Tenacious Teal

Step 1: For this look, I used a single brush; a pointed pencil brush with a pointed tip. I prefer this shape because it actually allows me to apply shadow in an angular shape just by dragging the brush diagonally downward to the center of the eye.
Fill in the outer corners of the eye in a thick angular triangle using the black shadow.


Step 2: Dust off the brush on a piece of clean napkin and then pick up the soft medium brown. You want to stack this on top of the black earlier, overlapping it a bit so there is no harsh line between the 2 shades.
This time, angle the shadow down almost to the inner corner of the eyes.


Step 3: The last step on the lids is just applying the softest beige shade  from the inner corner outwards. The only difference is that instead of going straight up in a triangle like the other 2 colors, this shade curves in an arc along the socket line before straightening outwards at the outer corners.
Again, the color should fade into the medium brown without any harsh lines in-between. This shape visually elongates the eye and emphasises an almond shape.


 Step 4: Finish by lining the lower waterline with black pencil, and then applying mascara or false lashes. The final look is subtly-dramatic and goes easily with both a soft or a dramatic lip.


Step 5: The optional step for converting the neutral eye into a play-time look. I dabbed a bright turquoise cream shadow down the center of my lids using my ring-finger. Don't smudge back and forth; just tap to blend a bit. You want the color to be distinct and not muddy.
This just gives a nice pop of texture and unexpected color on the center of the lids.

Friday, October 12, 2012

Soft Glamor: Easy Evening/Party/Prom Neutral Eye


Note: Leaving everyone with a look while I pop off to NYC for a holiday!
Posts will be a bit sparse for the next 2 weeks. Hope you all stay well and have a great Halloween!

For everyone who is relatively new to eye makeup and not sure how to add some flattering glamor for formal occasions, this is a look you can try.
It's comprised of neutrals, so it goes with pretty much any outfit, although you can change the lid shade from a smoky brown to any other color and retain the shape and application.
I used a:
  • Matte black
  • Smoky taupe brown (semi-matte)
  • Coppery-beige shimmer
  • Silver-white shimmer
Also, a black eye pencil, black mascara, and a single strip of wispy lashes cut into half.


Step 1: First use a firm smudge brush or angled brush to apply black to the lash line, like you would apply a thick swatch of liner. As always, draw in the outer flick first, parallel to the angle of your lower lash line, and then extend the line inwards to the inner corners.


Step 2: The main lid shade for the smoky look. I used a deep taupe brown (BH Cosmetics MS17; use MAC Satin Taupe if you have it) above the black earlier, and gently filled in the entire lid EXCEPT the inner corners. Follow the line of the black and wing the brown out at the outer corners.
On the inner corners, run it along the socket line only.


Step 3: On the inner 1/3 of the lids, apply a peach-tan shimmer. MAC Tan pigment or BH Cosmetics CS09). This doesn't show up that well on camera but in real life both these shades are very intensely metallic.


Step 4: [Recommended for the very pale to medium-fair skins; Optional for everyone else] Dab a bit of silvery-white shimmer right in the inner corners just to brighten things up a little. This is only needed if the tan shimmer is the same tone or darker than your natural skin tone. You'd need a little more brightness at the inner corners for a more flattering effect. 
If you have caramel to dark chocolate skin, the peach-tan shade should already pop against your skin.

Step 5: The lashes. I cut a pair of wispies (fluttery, irregular, natural-looking) into 2 halves and then used one half on the outer lash line. This beefs up your lashes only on the outside, and emphasizes that sultry, catty effect. You want to curl your natural lashes before you apply falsies.

Let the glue dry at least 30 seconds or until you see a bit of the glue going grey or transparent. Then place the inner corner in the center of the lid, and then tuck the outer corner down.
(Half strips are a much easier way to apply false lashes for those who aren't familiar with it, and cutting a single pair of lashes into 2 is cheaper than buying a single pair of half strips for the same price!)

 
Last step: Finish by applying black pencil along the inner rim of the lower lids to just intensify the lash line further, and then you can apply some mascara just to weave your natural lashes into the false ones.


Tips on cutting lashes:
  1. Look for lashes that are symmetrical, with longest hairs in the center, and outer hairs equally short. 
  2. The best lashes for cutting have short outer hairs and much longer hairs in the center. This helps if your natural lashes are short, because the short end of the false lashes should more or less blend in with your own instead of sticking out obviously in the center of your eye.


Friday, September 28, 2012

Punky-Pretty (Fluorescent Hot Pink with Smoky Cut-Crease)


This is a very dramatic look pairing hot pink with a smoky dark russet brown. Definitely more for the clubs or a party than a day out with the girls!
I used new shades from my BH Cosmetics shadows:
WM20 - An true matte hot pink
MS12 - Dark sparkly blackened red-brown
WS07 - A mid-tone satin mauve pink


Step 1: First run a black khol along your upper and lower water lines.


Step 2: Using a pointed brush for control, first draw a line diagonally up and out at the outer corner of the eyes. Then pick up more shadow and run it along the socket line, stopping before you reach the inner corners. 
Smoke the entire line out to get a really thick brown swatch.


Step 3: Pack a neon hot pink along the entire lid, leaving only the inner corners empty. Then run the pink along the outer halves of the lower lash line as well, extending the line up and out, right under the dark brown wing created earlier (below).


Step 4: To illuminate the eyes a little, apply a paler mauve pink to the inner corners of the lid. 

Step 5: Finish by checking to see if you need to touch up your black liner. (To help it last longer and look more intense, dab a matte black shadow over the pencil to set it.) 
Then finish by curling lashes and applying black mascara.

Saturday, September 22, 2012

Navy and Gold Evening Look with "Frankenshadows"!


I like blending and mixing my own shadows. I do this mostly with loose mica, glitter, and binders, and sometimes I crush up unwanted shadows, mix them with other shades, and then press them into something entirely new.


In the nail polish community, your own blends of varnishes are called Frankenpolishes. Well, these are my Frankenshadows.

What I used here were:
  • Nightmoth: This is a black matte pigment mixed in with metallic navy shimmer, with a pinch of aqua glitter thrown in. I can't think of an alternative in the stores for you, but any very dark navy shade would do. You can always pat a little glitter on top for a similar effect.
  • Ambre: This is more of a generic warm metallic amber-gold that you can find easily I believe. 
  • MAC Blooz pencil: A dark navy pencil

Step 1: First, lay the base. You want the shadow to always be most intense around the lash line, so I used a dark blue pencil (MAC Blooz is no longer available but they have alternatives) and ran it along the lash line, top and bottom. 
Along the top lid, make the lid very thick.
--

Step 2: Using a firm brush, very gently smoke the edges of the pencil out. On the top lid, I smudged it much further out so it fades towards the socket line.


Step 3: The navy shadow. I used a flat shadow brush to first gently pat shadow onto the outer halves of the lids, up to the socket line. I also packed it right on the lash line, to set the dark navy liner.


Step 4: With the fine smudger brush once again, I pulled the blue shadow inwards along the socket line so it faded inwards. Don't pick up any more shadow with your brush, because the line is supposed to be very soft rather than hard and precise.


Step 5: Using a smaller shadow brush for precision, I packed the warm gold metal shadow right onto the inner half of the lids in a tear-drop shape. It should fade into the blue but not be over-blended where they meet. That would muddy up the entire look. The gold and the blue should still stay very intense and clean. 


Step 6: With a fluffy blending brush, I started to soften the edges of the navy shadow, which can be quite hard against paler skins. You want to ONLY BLEND ALONG THE SOCKET LINE. If you bring your brush down any lower, you will muddy up the gold. The entire look could go from navy-and-gold to plain ol' charcoal in a second.


Step 7: Finish by curling lashes and applying black mascara! (If you need to touch up the gold or blue, go right ahead BEFORE you apply the mascara.)

Sunday, September 16, 2012

Neo Noir: Dramatic Metallic Look


I wanted to revisit the classic dark-eyes-dark-lips noir look, but update it a little with muted, mysterious colors on the lids. It's actually quite a simple look to recreate.
I'm using limited edition crushed metallic pigments from MAC, but you can easily find alternatives in the permanent range. You will need:
  • Black pencil
  • Bright teal-green (Rain Drop pigment; alternative: MAC Steamy shadow)
  • Pale silver-green (Moss Garden pigment; alternative: MAC Reflects Transparent Teal)
  • Mascara
Alternatively, you can choose any color as long as you pair a bright medium shade and a coordinating pale glittery shade. Just remember that because you are applying the shadow over a black base, the shades you choose need to be a shade lighter/brighter than you intend them to be. If you're not sure, just test it over black pencil on the back of your hand first.


Step 1: I began by applying a very thick coat of black kajal to the entire lid, up to the socket line. Then I ran it along the loewr lash line as well.


Step 2: Using a finger, very lightly smoke out the edges of the liner so you don't have any harsh lines. It should just look like a smoky eye.


Step 3: Laying the first shade; apply the medium shade onto the entire lid, over the black, leaving only the center empty. I used my fingers because that controls crushed metal pigments better, but if you're using regular pigment or pressed shadow, just use a shadow brush.
When you're done, just brush or gently smudge the color out at the outer corners to create faint wings.


Step 4: With a damp flat brush, I picked up the more glittery, pale shade and smoothed it onto the center of the lid. Blend slightly into the first shade, but not too much.
Next, apply the pale shade to the innermost corners of the eyes as well.


Step 5: Finish by touching up black liner along the water line, and then applying mascara.


For the lips, I applied a dark liver-brown (MAC Amplified Lipstick in Deepest Wish), then kept the cheeks soft with a very light pink (Bourjois Eye Shadow #15).

Thursday, September 13, 2012

Graphic Winged Liner Tutorial: Tricky to do but makes quite a statement!


Disclaimer first: this is going to take a bit of practise if you're not used to working with liners. 
Also, I used a really bright purple liner from Lime Crime, called Orchidaceous, and I haven't seen any dupes, so if anyone knows any similar alternatives, do reply to this post and let everyone know in case there are some who aren't looking at spending too much on a colored liner!
You'll need 3 shadows:
  • Pale cotton-candy pink or beige (e.g. MAC Yogurt)
  • A medium violet-blue duochrome. (I used a limited edition shade from Urban Decay called Omen, but you can also use more pink version like MAC Stars n Rockets or Coastal Scents mica Chameleon Violet, which is a great, cheap dupe of this shade.)
  • A soft grey/charcoal (I'm not going to name any shades because you can use ANY deep grey.
For the liner, I used:
  • A charcoal (grey-black) pencil from Bourjois, #51 Noir Effet Miroir
  • Lime Crime Orchidaceous, as mentioned above


Step 1: First pack the pale pink/beige shade into the inner 1/3 of the lids.


Step 2: With the violet shadow, run along the lower lash line, and then pack onto the outer 2/3 of the lids, blending inwards slightly along the socket line.


Step 3: The defined crease. Use a dark grey and a small pencil brush, and run it along the outer halves of your socket line to emphasize it. This is not the fold of your crease. It's the hollow arc above your eye ball, where your eye contour is naturally. Feel for it with your fingers.


Step 4: Just use the brush you used earlier (to apply your purple shadow) to blend out and soften the grey line. It shouldn't look like a harsh stripe.


Step 5: Use your dark grey-black pencil to draw the outer end of your flick first. (If you don't have a charcoal color, a black would work perfectly well; a charcoal is just less dramatic.) Make sure it is parallel to your lower lash line.


Step 6: Thicken the line by drawing from the outer tip INWARDS towards the center of your lid. Then fill in the gap between the 2 lines and extend it to the inner corners.


Step 7: This is the trickiest step. Apply the bright violet liquid liner WITHIN the V of the black winged liner. The easiest way is to place the brush down with the tip pointing outwards. You'll actually be "stamping" your skin with the liquid on the length of the bristles.
Then, just drag it inwards gently like you would when painting your nails. The length of the brush should be against your skin the whole time. If you need to thicken the line, repeat the same movement, always moving in the same direction. 


Then finish by letting the ink dry, curling your lashes and applying mascara. It's important to make sure you coat your lashes properly with black mascara, as there could be a lot of purple ink on them.