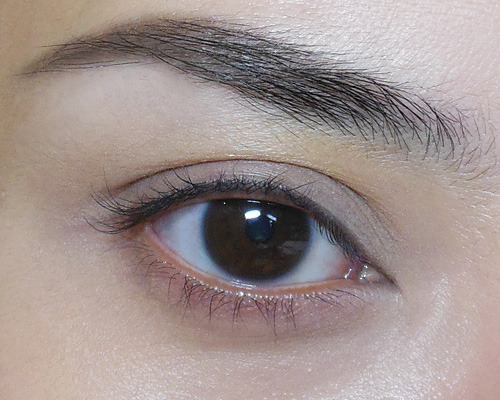
The one I’m doing today is just a regular polished brow and the basic guidelines apply to ALL brow shapes no matter how thick or sparse yours are:
- Trimming/plucking for a neat appearance, without altering your natural brow shape too obviously
- Filling in sparse or patchy areas for a slightly fuller look
- Grooming the hairs so they look and stay neatly combed rather than pointing in all different directions
Disclaimer: Now there are different ways of doing brows, and this isn’t the only way. You can also choose to do:
- dramatic, thick, strong brows (40s- 50s bombshell brows and boyish brows)
- super thin and dramatically arched (20s-30s flapper brows and theatrical/drag brows)
—
BASIC COLOR CHOICE
You need to remember only 2 things for a natural looking brow that works with your natural brow hairs.
- Go softer/lighter than your actual brow color
- Go a little more grey than your actual brow color.

A pencil with grey tones will create the illusion of shadows that a naturally fuller brow casts, so resist the urge to match her hair exactly and go for true-brown or worse - red toned shades if you don’t want your brows to look drawn on.

FILLING IN YOUR BROWS: PENCIL, LIQUID OR POWDER?
If you have full brows, you might not need to fill them in at all, so skip this!
Liquid brow markers: Allow you to draw on very subtle little strokes in sparse areas. Good for slightly uneven brows that don’t have obvious gaps or patches. More common in Asian brands, but Make Up For Ever also has a range that comes in a tube.
Pencil or Pot: The most common products, but might be easy to overdo if you use a very soft and pigmented formula. Unlike regular eyeliners, a good brow pencil or gel should not be very pigmented. (Shu Uemura has my favorite brow pencils because they are extremely hard and deposit very little color in each stroke, so it’s hard to overdo.)
Powder: The best option if you have sparse brows and a LOT to fill in. Also easier to control if you’re new at this.
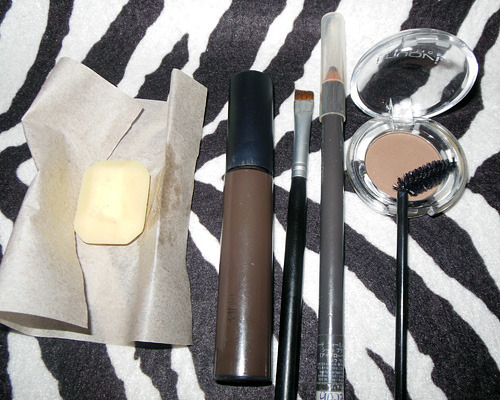
OTHER TOOLS TO USE:
If you are using a powder, pot, or squeeze-tube product, you will need to get a flat angled brow brush with stiff bristles, because it will pick up the least amount of product and the shape makes it easy for you to do short hair-like strokes.
Markers and pencils work all on their own of course.
You will also need a disposable mascara brush or toothbrush. (I bend mine at the base for easy brow combing.)

IF you have unruly brow hairs (most of us do) that don’t all neatly go in the same direction, you probably need something to set them so they sit nicely through the day. You can either use a brow wax that comes in a kit with a brow powder, or a brow mascara (colored/clear).
BROW SHAPING: TO PLUCK OR NOT TO PLUCK?
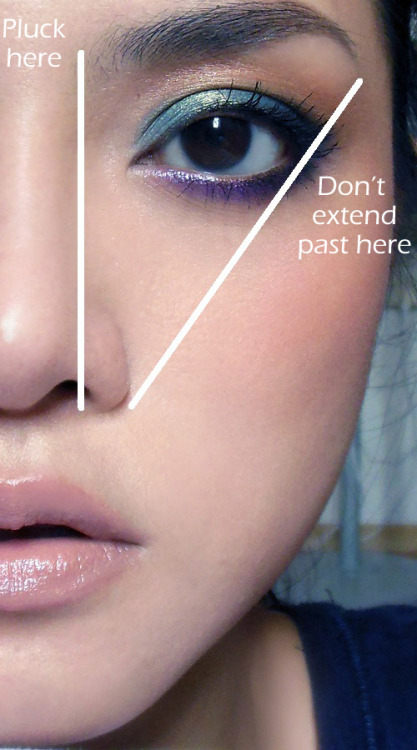
If you look at the top image with the 2 lines leading from the nose to the brow, you will see where a typical brow starts and ends. It’s a general guideline, not a law. Just remember these tips:
- your nose bridge will look wider the bigger the gap between your brows.
- it’s sometimes hard to gauge if both brows start at the same point. Pluck too much and you could end up with one longer brow and one shorter brow. Not cute.
There really is no set rule in terms of where your brow should start; it really depends on your preference as to how thick or thin you want your nose bridge to look. But in general, your brow should not start further out than the inner corners of your eyes or it will look really odd.

The next thing to remember is: RESPECT YOUR BROW SHAPE!
Meaning:
- Don’t pluck the top edge of your brows. Your brows are designed to fit your face and plucking at the top can easily unbalance everything and make you look “angry” looking.
- When trimming stragglers below the brow, think of an invisible line down the center of your eye (above). Don’t pluck too far in underneath or you could end up with the infamous “tadpole brow” with a bulbous inner corner and too-thin length.
- The base of your brow should naturally also arch further out (blue triangle) than the top of the brow (red triangle). If in doubt, don’t pluck anything that doesn’t lie far away from the main brow shape.

BROW FILLING:

1. I’m using my “worse” brow to demonstrate.
Before you start, you want to use a mascara wand to comb your brows outwards angling up slightly. This allows you to see where all the gaps will actually be when you finally set your brows with a wax or brow mascara.
I’ve got a sparse patch that my brow hairs don’t quite cover when they are brushed out and up. Take note of where you are most uneven.

2. When filling in your brows, DON’T simply start at one end and fill everything in like a coloring book. And don’t do an outline around your brows!
Start where you need the most filling in and use very light, short strokes until the patch “evens out” and merges into the rest of your brows. You don’t need to fill in areas with already dense hairs.
—
BROW SETTING:

I personally use either a taupe-colored brow mascara from MAC (Beguile) or uncolored wax to set my brow hairs. I find clear mascara tends to give a very wet glossy appearance that I don’t really like.
As mentioned, many brow powder kits come with a wax. I make my own using beeswax and shea butter just because I have it handy.

I like following the inner angle of my brow when I comb. Do little strokes all in the same direction.
Some makeup artists like to do an even more exaggerated upward angle but I find following the angle of the natural brow better for daily wear.
Application:
- Brow mascara: Clean off the tip of the mascara wand on a napkin or you could end up with a blob on your brows. You want minimal product on the brush when you begin brushing your brows.
- Wax: Instead of using those flat angled brushes provided in brow kits, use a disposable mascara wand instead. Rub the tips lightly in wax and pick up minimal product (the wax shouldn’t be visible little chunks on the wand) and just lightly comb through your brows.
LAST NOTE:
If you have very heavy, dense or low brows and not a lot of lid space, resist the urge to try to thin your brows in an attempt to “open up” the eye area. You could end up with an overly severe and unnatural looking brow.
You can consider lightening your brows a little with facial hair bleach (NOT regular hair bleach). This is a trick that can really soften and brighten the eye area while keeping everything natural-looking.
Just make sure you do a sensitivity test first and leave the bleach on for the minimal amount of time the first time. You can always bleach more if it’s not light enough. You can’t reverse it if you overdo it.
What are the names and colors of the products you use to fill in your brows? Because i have black hair too and I'm trying to find a natural shade for my brows and i love how your brows turn out. Also you seem to have the perfect lip shape and eyes, so envious
ReplyDeleteà la foliee
Thank you for your information, your blog is so informative and intresting.
ReplyDeleteNoida packers and movers
Delhi packers and movers
Gurgaon packers and movers
Faridabad packers and movers
Packers and movers Indirapuram Ghaziabad
Delhi movers and packers
This comment has been removed by the author.
ReplyDeleteEnglish Arabic Translation Services
ReplyDeleteCertified Translation Services Arabic to English
Arabic to English Translation Services Near Me
Arabic Document Translation Services Near Me
Translation Services Arabic