Everyone can wear a smoky eye. It just takes a little experimentation to find out which shape suits you better.
These are just general guidelines, and you should remember that they will each appear different on different eye shapes. There are also more complicated ways to do smoky eyes. I'm just running you through the basics.
For demo purposes, I'm using black face paint (Snazaroo) and 2 brushes. One synthetic concealer brush to pack on the black, and one dry blending fluff brush (below) for smoking out the black.

For your own looks, you don't need to use black or a facepaint! You can use black kajal, khol, gel liner, pencil or even a powder shadow. Anything that doesn't set too quickly, since you need time to smoke it out.

Step 1: A basic eye is commonly the darkest right at the lash line, and then fades outward. So the basic step is to pack most of the dark color onto the main portion of the mobile lid, from lash line up almost to the socket line. The darker the better.
IF you are using black face paint like me, make sure to dampen your brush just a bit so the face paint is slightly diluted and easier to work with and blend out.
Soft/Basic Smoky Eye
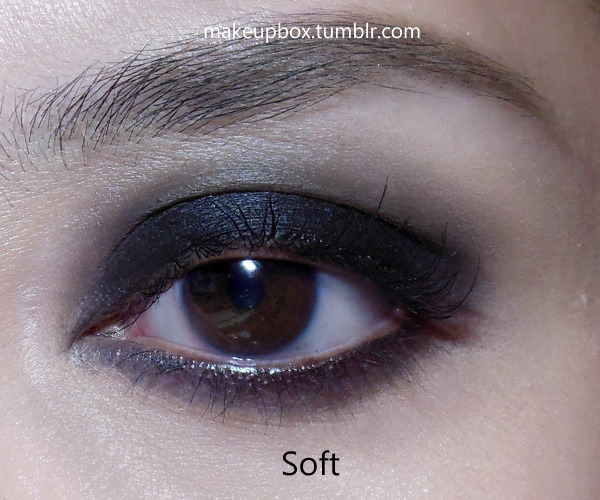
This is the simplest smoky eye, and I would say most people are able to pull this off. Also usually considered the most sexy smoky eye, because it looks more lived-in and approachable.


The Glam/Winged Smoky Eye
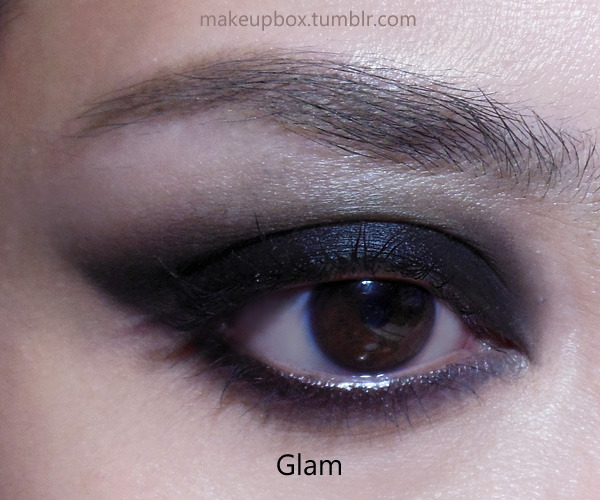
This is a very 90's bombshell look and still popular on the catwalk today. If you look at Pam Anderson and many of the Guess girls in old campaigns, you will see this type of very heavy, cat-like, sexy eye.

The longer the more dramatic.
If you're not sure, don't pull it out too far!

Tip: If you make a mistake and the top is too heavy, you can easily rub it out with a clean finger or a cotton bud.

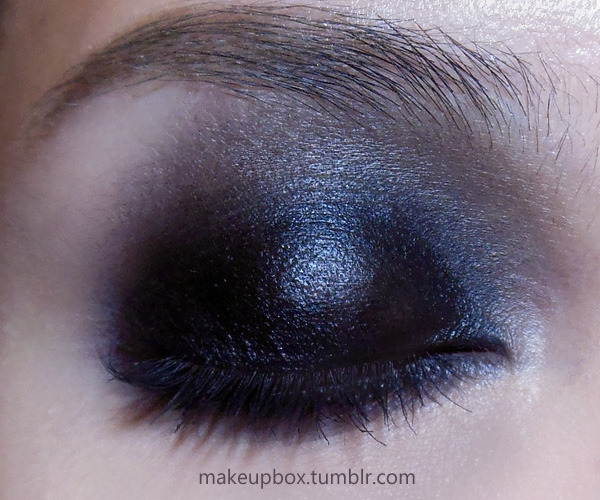
20s/Siren Smoky Eye

This is probably the hardest shape to pull off (unless you're going to a costume party as a cast member of the Great Gatsby) because it isn't always flattering for all eye shapes. If you have hooded eyes, close-set eyes or eyes that droop slightly at the outer corners, I wouldn't really recommend this.
Otherwise, this is a super-sultry ad mysterious look to wear.
Because face/grease paint WAS commonly used back then, I added just a little more moisture to my black paint for this look, to get that slightly translucent and almost greasy sheen (even though it's not greasy at all).

After applying color to the mobile lid, the main thing to do is to extend it up slightly past the socket line at the inner 1/3 of the eye. Remember the shadow should not extend out past the outer corners of the eye. You want the exaggerated roundness of an "owl" shape. Not a "cat" shape.

(The higher your brow, the more dramatic this look will be.)
At the outer corner, the edge should also be smoked out, but it shouldn't be buffed upwards because they didn't do a winged shape in the 20s and the overall look actually droops downwards.


As you can see, I LOVE a good sheen on my black paint.
A few more ideas to change it up a bit:
- Use a purple or cobalt blue gel liner instead of black
- Add a little black glitter over the black base for a black-crystal effect
- Set your black paint with black powder shadow to lock everything in place and intensify the look even further
- Do only the upper lids and leave out the lower lash line for a lighter, less dramatic smoky look. (Doesn't work for the 20s look.)
- Apply a duochrome shadow over the black
- Blend a pale metallic shadow in the center of your eye to make the entire look POP.
wow great ilove it
ReplyDeleteThank you for your information, your blog is so informative and intresting.
ReplyDeleteNoida packers and movers
Delhi packers and movers
Gurgaon packers and movers
Faridabad packers and movers
Packers and movers Indirapuram Ghaziabad
Delhi movers and packers