Showing posts with label dramatic lips. Show all posts

Sunday, August 2, 2015

Urban Decay’s new Matte Revolution Lipstick Swatches


Intense matte lipsticks seem like a natural fit with Urban Decay, which is known for edgy intense colors. So it’s a bit surprising that it’s taken them this long to actually launch a matte lip range.
Still - better late than never! There are 9 new creamy colors (SGD$33) that will launch on 20 Aug in Singapore, each infused with shea, illipe, avocado, olive and babassu oils. Some of the shades are slightly creamier feeling than the others - several of these lean closer to the texture of MAC Satin lipsticks more than typical Mattes - but they all do eventually settle into a matte finish after the excess oils and emollients absorb or evaporate.
The shades are quite creamy and smooth-feeling, so they tend to appear creamier in my lip shots partly because of the bright lights, and partly because they’re all freshly applied when I shoot them.


I grouped the shades into neutrals/warms, and cools. As you can see, these aren't wallflower colors. With the exception of Stark Naked, most of them pack a punch and are quite dramatic looking. 

Stark Naked is a peach-toned nude. It's one of the more matte textures in the bunch.


1993 is THE 90's brown tone. And it's quite a creamy satin texture. If you want it matte, you will either need to kiss a sheet of tissue or roll your lips together a few times to get rid of the shine.


Tilt looks tangerine in the tube but goes on with a neon coral undertone. A very fun shade, with more of a matte texture when worn.


Temper is a brick red. Possibly one of the less dramatic deep colors, because it's so wearable. The tomato-brown undertones give it slightly more neutral undertones compared to typical reds.


Bad Blood is one of my faves in the range. It's not actually a matte-matte; it's quite creamy, but it's a gorgeous deep red with oxblood undertones. Very classy and something of a 40s retro-red.


UD's signature purple in lipstick format. Bittersweet might be as creamy or more creamy than Bad Blood even. It takes about an hour or two to settle into a more matte finish. As with all purples it looks much more blue and outlandish on camera. In real life, it's got more pink undertones, and is actually pretty wearable as far as purples go.


If  a proper neon pink is more your style, check out Menace. This type of shade never goes wrong in matte texture. Menace is also one of the most "matte" of the range, and you'll get minimal shine compared to the other shades in the collection.


After Dark is special because it's the only matte shade shot through with a frost. This dark plum with a blue iridescence is pretty darned cool to look at. But the blue frost actually doesn't really look that apparent in real life unless you're looking very close. It's just a very dark plum. Also one of the more matte ones among the 9.


The shade that made my heart stop the moment I saw the full range was Blackmail.
Ah, you know I love a good noir. This black-rose shade has plum undertones, but mostly just looks almost-black against the skin. For all the dramatic goth divas only! I've heard complaints that this one goes on patchy but somehow I don't seem to have that problem. Maybe it's just my habit of really whacking on a very thick layer. I didn't have any problems building it up to opacity, except maybe near the center of the lips.

These are relatively creamy and easy to apply, with the exception of a couple pf shades (like Tilt and Menace for me) which feel a bit more like traditional matte lipsticks. They generally don't drag on the lips and feel pretty smooth but - these are highly pigmented lipsticks after all. And in my experience they will all feel slightly dry and look more matte after the first hour or so when the oils have absorbed or dried up a bit.

What shades caught your eye so far?

Thursday, March 8, 2012

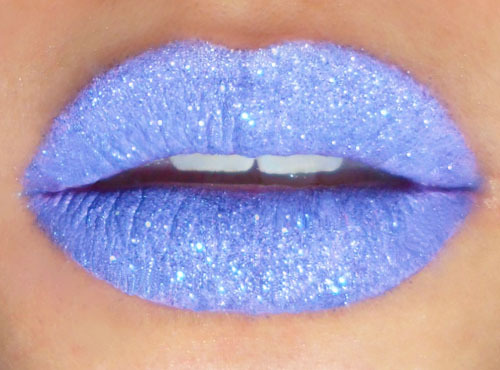
Lavender Sparkle “Stick-On” Lips

Lime Crime D'Lilac lipstick, coated with lavender glitter
No these aren't the latest Violent Lips tattoos. You can get the look by applying a layer of lipstick, and then gently packing on a couple of layers of glitter with a flat shadow brush.
For tips and tricks, click here!

Friday, January 13, 2012

Dramatic Metallic Lips: Making your own Lip Tars

Note: All images show D.I.Y. lip tars applied neat using a lip brush, without lip primer, liner or lipstick as a base!
Get your own metallic brown lips with a rich copper-brown pigment like MAC Chocolate Brown.

If you've spent some time being obsessed about OCC Lip Tars, you'll probably be interested to know that the formula is extremely simple. It consists mainly of oils and pigments. There's nothing really magical or all that hard to recreate aside from the color formulations, because matte pigments are harder to work with than metallic ones. 

Arm yourself with:
  • A light vegetable oil (avoid extra-virgin as these have a stronger smell and go rancid faster), jojoba oil, or silicone oil
  • a bunch of pigments in shades that you feel would make great lip colors
  • [Optional] skin-safe essential oils like rose, mint, etc. according to your preference
  • Clean plastic ziploc bag in the smallest size available
  • Small eye dropper bottle
  • Spatula/scoop


The steps are quite idiot-proof:
  1. Drop a scoop of pigment into a small ziploc bag and add about half the volume of oil
  2. Zip up and smoosh everything around, getting everything as smooth as possible. If the formula is too fluid, add more pigments. If there are lumps that refuse to dissipate, then slowly add a drop or two more oil. It's better to add too little oil at the start than too much, as you won't be able to go back if you've used all your pigment and the formula is too sheer.
  3. Test a tiny bit on the back of your hand. You should have a lotion like consistency and the formula can be as opaque or sheer as you want. If you're really going for the lip tar look, make sure it's opaque, but smooth to the touch.
  4. When you're done with the formula, cut the corner off the bottom of the ziploc bag and squeeze the mixture out into a small travel dropper bottle like you would pipe cake icing out of a bag.
And you're done!
Like lip tars, the pigments will settle to the bottom after awhile, so you will need to shake a bit before each use just to re-distribute the pigments.

It goes without saying these work better applied with a lip brush than applied with your fingers or from an applicator tube like actual lip glosses. 

Dark metallic purple home-made lip tar.
One thing to note whether you're using an OCC lip tar or a home-brew is that natural oils tend to absorb into the skin or dry up after a few hours, so the product will start to look less shiny and more matte. If you want a really sticky, high-shine finish, you will need to buy specialty ingredients like Versagel 750 ME, as lip balms and petroleum jelly won't quite cut it, although mineral-based or silicone oils tend to be shinier for longer than organic oils.

Metallic pigments tend to stay true to their finish and shade when suspended in a medium, but if you are working with matte pigments, you'll need to take note that they will always become darker once suspended. What looks like a bright neon pink powder will become a deep magenta once "wet".

To get it to look as light and bright as it does when dry, you will often need to slowly add in white pigment to slowly adjust and make the color "creamier", brighter and paler. If you're working with matte pigments, it's a good idea to have a digital micro-scale to weight how much of each pigment you added, or you will find it exactly hard to mix the exact same shade again once you run out of your current batch.

Electric pink creme-finish lip tar made with matte neon-pink and white pigments.