Showing posts with label home brew. Show all posts

Friday, January 13, 2012

Dramatic Metallic Lips: Making your own Lip Tars

Note: All images show D.I.Y. lip tars applied neat using a lip brush, without lip primer, liner or lipstick as a base!
Get your own metallic brown lips with a rich copper-brown pigment like MAC Chocolate Brown.

If you've spent some time being obsessed about OCC Lip Tars, you'll probably be interested to know that the formula is extremely simple. It consists mainly of oils and pigments. There's nothing really magical or all that hard to recreate aside from the color formulations, because matte pigments are harder to work with than metallic ones. 

Arm yourself with:
  • A light vegetable oil (avoid extra-virgin as these have a stronger smell and go rancid faster), jojoba oil, or silicone oil
  • a bunch of pigments in shades that you feel would make great lip colors
  • [Optional] skin-safe essential oils like rose, mint, etc. according to your preference
  • Clean plastic ziploc bag in the smallest size available
  • Small eye dropper bottle
  • Spatula/scoop


The steps are quite idiot-proof:
  1. Drop a scoop of pigment into a small ziploc bag and add about half the volume of oil
  2. Zip up and smoosh everything around, getting everything as smooth as possible. If the formula is too fluid, add more pigments. If there are lumps that refuse to dissipate, then slowly add a drop or two more oil. It's better to add too little oil at the start than too much, as you won't be able to go back if you've used all your pigment and the formula is too sheer.
  3. Test a tiny bit on the back of your hand. You should have a lotion like consistency and the formula can be as opaque or sheer as you want. If you're really going for the lip tar look, make sure it's opaque, but smooth to the touch.
  4. When you're done with the formula, cut the corner off the bottom of the ziploc bag and squeeze the mixture out into a small travel dropper bottle like you would pipe cake icing out of a bag.
And you're done!
Like lip tars, the pigments will settle to the bottom after awhile, so you will need to shake a bit before each use just to re-distribute the pigments.

It goes without saying these work better applied with a lip brush than applied with your fingers or from an applicator tube like actual lip glosses. 

Dark metallic purple home-made lip tar.
One thing to note whether you're using an OCC lip tar or a home-brew is that natural oils tend to absorb into the skin or dry up after a few hours, so the product will start to look less shiny and more matte. If you want a really sticky, high-shine finish, you will need to buy specialty ingredients like Versagel 750 ME, as lip balms and petroleum jelly won't quite cut it, although mineral-based or silicone oils tend to be shinier for longer than organic oils.

Metallic pigments tend to stay true to their finish and shade when suspended in a medium, but if you are working with matte pigments, you'll need to take note that they will always become darker once suspended. What looks like a bright neon pink powder will become a deep magenta once "wet".

To get it to look as light and bright as it does when dry, you will often need to slowly add in white pigment to slowly adjust and make the color "creamier", brighter and paler. If you're working with matte pigments, it's a good idea to have a digital micro-scale to weight how much of each pigment you added, or you will find it exactly hard to mix the exact same shade again once you run out of your current batch.

Electric pink creme-finish lip tar made with matte neon-pink and white pigments.


Saturday, October 22, 2011

D.I.Y. Liner/Sealant Formula

The good thing about a sealant is that it can be used to suspend pigments and glitter, so that you can apply an intense swatch of it as glitter or just foiling your pigments and shadows for a more dramatic look. There are ready-made formulas around from many brands but if you can't get hold of them easily, or at a convenient price, you can always make your own with the below ingredients.


Water:
  • Cheap
  • Works on pigments but not on glitters
  • Not long-lasting (pigments and glitter will fall off easily once the water evaporates)
Eye Drops
  • Gentle
  • Not too cheap but not very expensive either
  • Works on pigments but not on glitters
  • Does not seal makeup although it sticks better than water
Glycerin Solution:
  • 1/4 to 1/3 parts with water
  • Affordable
  • Does not suspend or cling to glitters
  • Does not seal makeup although it sticks better than water
Oil-free Makeup Remover: 
  • Foils shadows very well
  • Not expensive but not cheap either
  • Works on pigments but not on glitters
  • Does not seal makeup although it sticks better than water
Eyelash Glue:
  • extremely longlasting
  • gives very intense glitter liners
  • works with glitters but not with pigments 
  • have to apply the glitter AFTER you apply glue, which may be messy
  • pain to remove
  • expensive to use in large quantities
Experimenting with various glitters and pigments.

My Formula?
Gum Arabic solution.
Gum arabic is a natural gum of plant origin, and is used in pill coatings, confectionary coatings, painting and a whole variety of other uses. (But as with anything, if you tend to have sensitivities, just swipe a little on the inside of your elbow to see if you are allergic before use. I don't have any problem with it.)
  • This sealant sets into a "glaze" and will not rub off until you wash it (liners in top image are actually completely dry and budge-proof but look "glossy" and wet) 
  • You can easily get it from most Art Supply stores (usually the watercolor paint section) for a few dollars
  • You'll need to dilute it for use, which means 1 bottle will last forever
  • Don't use this if you need to smudge or blend anything. This will really set it.
Diluted gum arabic solution (30% concentration) in dropper bottle.

Get a dropper bottle and mix your formulations as per below:
  • 25-30% concentration - good for making liners and you will get a more budge-proof and glazed texture
  • 10-20% concentration - good for pigment or shadow foiling (do NOT wet your brush with this and touch it to your pan shadows as this will SEAL them)
  • 2-5% concentration - put a tiny bit into a spray bottle with toner and make your own makeup setting spray
Be sure to test on your hand the first time too. If your liner cracks or feels a little too thick after it dries, you'll know your formula is too concentrated.


Step 1: Apply black liquid liner to the lash line just to keep some definition. This will also serve as a guiding line for your glitter or metallic liner. 
Step 2: Add pigment or glitter slowly to a tiny drop of your sealant, and mix with your liner brush until the formula looks almost like it is becoming clumpy.

Step 3: Use a fine brush to apply your glitter liner just above and slightly overlapping the black liner applied earlier. You can use either a gel liner brush (small tapered flat brush) or a pointy super-fine brush like the one I used (get these at an art supply store).
Don't worry about applying an opaque and even line in a single stroke. You will likely have to make several passes as there won't be enough formula on the brush to finish your line. 


Step 4: Apply mascara last to finish the look. There will be no messy fall out to clean up, and your liner will last for hours and hours.


Cleaning up:
Gum arabic solution is water soluble, so if you get any on your hands, counter, etc, water will get it right out easily. However, like any makeup, the glitter and pigments themselves will cling to your skin, so to really remove it from your skin at the end of the day, make sure you use a proper face wash or makeup remover and rub gently to dislodge everything.

Monday, August 15, 2011

How to even out NYX Narcissus Lipstick, plus a tutorial!

Top-to-Bottom: NYX Narcissus Round Lipstick, Revlon Stormy Pink Matte Lipstick, layered for an even, opaque finish.
Narcissus is one of NYX's best-sellers, but I'm one of those who feel the texture leaves much to be desired. Unlike many of the creme formulas, Narcissus is a semi-shimmery, bright doll-pink which has been compared to MACs Viva Glam Gaga.

The problem is that the very-creamy, slightly-shimmery texture does not adhere to your lips well, so it will sink into lines, and streak and smear around every time you press your lips together. With a shade this bright, any unevenness is extremely obvious.

The trick? Layer this over a matte lipstick. 
The matte texture will absorb some of the grease in the texture and make Narcissus less slippery. This means it will stay more even on your lips. You can use a nude lipstick or even some concealer, but to retain the original intensity and not mute the color, a bright pink that is very similar in shade would be your best option.

NYX Narcissus layered over Revlon Matte Lipstick in Stormy Pink gives a more even and opaque finish, without visibly altering the color.

Wine-smoked Eye Look with NYX Narcissus lipstick: (Click for tutorial!)

Wet n Wild Coloricon in Knock on Wood, NYX Blush in Silky Rose, and NYX Narcissus lipstick


Monday, July 18, 2011

Color of the Moment: Getting that Nina Ricci F/W 2011 Milky-Salmon Lip!


Remember the gorgeous creamy-salmon lip color on the Nina Ricci F/W 2011 catwalk 
every magazine editor was raving about?

Pat McGrath just disclosed the formula. 
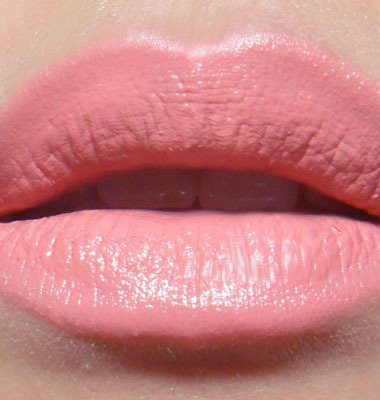
Mix concealer with a coral shade to get that perfect blend. I used MAC NW25 (it's more pink than an NC, and it has the best opacity and texture for the lips) with 2 coral-ey colors. One is more peach and one is more pink. It just depends on your skin tone and preference.


I tried all kinds of lip concealers, nude lipsticks, etc. MAC NW25 + Revlon Kiss Me Coral Super Lustrous Lipstick (bottom swatch) is a win.


If orange is not your thing, and you want to lean a little closer to pink, Rimmel's Pink Fame Color Show-Off Lipstick (hot coral-pink at top-left) gives an even brighter, pinker dupe when paired with a concealer. Replace the Revlon with this if you want a really true-to-catwalk version.


I do recommend using a paler or deeper concealer depending on your skin tone, and to always choose a slightly salmon shade regardless of whether your skin is warm or cool. It should not be too deep or dark or the effect is spoilt. 

To mimic the matte texture that McGrath did (and I did not), layer a single-ply of tissue over your lips, and dust over with translucent powder before applying another layer. You might want to scrape some product into a small jar and pre-mixing it so that you have a consistent shade for touching up.

Pair with bronzed skin for best effect!