Showing posts with label hot pink. Show all posts

Thursday, April 30, 2015

Shade Highlight: OCC Yaoi Lip Tar


I'm a complete OCC Lip Tar addict. I have probably around 40 tubes in total, and have been collecting them since a few years ago. 

Which is strange if you consider the fact that these are some of the most basic beauty products in the world. They are literally oil and pigments/dyes with some preservatives. That's it. But somehow they're just perfect in their simplicity. 

That said, I do happen to prefer most of their creme (or what they now call "Matte") colors because some of the metallic ones can have a slightly odd consistency. The sparkle pigments are a bit coarse, which makes for a more visible sparkle, but also a texture that is more gritty on the lips, and also tends to sink into lines and emphasize flakes more.

The darker metallic shades are much nicer in general than the pale ones because the darkness makes them automatically appear more even. 

But I do love me some Yaoi.

OCC Yaoi worn over fuchsia lip liner

If you didn't know, Yaoi in Japanese refers to "Boys' love" roughly. I.e. a specific genre of manga and fiction in Japan popular among some women, which depicts romantic attraction between boys/men. Don't ask me. I don't get it. But I do get this lip color.

It's a frosty neon, blue-toned candy-pink. In fact, I'd probably describe it as a metallic/semi-sheer version of Candy Yum Yum from MAC.


It's such an over-the-top, potentially-tacky, frosty Barbie color that it's actually cool. 

You can mix a teeny tiny bit with clear gloss for a sheer frosty pink, or just lay it on strong for that shiny lip effect. What I will recommend if you want to wear this at full intensity, is to 
  1. apply it over a hot pink lip pencil or a matte lipstick. Lip Tars are oil and pigments. They contain no wax, so they WILL bleed. There is no getting around it. Also, the metals have a bit more of  a tendency to be sheerer and not as opaque and even as the creme textures, so a base layer of color will ensure everything looks even.
  2. start small. Apply just a tiny bit first, and add more if you need more. This is more true for the matte colors than the metallic ones, but it's still good to use less because when you over-apply, everything slides around.


Frosty opaque lipsticks have been out of fashion since the 80s, so wearing this looks instantly retro. My favorite OCC pinks are probably still Pretty Boy and Anime, but I have to say - this one is still fun fun fun.

Do you own any metallic Lip Tars? And what colors are they?

Monday, May 27, 2013

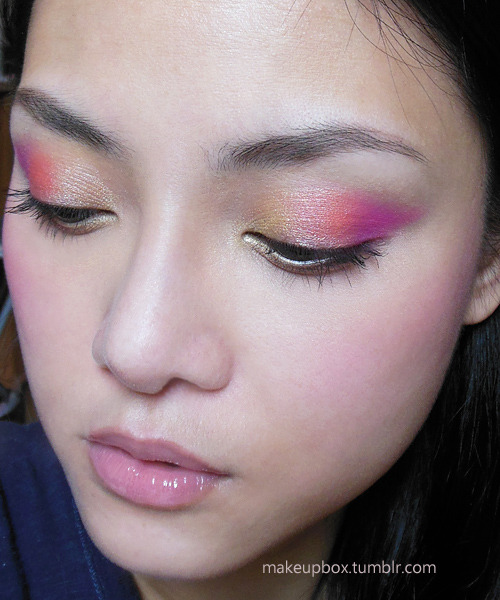
The Summer Wing: Easy Gold, Coral and Neon-Pink Winged Eyes


This is an easy gradient winged eye and actually more flattering than you might think neon pink shadow would be.
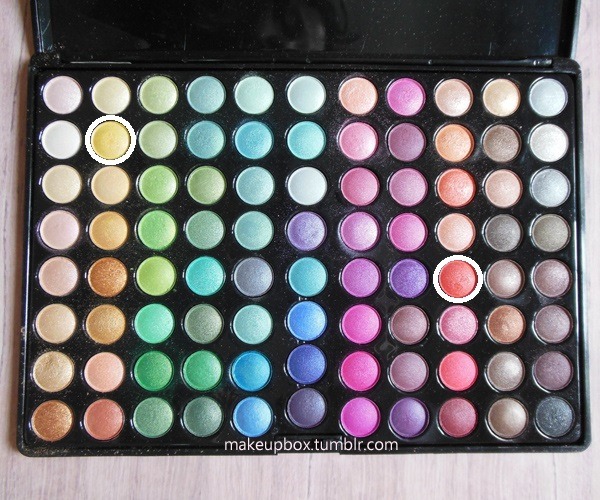
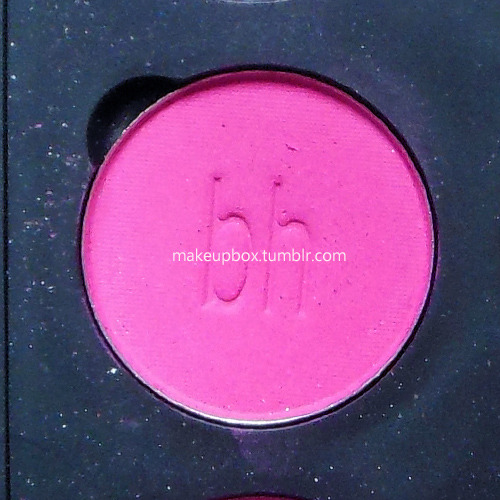
The 3 main shades are yellow, coral, and fuchsia, but the key to the look is that I used 2 shimmers in the 88 Shimmer palette for the yellow and coral, then switched to a matte neon pink (BH Cosmetics WM20) at the outer corners. 
This creates more strength to the look, although you can also use one of the fuchsias in the shimmer palette if you want to save the trouble. A matte is just more flattering when you're wearing a neon pink on the lids, in my opinion.

Monday, February 20, 2012

NYX Sweet Pink Matte Lipstick


I mentioned this lipstick quite a few times and thought it was about time to do more of a feature.
NYX Sweet Pink is a deep, matte magenta which is strong and bright, but one shade less neon than shades like Barry M Shocking Pink or MAC Candy Yum Yum. If you want to try a hot pink but are afraid of neon notes, then NYX Sweet Pink is a fabulous, more lady-like alternative.

Magenta Balenciaga with NYX Sweet Pink Matte lipstick.

Friday, January 13, 2012

Dramatic Metallic Lips: Making your own Lip Tars

Note: All images show D.I.Y. lip tars applied neat using a lip brush, without lip primer, liner or lipstick as a base!
Get your own metallic brown lips with a rich copper-brown pigment like MAC Chocolate Brown.

If you've spent some time being obsessed about OCC Lip Tars, you'll probably be interested to know that the formula is extremely simple. It consists mainly of oils and pigments. There's nothing really magical or all that hard to recreate aside from the color formulations, because matte pigments are harder to work with than metallic ones. 

Arm yourself with:
  • A light vegetable oil (avoid extra-virgin as these have a stronger smell and go rancid faster), jojoba oil, or silicone oil
  • a bunch of pigments in shades that you feel would make great lip colors
  • [Optional] skin-safe essential oils like rose, mint, etc. according to your preference
  • Clean plastic ziploc bag in the smallest size available
  • Small eye dropper bottle
  • Spatula/scoop


The steps are quite idiot-proof:
  1. Drop a scoop of pigment into a small ziploc bag and add about half the volume of oil
  2. Zip up and smoosh everything around, getting everything as smooth as possible. If the formula is too fluid, add more pigments. If there are lumps that refuse to dissipate, then slowly add a drop or two more oil. It's better to add too little oil at the start than too much, as you won't be able to go back if you've used all your pigment and the formula is too sheer.
  3. Test a tiny bit on the back of your hand. You should have a lotion like consistency and the formula can be as opaque or sheer as you want. If you're really going for the lip tar look, make sure it's opaque, but smooth to the touch.
  4. When you're done with the formula, cut the corner off the bottom of the ziploc bag and squeeze the mixture out into a small travel dropper bottle like you would pipe cake icing out of a bag.
And you're done!
Like lip tars, the pigments will settle to the bottom after awhile, so you will need to shake a bit before each use just to re-distribute the pigments.

It goes without saying these work better applied with a lip brush than applied with your fingers or from an applicator tube like actual lip glosses. 

Dark metallic purple home-made lip tar.
One thing to note whether you're using an OCC lip tar or a home-brew is that natural oils tend to absorb into the skin or dry up after a few hours, so the product will start to look less shiny and more matte. If you want a really sticky, high-shine finish, you will need to buy specialty ingredients like Versagel 750 ME, as lip balms and petroleum jelly won't quite cut it, although mineral-based or silicone oils tend to be shinier for longer than organic oils.

Metallic pigments tend to stay true to their finish and shade when suspended in a medium, but if you are working with matte pigments, you'll need to take note that they will always become darker once suspended. What looks like a bright neon pink powder will become a deep magenta once "wet".

To get it to look as light and bright as it does when dry, you will often need to slowly add in white pigment to slowly adjust and make the color "creamier", brighter and paler. If you're working with matte pigments, it's a good idea to have a digital micro-scale to weight how much of each pigment you added, or you will find it exactly hard to mix the exact same shade again once you run out of your current batch.

Electric pink creme-finish lip tar made with matte neon-pink and white pigments.


Sunday, January 8, 2012

Drugstore Fuchsias: Swatches and Tips for Application

Selection of  drugstore Fuchsia shades
Fuchsia is not a daily shade for most people, but there are some occasions when you want a strong lip and red is not always the easiest shade to get right. If you can't seem to get reds to work for your skin tone, or have the sort of face where reds just make you look a little aged or severe, a good alternative to try is a fun, deep, fuchsia pink.
Technically speaking, a fuchsia is a very strong and bright blue-based pink, maybe not so bright that it's highlighter-pink or so dark as to be called rose, but as we all know, what one person considers fuchsia can be very different from another's. I've chosen something of the middle ground where the shades are quite deep relative to other pinks, but still have a touch of bright blue tones to them.

Swatches L-to-R: Rimmel 220 Shocking Pink, Sephora R11, NYX Louisiana, L'oreal 288 Intense Fuchsia, and Revlon 330 Fuchsia
I own several of these deep, and the main difference between them are in the base tones (whether they lean more towards a hot red or towards a cooler magenta). Which to wear depends on your skin tone and preference. I am not one of those color nazis who will tell you that if you have "warm skin" you should wear "warm fuchsias". There's no such rule. 
Just note that a warmer red-fuchsia will tend to "fit in" better and look less bright, whereas a blue based one will tend to stick out more, regardless of whether you are warm or cool toned. This is regardless of your skin tone simply because a bright blue-pink is not a shade that occurs in nature and will provide more contrast. 

Of the shades I own, I probably wear Revlon Color Burst 030 Fuchsia most due to its good, creamy texture and the fact that it does not stain my lips. It's not the most opaque (L'oreal, Sephora, Rimmel and NYX matte are more pigmented) and it's an interesting blend between something with a rather warm red base tone, paired with a faint blue sheen which does not look like noticeable shimmer (thank goodness) but pulls the shade toward the cool side in some lights.

Revlon Colorburst in 030 Fuchsia
My latest acquisition is L'oreal's Intense Fuchsia, after I saw it on Gwen Stefani in the latest issue of InStyle magazine. But don't you hate how Photoshop and photography lies? It was nothing like the intensely blue-toned pink shown on the cover image. L'oreal Intense Fuchsia is more of a red-based strawberry fuchsia with a faint hot pink sheen (not too noticeable on the lips).
It's not that it isn't a nice shade, but you aren't going to get that glorious electric pink with a noticeable blue sheen that Gwen was sporting.
Texture-wise, there is nothing to complain about. I always found Colour Riche lipsticks to be very pigmented and lusciously creamy without being cheap and slippery. But beware that this lipstick stains big-time. This means that over the course of the day, your lipstick will start to look darker and more red, as the dyes color your lips more and more, and it starts to show up beneath the fuchsia. You'll end up with a bright strawberry rose, which is lovely, if that's the shade you're going for.

Rimmel Shocking Pink is similar to this deep red-pink shade, but is fully matte, and does not contain shimmer, so it will look a tad deeper when applied as there is no sheen or shine whatsoever.

L'oreal Colour Riche in 288 Intense Fuchsia
 NYX Louisiana is not technically a fuchsia by my book, but a lot of people describe it as a hot pink on review sites, so I thought I'd include it for comparison purposes, just to show you why I don't consider it so.
Compared to the other shades in the swatch image above, Louisiana is a lamb among wolves. It's softer, warmer, and has more noticeable deep-peach undertones although it's by no means a pale shade. If you're new to hot pinks or are afraid of going too over the top for work or school, this is a safe shade that will still stand out without being too electric.
The blend of pink, red and peach is also quite a flattering shade for most skin tones. Beware though, that the texture is the typical NYX texture which is not going to feel very rich and luscious. It's waxy and slippery, with a plastic taste, but at least for this particular shade, it doesn't look as cheap as it feels.
NYX Louisiana Round lipstick
 This brings me to one of my cooler fuchsias. Sephora's line of lipsticks are hits and misses for me. (Actually, more hits than misses.) It might not be considered a drugstore for most, but I included it as the price range is similar.
R11 (the case does not include the name... it's only labeled on the plastic seal, which is silly as you throw it out...) is a deep magenta pink which is probably closest to a true fuchsia tone. The coverage is opaque, the texture is very much like a high end lipstick, and the finish is creamy and moisturising. There is no shimmer whatsoever, so this is a true creme finish.
It also does not stain, so if you like cool toned shades, I highly recommend this.
Sephora Rouge R11
I had to throw in an honorable mention which I did not include in the swatches when I was taking the pictures.   I'm not sure why I forgot it when I was taking pictures in preparation for this post the day before. 
NYX matte lipstick in Sweet Pink is another true cool-toned magenta pink, even more blue than Sephora R11, but not electric bright.

It has a wonderful creamy-matte finish and is one of my favorite blue-based shades to wear, as it makes your skin glow and your teeth look whiter. If you're drawn to but still afraid of shades like Shocking Pink and Candy Yum Yum, you'll be happy to know that this shade is nowhere near as bright. And the opaque matte texture means it stays on very well.

The only minus to this affordable-but-expensive-looking shade is the scent, but hey, that's a small problem for a good lipstick.
NYX Sweet Pink Matte Lipstick
Application Tips:
The problem with wearing any bright lipstick for hours is the feathering and/or fading. It always look gorgeous when just applied, but after 3 hours of talking, drinking, or general wear and tear from pressing your lips together, etc, you will find the edges of the lipstick have smeared or feathered into an unflattering mess. 

Matte formulas can minimize the problem but they may not eliminate it unless the finish is very dry. And not everybody wants to wear a full matte lip.

This is what I do to keep everything under control when I wear a fuchsia lip (demo using Revlon Fuchsia) out for a full 12-hour day:

Step 1: Apply a lip primer over the lip line (I use POP Beauty's Lip Magnet, which is a very sheer beige that does not change the color of lipsticks), and rub with fingers to even out and remove access.

Step 2: Apply lipstick to the lip area, without going beyond your lip line. 

 Step 3: Gently kiss a sheet of tissue to remove the moisture and some of the excess pigments.

Step 4: Use a fuchsia lip pencil (NYX Fuchsia is great and affordable, but if you're particular about brands, MAC's Chromagraphic Pencil in Process Magenta is a great liner for most fuchsia shades), and lightly run in windshield wiper motions along your lip line. I say windshield wiper motion because you are not going to get a perfect line in a single stroke. You want to almost fill in the lip line with your pencil, so you create a thicker barrier around the edge of your lips.
NOTE: You can choose to fill in your entire lip with the pencil first, but I don't like to weigh down the color and texture of my lips that way, so I only fill in the outer edges.

Step 4: Reapply your lipstick as layering will intensify the color and shine, and lock it in.
Then with your finger, very lightly and gently dab along the outer edges of your lip line to remove any excess emollients. If you end up removing too much product, go back in and replace it with the fuchsia pencil. Not the lipstick.
Remember; the key is to keep the outer-most edges matte so the lipstick does not bleed over the course of the day. Dabbing just at the edges will help you to achieve that while keeping most of the lip looking glossy and moist.

For a day-appropriate look, I like to pair it with very neutral eyes and a soft pink cheek to keep the whole face reined in. 


Tuesday, November 29, 2011

Pink Aura: Smoky fuchsia, purple and grey look (Urban Decay 15 Year Anniversary Look #3)


This is a 3rd look created with the Urban Decay 15 Year Anniversary Eye Shadow Collection (I've getting my money's worth, dang it). I'm doing the "MAC Smoky Eye" with deeper shades at either corners, and the lightest color in the center of the lid. The overall look is colorful but soft and blended with no hard lines or edges.

The 3 shades used for this look are:
  1. Junkshow: duo-chrome satin fuchsia with blue sheen (MAC Stars n Rockets is higher-sheen but similar)
  2. Omen: duo-chrome medium satin-purple with blue sheen 
  3. Ace: Smoky metallic grey 
You don't need to use shades with exactly the same duochrome effects (although that would be fun). Matte and regular shimmer would work just as well. 

Step 1: Pack the bright pink shadow into the center of the lid and smoky gently up just above the socket line. When your eyes are open fully, you should see a bit of pink peeking above your eye lid fold.


Step 2: Pack the medium purple shade onto both sides of the pink, taking care to stop just short of the inner most and outermost corners. (The purple looks grey here due to the angle of the light. See bottom-most picture for the true shade.)

Step 3: With a pointed pencil brush, run a smoky grey shadow along the lower lash line, then pack into the outermost corners of the upper lid. With what is remaining on the brush, sweep gently inwards along the outer half of the socket line to sculpt the eye a little, and dab into the inner corners of eyes as well.
With a soft blending brush, blend out any harsh edges to the grey.


Step 4: At this point, if you've muddied up any of the colors, use your finger to gently dab more purple and pink onto the respective areas. This will intensify the color.
For a little extra oomph, I applied purple metallic pencil  to the waterline (you can use regular grey or black but that trace of purple is just much more interesting). Finish with black mascara!
Picture taken with flash