
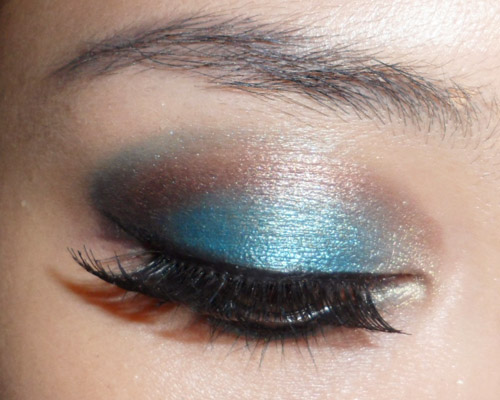
This is a twist on the traditional colorful eye, created by alternating 2 shades concentrically outwards. It's definitely a dramatic look, and plays on subtle color and a very strong, defined eye line. The shape of the look means it will only work if you have a crease. If you don't, but want to recreate this look, you will need to use lid glue to create a fold or the colors will not show up.
I'm not categorizing this as an Urban Decay 15 Year Anniversary Look, as one of the key shades is a russet metallic brown pigment from MAC called Copper.
Products Used (All Urban Decay shadows are from the 15 Year Anniversary Palette:
- A teal blue shadow (Urban Decay Deep End)
- Rich russet brown shadow (MAC Copper - you can also use MAC Sable)
- Matte black shadow (Urban Decay Blackout)
- Pale sheer-gold shadow (Urban Decay Vanilla - you can use MAC Vanilla pigment)
- Black kajal (The Body Shop)
- Black liquid liner (Bourjois Liner Pinceau 16 Hr)
- False lashes
Step 1: Pack the teal blue right in the center of the lid, leaving just the innermost and outermost corners bare as other colors will be packed in there.

Step 2: With a pointed brush, run a coppery brown shade along the crease, stopping short of inner and outer corners as well. You can use a normal brown for the crease color, but a red-toned one stands out better against the teal blue on the lids.

Step 3: Fill in the outermost corner with matte black. Do not pull up into a wing or flare. This is important for the next step.

Step 4: With a pointed pencil brush, pick up the teal blue shadow again, and run it lightly around the rims of the deep copper shade, blending into the black at the outer most corners. Then with a very soft blending brush, blend the outer corner gently so you don't have any overly-harsh lines.

Step 5: On the inner corners, apply just a touch of pale, translucent gold and very gently blend in and up just to tie the colors together. Then apply black kajal generously to the water line. You can use any black pencil but I recommend kajals if you can get hold of them, as they have this beautiful creamy sheen to them.
IMPORTANT: After applying kajal along the water line, use a fine pencil brush to run teal blue shadow right under it, along the bottom lash line. This sets the outer edges of the pencil and prevents smearing. Repeat at innermost corner using the pale gold.

Step 6: Apply black liquid liner along the upper lash line, then curl lashes and apply falsies to complete the look.
Woah! What falsies did you use here? This looks incredible~
ReplyDeleteHi Eden-Avalon, these are random synthetic lashes I got from the local SASA (it's our version of a cosmetic company outlet) from a brand called "Fairy Lash". I initially picked them because each lash strand looked so beautifully tapered (even human hair lashes don't end in those ultra fine points). These can pass as expensive mink lashes.
ReplyDeleteIn reality though, they are a pain to work with because the lash bands are so stiff, and I wouldn't really recommend them unless you want to risk them popping off every two hours. :/ Totally impractical.
Love this Banded Smoky Eye using Urban Decay Deep End and MAC Copper pigment—stunning blend and depth. king von puffer jacket vibes add unique contrast and bold fashion energy style.
ReplyDelete