
Transfer foils were created for arts and crafts. Then some genius decided to use it on nails. Not long after, some people thought it might be a good idea to attempt it on the lips.
(That didn't go too well, because while it looked cool when it was done perfectly - a la Katy Perry - very few people ever managed to do it perfectly. Tons of women ended up with disappointing patchy, cracked-looking lips.)
Since I've got tons of foil (I buy mine from dollarnailart.com), I naturally wondered about using it for other things. It is BRILLIANT as a dramatic transfer tattoo on the body, But what about the eyes?
The Adhesive:
While there isn't anything harmful about applying the water-based nail foil adhesive onto your hands and body in general, applying it to the eye was another thing altogether. Because companies are so hush-hush about the ingredients of their glues, I could only guess at what ingredients Shizzle Lips and Glitzy Lips used in their "lip approved" skin-safe glues and whether they were mostly similar to nail foil glues.
You only need to know that you can use lash adhesive (if you have a strong and thick formula like Duo, add a tiny drop of water to thin it out before applying with a brush or it will be too hard to spread nicely).
The Foils:
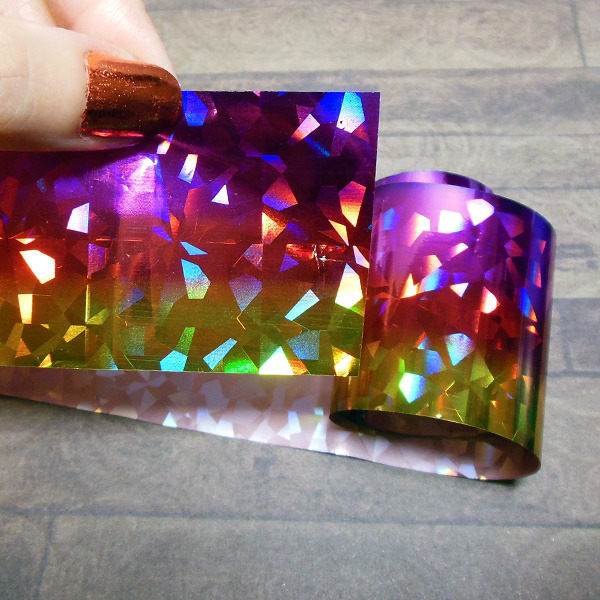
It's the same thing no matter where you buy it from. These are layers of reflective or holographic ink that isn't toxic or reactive in their dry state. Whether you pay $1 at Dollarnailart.com or $29.90 for Glitzy Lips, it is EXACTLY THE SAME THING and they work the same way.
The strip I chose was unfortunately part of a jumbo pack from eBay, which doesn't have a name or number. You can substitute any other color foil though I recommend a strip that has a similar ombre gradient if you want the same effect I got. At dollarnailart.com, a similar alternative would be Wrapping Paper or Wildberry Splash.

Step 1: Start with very clean skin. No lotion, no makeup around the lid area or the glue and foil will not stick properly. Apply a layer of glue evenly to your lid, like you would apply a thick swatch of liner. Let dry for 2-3 minutes, then go back in with a 2nd coat. Let dry another 2-3 minutes. This minimizes patchiness and will ensure you have a strong layer of glue that can grab onto the foil.


At this point, you're likely to have some patches where the foil didn't stick properly. You can always dab more glue on those areas, let dry, and then go back in with foil to patch up.

Step 4: There will be a bit of a gap between the lashes and the foil, and this is where you go in with black gel liner to fill in. Along the top edges, if there are bits of foil that are sticking out or the edge is uneven, simply use a cotton bud dipped in rubbing alcohol to gently smooth it out just a bit. You won't be able to get the edges completely perfect, so don't worry about it.

Go back in with a matte black shadow and a softer brush to gently smoke out the line so it isn't too harsh.

Finish with mascara, and [optional] a little beige or yellow pencil along the lower waterline.

Foils are waterproof and last quite well through the day unless you wet them and rub vigorously. Everyone is going to wonder what the HECK is on your lids every time you blink.
Perfect statement-look for a party or the club!
Clean-up?
Just use regular makeup remover and a cotton pad or napkin to remove your eye makeup. Moisture plus a bit of firm friction will rub it off the same way craft glue or false lashes can be peeled off the skin.
Omg that's amazing!
ReplyDeleteThanks, Stella! (I must admit I didn't think it would work at first. Foil can be so finicky on skin!)
ReplyDeleteThank you for your information, your blog is so informative and intresting.
ReplyDeleteNoida packers and movers
Delhi packers and movers
Gurgaon packers and movers
Faridabad packers and movers
Packers and movers Indirapuram Ghaziabad
Delhi movers and packers