Showing posts with label bright lips. Show all posts

Tuesday, January 5, 2016

L'oreal Colour Riche Star Collection Lipsticks (Singapore Release) Shades and Swatches


L'oreal Paris has released their Star Collection lipstick series globally; and the shades are grouped into Pure Reds and Pure Nudes with the premise that everyone has a perfect nude and a perfect red that complements their skintones.

I definitely agree with that, but I really wouldn't restrict myself to ONE nude and ONE red. Considering how many different undertones there can be, that would be too boring!

In Singapore, the collection has been distilled down to 8 shades (SGD$21.90), each tagged to one style icon and bearing their signature on the cap. I do really like several of these - especially the Reds, and I'll tell you why later.  I daresay most people will find at least a couple of colors that they like in the series.

I still highly recommend swatching the testers in store whenever possible, because that's the only way to check the true shade of the lipsticks. The color indicators outside are not often that accurate for showing how they will look on skin. And - please - do not use the display images of the stars in store to try and guess which will suit you.

Below are the 8 swatches taken under white daylight lamps (these are pretty much what you get standing by the window in the day), and a brief description of the shades and what sort of skin tones they are recommended for.


STAR COLLECTION PURE NUDES
Star Collection Pure Nudes (from front): Barely Coral, Barely Pink, Barely Plum, Barely Moka

Who doesn't love looking at marshmallow-y soft colors like these?

The Pure Nudes come in gold tubes, and are creamy in texture. I had initially been expecting the nude shades to be more universally wearable but upon swatching I realized that these are quite pigmented on the lips and 3 of the 4 shades are on the paler side, so they can come off a bit too pastel or ashy on medium to tan skins. Make sure you try these on before buying, just to see how they look against your face.


Barely Coral - fronted by Fan Bing Bing, this is a soft creamsicle orange-nude better suited to pale to medium-fair skins with yellow undertones

Barely Pink - is what I call a "beach bunny" nude which often makes people look more tan. The color is fronted by Doutzen Kroes and I would say it sits better on neutral to slightly pink-toned skins and will look more dramatic and pastel on yellow skin tones.

Barely Plum - more a dusty mauve pink bearing Sonam Kapoor's signature on the cap. It's not as pale as Barely Pink, but it's very cool-toned, so it will sit nicely on neutral to pink skin tones, or the very pale-skinned, but might look a bit ashy on yellow toned skin.

Barely Moka - possibly the most universally forgiving shade of the 4, this neutral creamy caramel brown bears Gong Li's name, and will suit a pretty wide range of skin tones. If you're very pale, it can look quite monochromatic so you might need a nice warm blush to pep up your face. For medium skins it's a nice warm toffee, and on deeper skins it's a great non-chalky nude.
I love the texture of this formula but I personally would pick Barely Moka and possibly Barely Coral from here if I want a more dramatic pale-nude look. I have a medium-light yellow-based skin tone and the two pinks look a bit stark on me. These are not sheer lipsticks, so they won't be as forgiving on non-complementary skintones. Not to say you can't wear all of these if you are medium to tan - just expect them to look quite dramatically pale on the lips.

STAR COLLECTION PURE REDS

Now, the Pure Reds I love. Every single shade. These come in black tubes and have more of a satin, semi-matte texture compared to the creamy Pure Nudes. They don't feel too drying on the lips, but just have a much more muted sheen and more intense color.

Ironically when I first saw the 4 colors printed on the store displays, which are (let's be completely honest) photo-shopped onto the lips of the stars, I wasn't sure what they would really look like. It's partially a problem with print quality, partially lighting, partially just what happens when you try to photo-shop someone's lips a completely different color from what they originally are.

Star Collection Pure Reds (from front): Pure Vermeil, Pure Amaranthe, Pure Fire, Pure Scarleto
Even looking at the colors in the lipstick tubes, especially if you are looking at these under bad store lights, you might not be able to see the clear difference between Pure Vermeil and Pure Fire, or Pure Amaranthe vs Pure Scarleto. Because these swatch completely different from how they look in the tube.

The formula of the red dyes used for this range have a tendency to look over-saturated in the bullet and come off more red than they actually apply. Don't believe me? See swatches below!


They are actually very different, and I wouldn't even classify Pure Amaranthe and Pure Fire as "reds" at all. Which is fine - because all 4 shades are GORGEOUS intense shades which manage to be both bright and deep at the same time, so they will look beautiful on a majority of skin tones. And to think I would not have known if I hadn't swatched them at home. 

Pure Vermeil - coral-based red; this beautiful bright red shade has a touch of orange and a touch of pink and probably looks good on most skins. Fan Bing Bing's signature is on the cover.

Pure Amaranthe - L'oreal has an older shade called Amaranthe in the regular Colour Riche line, which is a creamy deep pink that I love. This gorgeous deep magenta beats that one hands-down in the drama department, and has enough red in it that it's not too cool or blue-toned for yellow-based skins. I would say pretty much anyone can wear this and look good. Gong Li's signature graces the cap.

Pure Fire - bright saturated orange with a shot of red. This is a glorious shade that would look good on yellow to neutral skins from pale to deep. If you have a neutral to pink undertone, you might still be able to pull it off. Just make sure to neutralize any areas of redness with foundation or concealer first. Li Bing Bing fronts this shade in the visuals.

Pure Scarleto - a true ruby red for that classic old Hollywood look. It's different from Pure Vermeil as this is deeper, more grown-up almost, and doesn't have that neon undertone which makes Pure Vermeil "pop" against the skin. I can see all skin tones pulling off a true red, although it's especially flattering on medium to tan girls who don't want something too bright. Blake Lively's signature is stamped on the cap of this shade.
I love the Pure Reds and would recommend them all. They each give a very different look on the face, but in terms of uniqueness I would go with Pure Vermeil, Pure Amaranthe and Pure Fire, simply because they're such fun shades. Pure Scarleto is good but a classic red shade a lot of people might already own in one form or another. If you don't then check this one out. Do note these have great staying power but do leave a stain on the skin after removal.
Tip:
On some lips, some of the pigments in these intense bright colors can go on darker. I'm not sure if it's the liquid dyes or oxidation or just the color of the natural lip coming through. If this happens to you and you want to maintain the brightness instead of having it show up as a deeper more red tone, simply buff a tiny bit of foundation or a matte beige eye primer over your lips before applying lipstick. This will help the lipstick pigments "float" and stay true. 


HEADS-UP!

There's a Lunar New Year promotion going on from Jan to Feb 2016. Purchase any 2 Colour Riche Star Collection lipsticks for $32. Perfect time to try out all the different reds I say!

Sunday, March 15, 2015

Laneige Two Tone Lip Bars: Swatches and Best Way To Apply Them


Ombre lips have been a big thing for a few years now, especially in Asia where the preferred style of "ombre" is more of the "stained" look, where there is a deeper or more intense color on the insides of the lips and a lighter, more muted shade around the outsides. 

This is not the same as the more dramatic style of ombre lips featured more commonly on social media among Western communities, where the top and bottom lips are different colors, and fade into each other in the center. 

Most of us bring two lip products out to achieve that effect, so a few brands have more recently come up with two-toned lipsticks to help reduce clutter in makeup bags. Laneige is the latest to create a series of Two Toned Lip Bars (SGD$34), that aim to to make ombre lips a one-step one-produce process.


The bars come with 2 shades stacked diagonally, and what you're supposed to do is to apply them vertically, with the deeper shade towards the center of your lips. (Or outside if you want your lips darker outside.)


Just remember to flip the bar upside-down when moving from top lip to bottom lip, cos otherwise you end up with a very strange striped effect instead of an ombre look.

The cons?
I'm not entirely sure you can get a seamless ombre effect in a single stroke without doing some other things to tidy up. Even when applied neatly and perfectly, the difference between the two shades can still look a bit harsh. The fact that they stacked the two shades together diagonally helps a bit, but doesn't blend the shades together enough without a little extra effort in my opinion.

And several of the shades in the range have a pale shade which is so muted and nude that when applied, it can make your lips very thin and mean, like in a press visual of Song Hye Kyo which actually looked a bit scary. But almost anyone can wear ombre lips, unless your lips are really extremely thin, or very mature and lined.

I'm using duo No 4 below to illustrate. 
This is a scarlet and white/clear duo, so the shades should blend together to give you a vibrant rose. But for most people, it can look harsh and geisha-like because of the huge contrast between the red and the white. In some cases, it looks like you simply applied lipstick in the center of your lips and forgot to blend.


So this is what I do to get the effect I want with ombre lips.

  1. Apply the lip bar vertically on both lips (like shown above).
  2. Flip the lip bar horizonally sideways and run it across the center of each lip just where the 2 colors meet. (When you hold it sideways, you get an automatic mix of both shades, and this allows you to blend out the pale and deep shade on your lips so they fade into each other more beautifully.)
  3. Run a nude lipliner lightly along the borders of your lips to add some definition to the shape if your lips look very thin wearing ombre. The liner won't look obvious but it will help to make the edges of your lips more visible. 


Voila, no more harsh line between the white and the red. And I don't look like a geisha. 


If you prefer the more dramatic contrast between the two shades, just follow Step 1.

For me, to get the softest, most kissable, fullest-lip effect, the "mixed shade", the medium color you get when you mix two colors, should take up the most space on your lips. Only the outer edges and the very center where your lips meet should be very deep and very light. And you can only achieve this effect if you apply the lip bars vertically first, then horizontally to blend the colors. 

That said, I do actually like these lip bars a lot. They take the hassle out of bringing two colors out with me, and the textures and pigmentation are amazing. Every one of these is extremely intense and creamy, and I have 10 swatches below. Some of the shades are quite hard to remove from the lips actually. The colors do cling and stain a bit, but that also means they last.

Apologies for an error in the shade numbers; the print was too tiny; No 3 here is actually No 8.

(Apologies - just checked a press document and realized that I labeled No 3 and 8 wrong. The print on the bottom of the tubes is so tiny and the manufacturers like to stamp serial codes ON TOP of them. Couldn't see through that!)

As per above, shade marked No 8 is actually No 3!

What are my faves here? Just initially, I like No 2, 6, 7, 8, 9, 10.
Yeah I'm no help narrowing things down. It's fun experimenting with these!


Friday, June 21, 2013

LIP TARS: What they are, how they work, what I think of some of the colors.

Obsessive Compulsive Cosmetics Lip Tars
I was recently asked my thoughts on Lip Tars and whether I thought it was worth it to invest in them. Well, I own 5 tubes so that's saying something. The thing to remember though, is that it's not for everyone. I'd recommend it if:
  1. You need to enjoy "mixology" and blending colors to make your own,
  2. You LOVE very strong accent makeup on your lips and you don't mind spending more time on your makeup, OR
  3. You're a makeup artist and you need to do both of the above.

 Most people would have no use for lip tars because:

  • They can't be applied quickly like a balm or gloss; it would look crazy
  • With most colors you need to use a brush
  • A lot of the colors are incredibly strong and not practical for school or regular office-work (ultraviolet, yellow, blue, black, white,... )
  • The pigments separate from the oils after awhile, and you need to have the patience to tip it the other way and shake it around until everything is mixed up again
That said, here are the colors I own and what I think, plus tips at the end of the post if you want to use them!

OCC Lip Tar in RX
True black. But you MUST wear a lip liner or some sort of wax base round your lips with this. It will very quickly bleed into fine lines.
I actually recommend MAC's Black Lipmix from the Pro range if you can get it.
It's not as glossy when it goes on, but the formula doesn't separate as badly and it goes on more opaque, with no bleeding. I would probably not repurchase this after I use it up unless I can't get my MAC for some reason.
MAC Lipmix vs OCC Lip Tar: The MAC isn't bleeding. It's just smudgy application. The OCC is though.
Mix with: ANY color to darken it or dull it.

OCC Lip Tar in RX
True, true primary blue. If you're looking for an opaque, intense blue whether to mix or wear on its own, this is the BEST shade you can get. I love it. Here's a post with a few things I did using RX.
One word for bloggers and those taking photos; this blue has a tendency to flashback in flash or bright lights, so it looks almost pastel blue in certain conditions. 
Mix with: Any color to cool it down. Use only a TINY dot when mixing!

OCC Lip Tar in Belladonna
This bright purple doesn't look this blue in real life. But even more than RX, the blue in this picks up in most frontal shots I take. In real life, it's not so ultraviolet.
Still it's a fantastic bright purple, and if you're the sort to love things that are "somewhat left of the center" (like me), you'll love wearing this color neat, without mixing anything in.
Mix with: Pinks to make them more lavender toned, with red for a burgundy/wine. 


OCC Lip Tar in Pretty Boy
Bright fuchsia pink.
This is the older sister (or brother) of Anime, OCC's best selling neon pink. It's still bright, but slightly more grown up and slightly more flattering on most skins. This is a shade I would recommend wearing just on its own with a fuchsia lip liner.

OCC Lip Tar in Ophelia
Soft beige pink.
The only pale shade I have in my collection at this time. It's a gorgeous cool-toned pink, but you can see no matter how much patting and blending I did, the lines are still visible where the pigments sank in. From a slight distance, and in real life, it's not really noticeable. Just be careful when you're taking anything in high-res.
Mix with: A bright color to soften it slightly. Although I'd also recommend just wearing this on its own because it's a very pretty and wearable shade for those with pale to medium-fair skin.

A few tips for those who can't resist the lure of these little tubes:

  • Try to always use a lip brush, except with some paler colors that look patchy or streaky. Then I recommend using your ring finger to lightly spread an pat it out.
  • Apply a very very thin layer first, spread it out sheer, let it set a bit, then build up more when needed. Don't plonk on a whole lot (this is not regular lip gloss!) because it will seep everywhere, and be more likely to bleed and sink into lines.
  • Lip tars are a blend of pigments and oils. This is the reason they separate, and why they seem to go on glossy, then lose some of the shine after awhile. The oils vaporize and get absorbed, leaving mainly pigments, unlike wax-based glosses and lipsticks which will just sit pretty on your skin.

If you want to make your own D.I.Y. Lip Tars (works better with metallic pigments), I also have a post on that here.


Wednesday, January 16, 2013

Tips and Tricks: What To Do with a Blue Lip Mix!


The idea of blue lips always sounds so ridiculous. Until you actually wear it and realize it looks pretty cool.
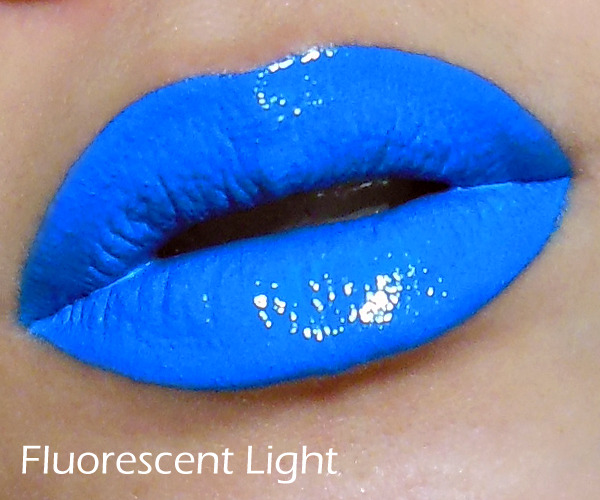
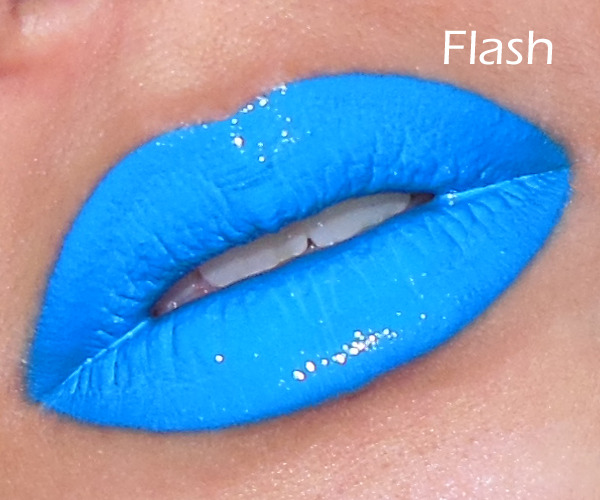
I'm demonstrating with Obsessive Compulsive Cosmetic's Rx Lip Tar, which is a rich creme cobalt blue. It's quite deep and strong in real life, but for some reason in white fluorescent light, it looks bright blue.


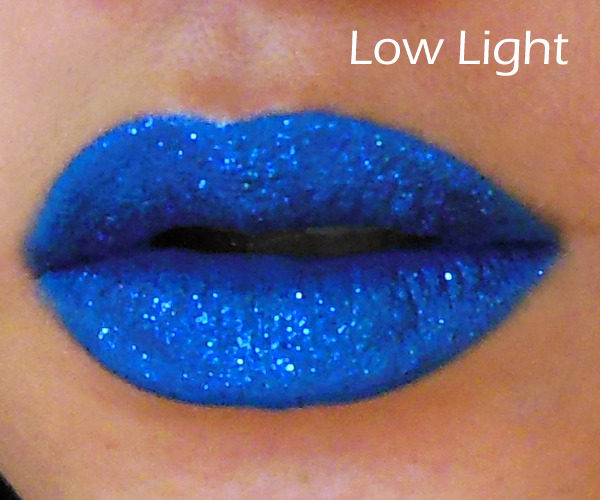
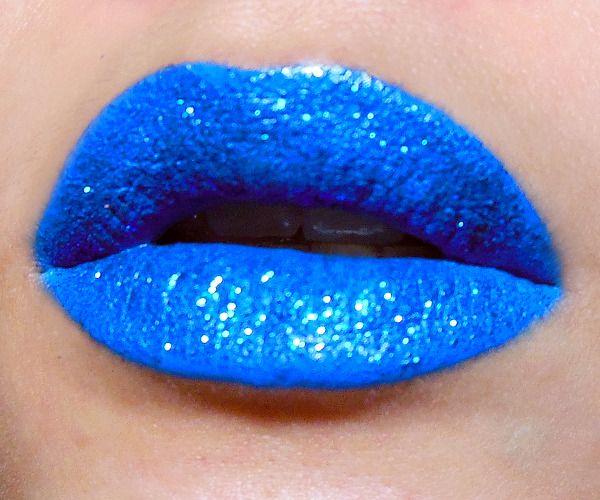
In 2 of the images, I applied Lime Crime's deep indigo-blue glitter, Aquarius, over the Lip Tar. The glitter is darker than the gloss, so it created a deep metallic-looking effect. To see the intensity/depth of the final color, check out the low-light image above. (I apologize for the unfocused image; for some reason my camera doesn't want to focus without light. I probably should have tried an indoor setting.)
If you're taking photographs with it, remember 2 things will happen:
  1. In indoor light, the sharp contrast of the blue against your skin color is going to create a dark border right around the lip color. 
  2. In flash, the blue is going to GLOW.


Tools and Tips:
  • Use a small concealer brush. There is no way you are getting this on using your fingers or directly from the tube. You will need plenty of precision because any streak, smear, or uneven lines is going to show up instantly.
  • It's best to apply a lip primer or clear liner first. This is because lip tars will rapidly bleed into fine lines around your lips (as you can see from the slight fuzziness on some of the images above).
  • For an extra precise lip, pick up a little concealer on a small brush after you apply your blue lip, and then go around the border of your lips just to clean up and get an ultra-neat line.
  • OCC Lip Tars AND MAC Lip Mixes will go on glossy, but eventually set to a matte finish. If you want to apply any glitter to it, do it quickly while it is still glossy, because once it sets it goes matte and it will no longer be as tacky.

Some Ideas for Mixing
Wearing a cobalt blue lip isn't practical for everyone. So what else would you find useful in a Lip Tar or blue lipstick?
Color adjusting/mixing!

A strong blue can do 2 things:

1. Add cool tones to a color that you find a little too warm (yellowish, orange) for your liking. Adding this to a basic red lipstick allows you to make it almost berry-ish or blood-colored. Very cool if you're going for a glam look or have deeper skin and find most reds showing up orange on you.

When added to a pink or mauve, it intensifies the bright magenta/violet tones so you can add a twist to your regular bright pink lipstick.

2. It adds depth to an already-deep color. Try adding a dot into a dark plum or liver colored lipstick. Instant Noir. This works the same way that a translucent blue-toned hair dye can turn brown hair black. 


Final reminder:
Don't over-apply when you're using it as a lipmix! The color is extremely pigmented and can overtake the original lipstick you're trying to adjust. 
How much do you need?
This little. That's ALL I used for the 3 lip color adjustment swatches above. One tube is probably going to last you for years if you're only using it on yourself.

Wednesday, August 3, 2011

Featured Lip Shade: NYX Haute Melon!

MAC Melon pigment on lids with NYX Haute Melon on lips

I love hot blue-based pinks for summer because they look so striking, but I do occasionally stray towards the corals.
And one of the most beautiful corals I have found recently is NYX's Haute Melon, a bright raspberry coral which is more flattering than the usual yellow-based corals shades.

NYX Haute Melon lipstick
The texture is slightly sheer and extremely creamy, with no shimmer.
Best thing is, it's under US$2.

L-to-R: Revlon Kiss Me Coral, NYX Haute Melon, Nyx Matte Indie Flick
As you can see, Haute Melon is softer, glossier, sheerer, and slightly more pink (below). It's extremely wearable and forgiving if you're afraid of corals, and it's also REALLY affordable. (Of course, if you want a REALLY fiery coral that is going to pop when you take pictures, get NYX's Indie Flick Matte Lipstick.)


Click here for other products used in the look!