Showing posts with label ombre lips. Show all posts

Wednesday, July 22, 2020

KATE Tokyo Red Nude Rouge Swatches and Review


Click to watch the KATE Tokyo Red Nude Rouge IGTV swatch video
Here's a quick IG video showing all 8 KATE Tokyo Red Nude Rouge duos swatched to show a full gradient. Meaning you can see the full spectrum of colors achievable in each compact, depending how much of each shade you use.


You obviously aren’t supposed to wear them the way I did. You can wear them ombre or 3D style, or just mix for a single solid color. The point is to wear them as vibrant or soft as you want, depending on the look and occasion. Also, each duo comes with a little sponge applicator but I find it much quicker with a clean finger, and you also won't contaminate each color by transferring the other onto it with a stained applicator.

Monday, January 16, 2017

Lancome Parisian Lips Le Stylo


Lancome's launched its beautiful Spring 2017 Absolutely Rose collection, which centers around delicate rose pink tones. First off, the pale rose-gold and pearl-pink packaging is absolutely gorgeous, but today I'm focusing first on three of the four available Parisian Lips Le Stylo duos.

These are double-ended lip bars (SGD$36) which are designed to give a subtle ombre lip effect, with a matte twist. Instead of simply working with two colors, the two shades you get aren't that far apart in tone. They are, however, very far apart in texture. 

On one end you get a sheer tinted cream which is very much like a tinted balm stick. It adds a slight gloss to the lips and very faint color.

Parisian Lips Le Stylo sheer cream end
On the other end, you get a sponge tip dunked in a pressed powder pigment, which gives you a complementary matte tint.

Parisian Lips Le Stylo powder end
I find these aren't really meant to be worn alone because the balm end doesn't give much visible color, and the powder end needs something creamy to stick to; otherwise you don't get much payoff. Together though, you get a lovely soft velvety matte tint, and the option to control whether you want it all one uniform shade, or if you want to concentrate the color in the center of your lips. 

Parisian Lips Le Stylo No. 03 swatch comparison
As far as application goes, it was straight-forward enough. You apply the creamy balm end over your entire lip, then press the powder tip around the center of your lips. Press your lips together a bit and you're good to go. The colors are also beautiful; I tested 3 of the 4 available shades and I like all of them, although my favorite is probably 01, a slightly warmer bright peony pink. I had expected 03, the palest baby pink shade, to look a bit crazy on me, but it actually turned out quite flattering and wearable.

The texture also stayed super comfy on the lips - it wasn't dry or icky feeling as you might expect with a matte texture. Probably because of how conditioning the cream end is. Lasting power is just average for a normal semi-sheer lipstick, which is to be expected. The balm won't stay on long if you eat, kiss or drink, but the powder on top does help it stay a bit better so it all averages out.


On the negative side, I did find myself wishing the creamy balm end was a little "fatter" because it does take awhile to cover your whole lip with the slim rounded crayon tip. And the other issue was having to re-dip the sponge tip back into the powder after pressing it into a balmy cream. After just a couple of uses, the powder is pretty much "contaminated". Doesn't affect the color, but I'll have to use it longer to see if it screws with how "matte" the powder looks after you've introduced so much cream into it.

Tuesday, March 8, 2016

LANEIGE New Two Tone Shadow and Lip Bars


I have a bit of a strange fascination with LANEIGE's popular Two Tone Lip Bars (SG$34) - those strange rectangular tubes of crayola-like dual-colored lipsticks that allow you to create ombre lips in a couple of swipes.


Nevermind that I actually never wear them out as intended, as ombre lips. I do wear ombre lips quite often actually, but I like them subtle. Meaning the two shades are no more than a few tones apart, so there is dimension but it's not "obviously two colors" on my lips. LANEIGE's lip bars pair very deep/strong and pale shades together, and if you're not careful it can look a bit crazy.

My preferred way to wear LANEIGE's Two Tone Lip Bars is to hold the two sides horizontally side-ways - as a single combined shade.

Because they're all frikkin' nice mixed together. They definitely gave thought to how the two shades in each bar combine and blend together.

The release of 4 additional new shades in 2016 is no different.


I kinda took my time to post a review because I popped one of the shades right into my purse the very day after I received them and never got down to swatching.

No 11 - Coral and yellow mixed to a warm papaya
No 12 - Red and nude mixed to a soft warm cherry
No 13 - Tangerine and beige mixed to a soft orange
No 14 - Rose and beige mixed to a rich fuchsia

As with the original 10 shades, these have a gorgeously creamy and pigmented texture and go on like butta'.


I have a bit more of a mixed response to the Two Tone Shadow Bars.
They're equally fascinating to me - I just love the bars and they seem like they would be a great idea. Two in one cream shadow sticks. But somehow, after the initial excitement, I'm not entirely sure they're the greatest idea ever.

Unlike with lipsticks, it's not actually troublesome to blend two shades together on your eyes quickly. In fact, it's very, very easy. Ironically these Two Tone Shadow Bars - pretty as they are - ended up making it very, very hard.


Firstly, the flat rectangular tips make it extremely hard to apply across the lids. In fact they are downright uncomfy if you want to get a full swipe across your eye. Good luck trying to get both shades evenly across your eye in one or two swipes. Eyes are curved, and a straight edge is just not going to be able to get two colors on quickly.

Also if you like to apply lighter shades on the inner half of your lids and darker shades in the outer corners, you can't do that with these sticks. And never mind that the socket is curved away from the lash line in the center of the eye. These sticks will give you a stripe cutting straight across your eyeball and socket. 

This somewhat reminds me of those L'oreal One Sweep Shadows from a few years back. (Read: someone who obviously doesn't apply makeup thought those palettes would be a really clever idea.)

I somehow feel if they had split the two colors into a double-ended stick with one color on each end, it would work a bit better. Putting it together ombre style is a new and fun idea - but in the end, it's just feels like something created to ride on the coat-tails of the successful ombre lip bars, and not because it's actually a great idea for the eyes.

Unlike the Lip Bars, the pigmentation is not quite strong enough for the two tones to have enough contrast against each other and if you go back and forth to get a noticeable ombre effect on the much smealler lid area, and you mostly end up with what looks like a single shade.


The colors themselves are actually pretty darned nice, if a little lacking in options - there are 4 all-warm colors currently:

No 1 - coral and peachy champagne
No 2 - rose-gold and champagne
No 3 - orange and champagne
No 4 - chocolate and champagne

There are no cooler-toned or deeper options aside from No 4, which isn't all that deep once blended on the lids. Also the formula is not designed to be budge-proof, and you're kinda supposed to apply a thin layer of translucent powder over them to set, or use them as base for other shadows. Which kinda mutes the sparkle and defeats the purpose. If you have crease-prone lids, I would skip these.

It's not easy to apply these as an eye base compared to the typical cream shadow sticks or pots because of the awkward shape and the slightly less creamy texture. And on their own they aren't as pigmented and don't set and last as well as many other shadow sticks on the market. 

 I say all this - but I remain very fascinated and I keep using them despite the slight hassle of working with that oblong top and the slightly finnicky formula. Maybe I have an undiscovered fetish for crayons.


Sunday, March 15, 2015

Laneige Two Tone Lip Bars: Swatches and Best Way To Apply Them


Ombre lips have been a big thing for a few years now, especially in Asia where the preferred style of "ombre" is more of the "stained" look, where there is a deeper or more intense color on the insides of the lips and a lighter, more muted shade around the outsides. 

This is not the same as the more dramatic style of ombre lips featured more commonly on social media among Western communities, where the top and bottom lips are different colors, and fade into each other in the center. 

Most of us bring two lip products out to achieve that effect, so a few brands have more recently come up with two-toned lipsticks to help reduce clutter in makeup bags. Laneige is the latest to create a series of Two Toned Lip Bars (SGD$34), that aim to to make ombre lips a one-step one-produce process.


The bars come with 2 shades stacked diagonally, and what you're supposed to do is to apply them vertically, with the deeper shade towards the center of your lips. (Or outside if you want your lips darker outside.)


Just remember to flip the bar upside-down when moving from top lip to bottom lip, cos otherwise you end up with a very strange striped effect instead of an ombre look.

The cons?
I'm not entirely sure you can get a seamless ombre effect in a single stroke without doing some other things to tidy up. Even when applied neatly and perfectly, the difference between the two shades can still look a bit harsh. The fact that they stacked the two shades together diagonally helps a bit, but doesn't blend the shades together enough without a little extra effort in my opinion.

And several of the shades in the range have a pale shade which is so muted and nude that when applied, it can make your lips very thin and mean, like in a press visual of Song Hye Kyo which actually looked a bit scary. But almost anyone can wear ombre lips, unless your lips are really extremely thin, or very mature and lined.

I'm using duo No 4 below to illustrate. 
This is a scarlet and white/clear duo, so the shades should blend together to give you a vibrant rose. But for most people, it can look harsh and geisha-like because of the huge contrast between the red and the white. In some cases, it looks like you simply applied lipstick in the center of your lips and forgot to blend.


So this is what I do to get the effect I want with ombre lips.

  1. Apply the lip bar vertically on both lips (like shown above).
  2. Flip the lip bar horizonally sideways and run it across the center of each lip just where the 2 colors meet. (When you hold it sideways, you get an automatic mix of both shades, and this allows you to blend out the pale and deep shade on your lips so they fade into each other more beautifully.)
  3. Run a nude lipliner lightly along the borders of your lips to add some definition to the shape if your lips look very thin wearing ombre. The liner won't look obvious but it will help to make the edges of your lips more visible. 


Voila, no more harsh line between the white and the red. And I don't look like a geisha. 


If you prefer the more dramatic contrast between the two shades, just follow Step 1.

For me, to get the softest, most kissable, fullest-lip effect, the "mixed shade", the medium color you get when you mix two colors, should take up the most space on your lips. Only the outer edges and the very center where your lips meet should be very deep and very light. And you can only achieve this effect if you apply the lip bars vertically first, then horizontally to blend the colors. 

That said, I do actually like these lip bars a lot. They take the hassle out of bringing two colors out with me, and the textures and pigmentation are amazing. Every one of these is extremely intense and creamy, and I have 10 swatches below. Some of the shades are quite hard to remove from the lips actually. The colors do cling and stain a bit, but that also means they last.

Apologies for an error in the shade numbers; the print was too tiny; No 3 here is actually No 8.

(Apologies - just checked a press document and realized that I labeled No 3 and 8 wrong. The print on the bottom of the tubes is so tiny and the manufacturers like to stamp serial codes ON TOP of them. Couldn't see through that!)

As per above, shade marked No 8 is actually No 3!

What are my faves here? Just initially, I like No 2, 6, 7, 8, 9, 10.
Yeah I'm no help narrowing things down. It's fun experimenting with these!


Sunday, May 5, 2013

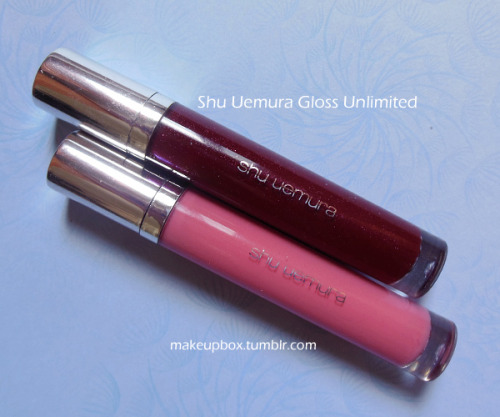
Jelly Ombre Lip and Big Doll Lashes (feat. Shu Uemura Gloss Unlimited)

Huge lashes, lavender cheeks, and a berry-stained "jelly" lip!

Shu Uemura Gloss Unlimited in WN 20 S (top), PK 70 C (bottom)
Apparently, two-toned lips are in this season. (Apparently, I've been doing them for 2 years while they were completely out of fashion; boohoo...) I don't usually use glosses to do ombre lips, because there usually isn't enough of a visual contrast. But when I saw a very dark shimmery wine shade in the Shu Uemura Gloss Unlimited range, I immediately thought "stained jelly lips!"


The Lips
In the grand tradition of the great Uemura-san himself, I swopped things around and did my lips before my eyes. Uemura believed a lip color could be applied first and thereafter be the deciding factor for the eye and cheek makeup you choose.)

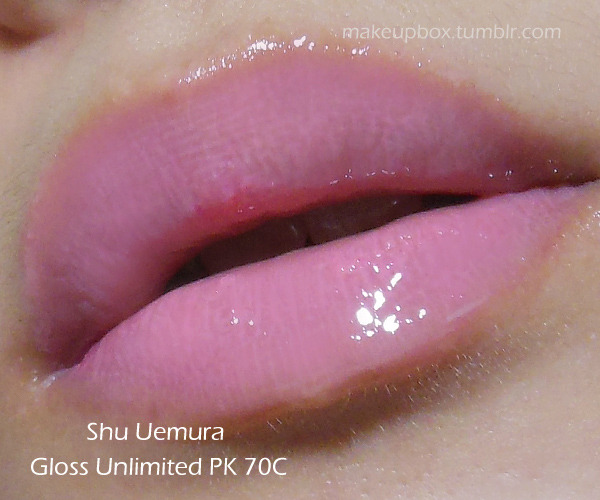
Step 1: I applied a soft beige pink, PK 70 C (translates to "Pink 70 Cream" for you and me) over the lips. (Try MAC's Please Me Lipglass if you can't find this in your country.)


Shu Uemura Gloss Unlimited in PK 70 C
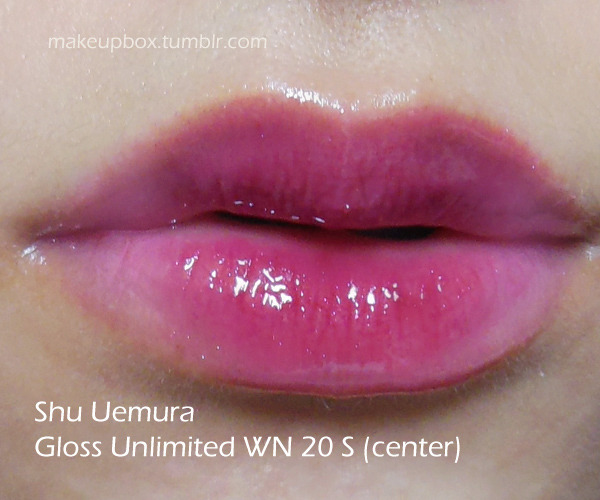
Step 2: Next, I applied a deep berry gloss (you need to use something quite pigmented or it won't have this level of contrast) WN 20 S (translates to "Wine 20 Shimmer"). (Try MAC's Desire or Rebel Lipglass if you can't find this.) 
Shu Uemura Gloss Unlimited in WN 20 S
*The US range seems to be slightly different from Asia (is anyone seeing a recurring pattern here???) so I listed alternatives with a similar color if not the same texture.

---

The Eyes
The modus operandi is "doll-like". Rounded, widened, with huge lashes. You can apply lower lashes if you want, but this isn't meant to be a super-dramatic look, so I skipped that.
image
 Step 1: To create a rounded eye shape, I used the 88 Warm Palette and mixed up a few of the medium browns just to create a warm matte tone that's about 2-3 shades darker than my skin color. This I applied to the entire lid in a rounded shape, blending upwards almost to the brow near the center.
Then on the inner corners, I applied a little pale beige.

image

Step 2: Line your lower eye rim with a pale yellow liner like NYX Yellow. Next, use a dark grey or charcoal pencil to create definition and emphasize a rounded shape. You want to line it such that it's thick at the center of the eye, and then tapered to a thin point at both ends.
On the lower lash line, run the charcoal pencil along the outer half of the eyes, making it thicker at the outside.

image

Step 3: Here's one trick to easier eyelash application. Apply the glue directly along your lash line. This can be done if you're using one of the brush-applicator lash glues, or with a liner brush if you're using regular tube glue.

image
Step 4: Apply long, dramatic clustered lashes (I used Red Cherry #16s) and push them up at the center of the eye for doll eye.


The Cheeks
I wanted a "glowy" sort of effect to go with the eyes and lips, so I used a lavender blush (MAC Full of Joy just on the upper areas of the apples and up long the cheekbones.


Why don't you pick a lip and then decide your makeup today? ;)

Monday, October 8, 2012

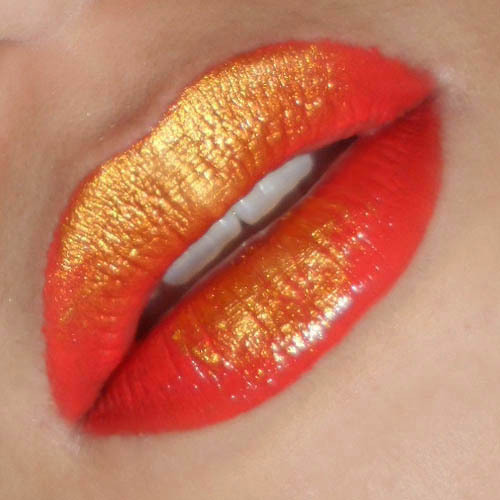
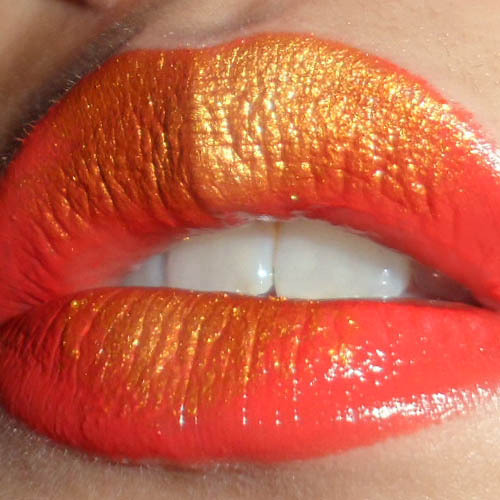
Statement Metallic Ombre Lips (Chinese Festival Colors)


This is a fun tutorial with a twist on the "traditional" ombre lip using a metallic pigment. You can choose any colors you want as long as they sort of stand out from each other. (Test on the back of your hand to see if you like the effect.)
Just because this is the Mid-Autumn Festival period for many Asians, I went with a nice coral red (Revlon Ravish Me Red) and a bright amber-gold pigment (Coastal Scents mica in Metallic Rustic Gold).
The only other things you'll need are a flat eye brush that isn't too small, and Q-tips in case you need to clean up any mess.


Step 1: Simply slick on your lipstick as neatly as possible. Matte lipsticks will allow the pigment to "float" and be more obvious. The glossier the lipstick, the more the pigments will sink into the moisture (and look dull).
You can still use a creamy lipstick. You'd just need to layer on more pigment.


Step 2: Using your flat brush, press one side of it into the pigment and then tap the brush to remove any excess. If you don't, all the pigment is going to end up on your chin. Not very sexy.


Step 3: The 1st step to laying down the color is to gently pat a thin layer of pigment onto the top lip. Go from center outward one side at a time, so that most of the pigments will be concentrated in the center. The first layer you lay down may not be very vibrant and opaque, but don't worry about that.


Step 4: This is where you pack a 2nd layer of color down the center of both top and bottom lips. On the top lip, this should give you that nice ombre effect where the gold is most intense in the center and then slowly fades out into the red.
On the bottom lip, I wanted more dramatic contrast (like gold foil pressed onto the lips), so I only pressed the brush down around the center. No ombre, no fading outwards like we did with the top lip.


If you need to, use a Q-tip to carefully clean up the edges if your lip, but if you didn't pick up too much pigment earlier, you shouldn't need to.
Now all you need is minimal makeup on the rest of your face, and you'll have the most vavavoom lips at the party! (Just be very careful about eating and drinking.)


Saturday, February 25, 2012

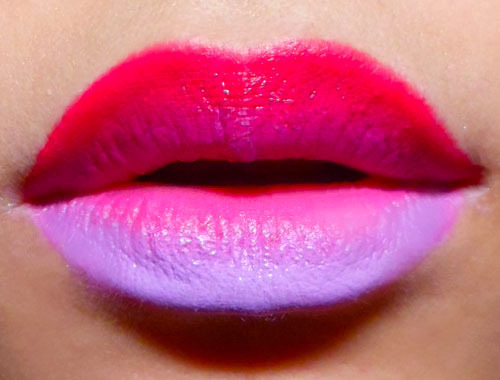
Psychedelic Cyclamen Ombre Lips: Rimmel Color Show-off in 220 Shocking Pink and Lime Crime D’Lilac (plus tips)

Red and lilac ombre lips


When you combine 2 shades that look really vibrant and saturated on camera, you get day-glo Cyclamen lips like the above. 
Instead of going for a typical dark shade to contrast against the pale creamy lilac, I went for a strong red-fuchsia in a matte texture.

Read on for tips for application!