Showing posts with label fashion. Show all posts

Tuesday, April 26, 2016

More Recent Bag Rescuing at Dr. Bags!


Not makeup, but bags today! 
I wrote last year about trying out Dr. Bags, a specialty designer bag restoration company with pro cleaning, coloring and coating services for premium leather goods. Besides bags, they also restore and recolor shoes, wallets, watch straps, you name it.

I tend to use my bags to death. I'm not the sort to be especially careful or ladylike with my belongings. They are subjected to a good amount of sun, rain, humidity, and tossing around. And that's just the outside. They also frequently suffer from makeup and pen stains - generally everything you do NOT want on an expensive bag. Needless to say, they don't tend to stay pristine looking very long, and I need restoration on a regular basis if I intend to use them for the longer term.

I recently went to get a black Fendi 3Jour restored because I'd used it for about a couple of months and ended up with one or two scuff marks. Very annoying because the marks showed an ashy white on a black surface. I.e. they look incredibly obvious. 

I thought maybe it was just some dirt that got into the leather grain and tried to use damp cloth, wet wipes, hand lotion (you name it) to try and get the marks out.

Black Fendi medium 3Jour, before restoration.

Well, that wasn't the smartest thing to do as I ended up making things ten times worse.

The men in my life got involved. My husband tried his hand at it, and so did my dad. Polishing cloths, leather polish, leather sprays, even a baby toothbrush and baby soap were brought in. Nothing worked. So I figured it was time to call Dr. Bags before we totally destroyed the thing.


I've used their services before so I kinda know what they can do, but I was still pretty surprised when I collected my bag. They'd pretty much removed everything but the worst scuff mark right around the center of the bag in the cleaning/restoring process, without even having to go through the hassle and cost of a recoloring. 


The bag looks almost new. Amazing.


And here it is looking all fresh and spiffy, none the worse for wear. Although I have made a mental note to be more gentle with it from now on...


The other bag I needed major restoration for was a vintage Louis Vuitton satchel that belongs to mom. I swear this bag is probably about 25 years old if not older
. 
It is actually a gorgeous Épi leather satchel in the classic Kenyan Fawn color. Absolutely fashionable right now, if not for the fact that it was discolored, fuzzed all around the edges, and badly stained from mold. 


If you've owned a few LVs you'll know they don't do well in humid countries. They get moldy and start "rotting" and disintegrating quite easily, especially if you don't air them once in a while. This one not only looked a little worse for wear, but the inside was all sticky and mottled with dark patches from mold.


There was a lot of head-shaking and tongue-clucking from the people at Dr Bags when they looked it over. I was so certain they'd met their match LOL.


But I have to say they did it again. My jaw dropped a little when they pulled it out in-store after the restoration. Honestly, it looks pretty much new from the outside now.

The leather is gleaming and the color is so much more vibrant now. I never even thought it could look so much brighter. (More Kenyan Fawn than a strange dull orange Cacao.) The hardware of course is gleaming like new.


And the most amazing thing is the dark mold stains on the inside flap are missing. I'm pretty amazed. 


Even the inner lining has minimal stains left. (And there were big black patches all over when I brought it in.)


You know what this means?
Mom is not going to get it back for awhile cos I'm borrowing it. The beautiful thing about fashion is that every few decades, if you can wait long enough and keep them in good condition, things that have gone out of fashion come right back into fashion.

Like this gorgeous compact satchel. And if you have old bags or second-hand ones sitting around, don't throw them out until you check how much it would cost to restore them. A bit of good restoration might be all you need to pull it out of the closet.


P.S. I have more information on approximate costings in my previous post on Dr Bags, but prices can vary depending on condition and size of your bag, so if you need a consultation check out their site (<-click here) and contact them for a more accurate quotation.

And if you're restoring something, I HIGHLY recommend you get it coated/waterproofed as well. I'm not being paid to say this - it's just my 2 cents. It's much cheaper and easier to prevent damage than to try and repair it later after it's ruined.

Even if the team at Dr Bags seems to be able to work a little magic.

Sunday, November 1, 2015

Something A Little Different: Designer Bag Restoration at Dr. Bags!


I love bags. Nearly as much as makeup. 

Carrying the right bag is the equivalent of wearing the right lipstick. It can make a look.
Of course, it's always a much bigger investment when you're talking about a Chanel or Dior or Saint Laurent bag versus a Chanel, Dior, or YSL lipstick. And the more you use a bag, the quicker it gets stained, scuffed, and discolored. Often pretty quickly, if you spend on exotic leather, suede, calf skin or fragile lambskin.

I used to think this was part and parcel of owning a bag. Once it got damaged, it got damaged, and you just had to enjoy it while you could.

And then a few months back a friend told me about Dr. Bags. 


This place is like an aesthetics clinic for your designer bags.
  • Protect new bags - You can opt to apply an invisible waterproof silicone HP coating on new bags to prevent damage and stains from water and minor abrasions for up to 8 months. 
  • Maintain and Restore used bags - You can deep-clean and restore bags to remove minor stains and fill in minor scratches and scuff marks.
  • Overhaul and recolor older bags - If your bag is old and completely discolored, you can get them touched up so they look newer - or get them recolored to a completely different shade!


My Experience

I decided to try out the various Dr Bags services with 2 bags that were perfect "candidates".
  1. The first was a lambskin Chloé Bronte bag in a soft blush-taupe shade which was so delicate that I had 2 scuffs on it before I even carried it out for the first time. And it was not waterproof so any droplet of water would absorb into the leather and stain it.
  2. The second was old magenta Balenciaga Velo that was stained and discolored to the point where I would never carry it out in polite company. 
Chloé Bronte: HP Coating and Cleaning

If there is one thing I recommend you do for your designer bags, it would be HP coating. It is invisible but repels water and bacteria for months. Don't wait until your bag gets stained and damaged. (Just like skincare, prevention is better than cure.) Repeat wetting and drying and even humidity and rain can cause your leather to dry out and crack very quickly.

I actually splashed water on my Bronte bag to see if it was really waterproof. (I won't lie - my heart almost stopped when I did that because previously, the leather would absorb the water and I had to wait hours for the water stain to fade, and not cause any permanent damage by touching or rubbing it while wet.)

But I waited - and waited. 

And the water didn't go in. Amazed. Now I can bring it out without worrying about rain and moisture. HP coating also prevents colored liquids from staining your bag. You can easily wipe off accidental spills and splashes (coffee, sauces, makeup) easily when you have your HP coating on. Just make sure to refresh your coating every 6-8 months if it's a bag you carry very often.
 

There was also a dark scuff mark from when I'd put the bag down on something, and I'd never been able to remove that mark.


After the cleaning and restoration treatment, it looks pristine.


Basic coatings cost around $150 per bag and can take maybe around a week.

You can also bring in your precious Louboutins and Jimmy Choos (all shoes, boots, and other leather goods) for HP coating so they stay pristine much longer.

Balenciaga Velo: ColourPro Colouring

For my poor beat-up Balenciaga which was stained and discolored from a bright magenta to a grey-prune tone, I decided to try out the ColourPro coloring treatment. This is perfect if you have a bag that's so old that it's no longer the color it used to be, or a stain that can't be removed completely with regular cleaning or restoration.


Dr. Bags offers a huge variety of colors, although the general advice for best results is that you can only go deeper, not lighter. That said, I've seen many people do a complete "white-out" and recolor their bags from another color, so discuss it with the team and see what the recommendations are.

Saturday, August 13, 2011

Duping MAC Pink Nouveau

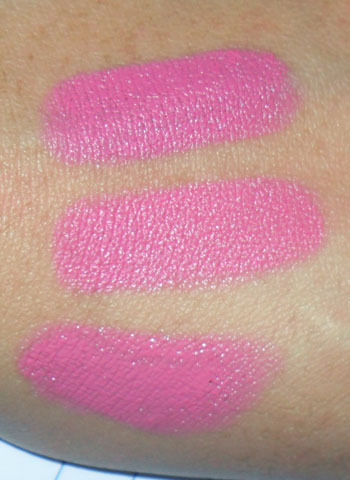
Top-to-Bottom: MAC Pink Nouveau, NYX Matte Summer Breeze, and  Etude House  VIP Girl PK009

If you don’t have access, or don’t want to pay so much for MAC’s Pink Nouveau, but want a bright pink, here are 2 quick options.

NYX Summer Breeze matte lipstick and Etude House VIP Girl PK009.
Note they are not 100% dupes. I’d say they are about 90-95% similar. Both are a twinge less blue-toned than Pink Nouveau, so if you are attracted to true pinks, but find Pink Nouveau a tad too “cool”, try these other two.
Texture wise, NYX Summer Breeze is MUCH closer to the satin finish of the MAC but with a faint touch more peach in the base. The Etude House lipstick is glossy in texture, so you won't get that full-on opaque doll-pink mouth as you would with the NYX and MAC versions. If you have dry lips, or don’t like a matte finish, get this.

Cost wise, NYX wins. The Etude House lipstick might possibly be cheaper if you’re in South Korea (but then I can't say for sure). It’s a little marked up in other parts of the world. But if you are just buying ONE lipstick though, getting PK-009 from your local Etude might be cheaper than footing the shipping cost for NYX.


Saturday, August 6, 2011

Wet n Wild Coloricon "Greed" Palette (Glam Look)


This is a second look featuring the Wet n Wild Coloricon Palette "Greed". Previously, I did a softer, more colorful look using the shimmery and coral-toned shades. This time, it's more a play on shapes and contrast than washes of color.


Step 1: Apply eyeshadow base over the lids, then black kohl pencil along the upper and lower lash lines. Smudge along the upper lids, and then re-line right at the root of lashes so it is darker there.

Step 2: Using a flat, firm brush, pack the matte black shade along the liner on upper and lower lids, and then extend outward in a wing. It should be thicker at the outer halves, and not too curved.

Step 3: Apply the shimmery coral in the lid area, not extending up past the socket line. Then use a small brush to blend matte coral along the outer half of the socket lines for some subtle contouring.

Step 4: Using a clean pencil brush, run the silvery-gold shade along the inner half of the socket line. This gives shape and very interesting contrast.

Step 5: Apply black liquid liner close tot he lash line, and then false lashes and black mascara to finish the look.


Wednesday, August 3, 2011

Featured Lip Shade: NYX Haute Melon!

MAC Melon pigment on lids with NYX Haute Melon on lips

I love hot blue-based pinks for summer because they look so striking, but I do occasionally stray towards the corals.
And one of the most beautiful corals I have found recently is NYX's Haute Melon, a bright raspberry coral which is more flattering than the usual yellow-based corals shades.

NYX Haute Melon lipstick
The texture is slightly sheer and extremely creamy, with no shimmer.
Best thing is, it's under US$2.

L-to-R: Revlon Kiss Me Coral, NYX Haute Melon, Nyx Matte Indie Flick
As you can see, Haute Melon is softer, glossier, sheerer, and slightly more pink (below). It's extremely wearable and forgiving if you're afraid of corals, and it's also REALLY affordable. (Of course, if you want a REALLY fiery coral that is going to pop when you take pictures, get NYX's Indie Flick Matte Lipstick.)


Click here for other products used in the look!

Saturday, July 30, 2011

Ondine (Featuring Everyday Minerals "Tide is High" Shadow)

Ondine was a water nymph who gave up her immortality for love, but was eventually betrayed by her faithless husband. In vengeance, she cursed him so that he would cease breathing if he ever fell asleep. The story has no happy end, but the mythological figure has always been one of dark and elemental beauty for me.

This is in no way related to the movie of the same name (although I enjoyed it). The bleak and harsh beauty of the Irish landscape and the haunting atmosphere and music did partly inspire the choice of colors and an eye look that's equal parts dreamy and heavy.

Everyday Minerals Tide is High (Shimmer), and Make Up Store Moss (Microshadow)
Read here for the step-by-step!

Monday, July 25, 2011

Dawn Storm: Wet n Wild “Greed” Palette


I’m a little late on the Coloricon train, but I finally got a few from Nonpareil.com, and I’ve been loving them so far.
The first one I decided to try was the 6-color #246 Greed palette, below. I think the shades are gorgeous. The pigmentation of the matte shades is higher on touch, but if you apply them with a brush, over primed lids, the metallics perform just as well, and are really gorgeous.


(Wet n Wild Coloricon 246 Greed)


One tip: Try to avoid applying or touching these with your fingers or you could end up hardening and “sealing” the metallic shades.

Click here for the step-by-step!

Friday, July 22, 2011

Leather, Silver and Denim: Neutral Eye for Day


For many people, neutral means "taupe", "brown", "grey", black", "beige". It means safe, reliable, and flattering for most skin tones.

Well, I wanted a departure from the usual combination of coordinated shades (like brown, on brown, on more brown), so I went for the colors of everyday items that we would consider as "neutrals" of a sort. Silver jewelery, dark blue denim, soft tan leather.

---
Step 1: As the shades are quite soft, it would be good to apply a good base so that you can really showcase the sheen and colors. 
Pack MAC Patina on the inner 1/3 of the lids and lower lash line.

Step 2: Pack a soft steel shade in the center of the lids. I chose MAC Electra because it is not too harsh and white, and not too deep for the center of the lids to pop.

Step 3: In the outer corners, apply a dark matte navy with a small blender, and extend down along the outer half of the lower lash line as well. I used Revlon Riviera Blue. You can use a black or grey, but those shades would not bring out silver and blue tones as well.

With a clean, soft blending brush, smoke out the outer corners of the navy so it becomes a slightly wing. If you want a more dramatic and contoured look, don't smoke it out.


Step 4: Apply black liner and mascara to finish the look. 

The final look should be defined and interesting to look at, but flattering to most eye and skin colors, and not too dramatic for day time wear.

Tuesday, July 19, 2011

New Eyeshadow Storage


Smiggle is an Aussie stationery store, and I love how bright and cheery everything is. I'm not about to throw out all my document folders and pen holders just for them, but I couldn't resist getting two of these beautiful three-tiered stackable tins for organising and storing my eyeshadows in.

They come in black, green, silver, white, fuchsia, aqua, blue, deep purple (and I think yellow but I may be wrong). Of course, I HAD to pick the fuchsia and aqua!


They are not too large, but they can just about fit all my individual eyeshadows and some of the smaller palettes.


 Above, aqua-blue Smiggle tin containing 

Pink Smiggle tin containing gel liners, cream bases, and paints.

Each tier comes with a flat lid cap (see pink stack in top picture) which fits snugly but is not too hard to remove, so you can even use the top of each tin as a separate surface for placing products if you need more separation.

Very neat.

Monday, July 18, 2011

Color of the Moment: Getting that Nina Ricci F/W 2011 Milky-Salmon Lip!


Remember the gorgeous creamy-salmon lip color on the Nina Ricci F/W 2011 catwalk 
every magazine editor was raving about?

Pat McGrath just disclosed the formula. 
Mix concealer with a coral shade to get that perfect blend. I used MAC NW25 (it's more pink than an NC, and it has the best opacity and texture for the lips) with 2 coral-ey colors. One is more peach and one is more pink. It just depends on your skin tone and preference.


I tried all kinds of lip concealers, nude lipsticks, etc. MAC NW25 + Revlon Kiss Me Coral Super Lustrous Lipstick (bottom swatch) is a win.


If orange is not your thing, and you want to lean a little closer to pink, Rimmel's Pink Fame Color Show-Off Lipstick (hot coral-pink at top-left) gives an even brighter, pinker dupe when paired with a concealer. Replace the Revlon with this if you want a really true-to-catwalk version.


I do recommend using a paler or deeper concealer depending on your skin tone, and to always choose a slightly salmon shade regardless of whether your skin is warm or cool. It should not be too deep or dark or the effect is spoilt. 

To mimic the matte texture that McGrath did (and I did not), layer a single-ply of tissue over your lips, and dust over with translucent powder before applying another layer. You might want to scrape some product into a small jar and pre-mixing it so that you have a consistent shade for touching up.

Pair with bronzed skin for best effect!

Saturday, July 16, 2011

I Hit Pan!!! (And the Reasons I Started a Makeup Blog)

MAC Patina shadow, above

To many an obsessive makeup hoarder/collector, that image signifies Satisfaction. 
(And I must say a bit of disbelief that we actually managed to use anything often enough to see the pan.)

I am one of those people who cycle between envy at those who manage to make a significant dent in their makeup items, and also terror at the thought of running out of the things I love.

Maybe I'm just OCD. When I use an eyeshadow palette, I'll inadvertently try to rotate between shades so no one color shows a bigger dent than the others. When I love a product, I'll start looking for an alternative for it so that I don't use it up. (Yeah, it's not logical.) And I also tend to get bored of wearing the same color nail polish or eye shadow consecutively. So I almost never do. 

I have a shelf dedicated to backups of favorites which I am not even close to finishing.

Strangely, I love "pan porn". I'll trawl the web occasionally, looking for images of half-finished items and wondering at how others manage to use the same items so consistently and feeling an odd admiration for them. The only things I can use repeatedly each day, and constantly finish through the years, are lipsticks and mascaras. 

Which leads me to two of the reasons I started a makeup blog:
  1. Use up more makeup
  2. Use more colorful makeup
I think it's time to get more pan porn of my own.

Thursday, July 14, 2011

Lip Mix: Getting Revlon Stormy Pink and Peach Petal to Work!

Revlon Super Lustrous Lipgloss in Peach Petal (left), Revlon Matte Lipstick in Stormy Pink (right)

Anyone would tell you these look like 2 of the most gorgeous shades in existence. Peach Petal has been likened to MAC's Underage and Florabundance Lipglass, and Stormy Pink to Pink Nouveau.
But after I picked these up, I found the textures to be really hard to work with. 

Peach Petal tends to settle into every single groove and line on your lip, where they show up as ghastly lines of milky beige. Stormy Pink is so low in pigmentation and opacity that you need to layer several times for the color to build up to any sort of intensity. And by then, it's become cakey and uneven. 

So it suddenly struck me that I should try layering them together. 


It's still not 100% foolproof (it still sinks into lines just a smidgen), but you get a nice semi-sheer candy pink which is just a tad less blue toned and more creamy than Stormy Pink, and more even and wearable than either shade.
It even reminds me a bit of a deeper and glossier version of MAC's Viva Glam Gaga.