Showing posts with label make up for ever HD powder. Show all posts

Friday, April 29, 2011

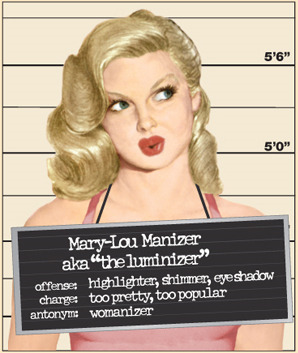
About: TheBalm's "Luminizer" (aka Mary-Lou Manizer, or wateva...)


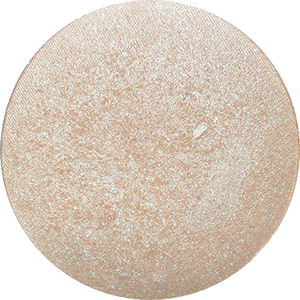
Unwieldy name aside, this is a lovely, LARGE compact of one of the most beautiful golden-ivory shades I've ever seen.
Reasons I love this:
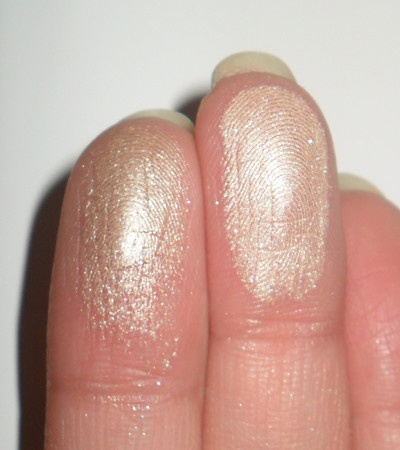
1. It's the most gorgeous pale-champagne shade with smooth-as-butter texture which is not glittery or chalky. It is able to mimic that translucent dewy look liquid or cream highlighters give, but is so much more portable and easier to work with. The shade is also flattering for most skin tones.

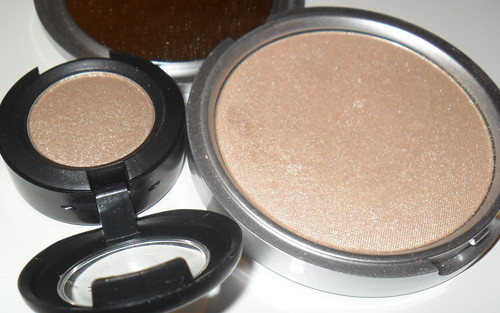
2. This is a pretty good dupe for MAC's Retrospeck (which has slightly deeper base tones but identical highlights). As seen below, it is finer-grained and more opaque (Retrospeck is a Lustre) so while you won't be able to get that same flecks-of-champagne effect, it's easier to work with, more pigmented, and gives a very natural sheen when sheered out.

3. Look at the amount you get. Both products are marked up here in Asia, but you get 8.5g of product in The Luminizer (5 x MAC shadows at 1.5g), and an ever-so-cute mirrored compact, for about 0.5 times the cost of a MAC shadow.

---
Tips for applying:
  1. I swipe this on my brow bones and cheekbones with a wedge sponge after applying my base, and before doing the rest of my makeup. By the time my setting powder goes over it, it's become a soft-focus highlighting sheen which emphasizes bone structure subtly.
  2. I sweep this over lids softly with black kitten liner. Apply red lipstick to complete the retro pin-up look.
  3. Dab this softly over the cupid's bow, and in inner corners of eyes to enhance your features.
  4. If you have light to medium skin, mix a tiny bit of this with your normal powder on a fluffy brush and apply over under-eye concealer for more illumination. THEN apply the rest of your makeup. (Caution: It may be easy to go overboard with this, so be careful and use a very light hand!)

Tuesday, April 26, 2011

Review: Make Up For Ever Face & Body Liquid Makeup


CLAIMS: 
This waterproof, ultra-light, water-based gel contains no emulsifiers and provides a totally natural, satin finish. Ideal for normal skin-types as well as for fine lines and large pores. Gives skin a uniform tone without accentuating imperfections. A makeup artist's favorite.

INGREDIENTS:  
Aqua, Hydrogenated Polyisobutene, Sorbitan Sesquioleate, Cycolentasiloxane, Methylpropanediol, Glycerin, Butylene Glycol, Mangifera Indica Seed Oil (Mango Seed Butter), Acrylates/C10-30 Alkyl Acrylate Crosspolymer, Tetrasodium EDTA, Fragrance, PEG-8, Phenoxyethanol, Tromethamine, Potassium Myristate, Chlorphenesin, Methylparaben, Propylparaben, Caprylyl Glycol, Sodium Polyacrylate, Panthenol, Hexyl Cinnamal, Limonene, Citronnellol, Geraniol, Butylphenyl Methylpropional, Linalool, Alpha-Isomethyl Ionene. May Contain: CI 77891 (Titanium Dioxide), CI 777493 (Iron Oxides), CI 77492 (Iron Oxides), CI 77499 (Iron Oxides).


VALUE FOR MONEY:

It's a large bottle but I'll have to let you see how it goes. You do go through quite a bit of it if you use a brush or sponge, and it's not cheap to begin with. Still, I'd say I really like the natural look and lightweight feel.
You can get it with other foundations, but not quite so easily.


SWATCH WATCH:  
MUFE Face and Body Liquid #32 = NC30 = Bourjois Healthy Mix Foundation #53 =  (slightly lighter than) Revlon Colorstay 310 Warm Golden = Everyday Minerals Golden Medium Foundation
(This foundation is sheer and "adjusts" to your skin tone a little, so though #32 is maybe just alittle deeper than my usual shade, it's not really noticeable once applied. I have not tried #20 but it does look like I may need to mix #20 and #32 for a perfect match.)


WHAT IT IS: 
A hydro-gel textured sheer-to-medium coverage foundation that stays true to color even in heat and humidity, and allows you to build up coverage in layers.  While transfer-resistant, it's not transfer-proof. But fair enough. I don't want to have to take it off with a toilet-scrub.


FINISH/COVERAGE:
This foundation gives a dewy finish (not shimmery; just like natural skin), but be careful what you apply under it (mattifying primer, moisturizer, etc), as that will affect the texture somewhat. The coverage can be quite moderate if you apply and layer it with your fingers. I find it similar to Studio Sculpt by MAC in coverage, though Studio Sculpt gives a matte-skin finish instead of a dewy one.


FEEL: 
  • Applied over fresh moisturizer: tacky for hours
  • Applied over clean skin (or after products absorb for 5-10mins): sets to lightweight feel, but will still be ever so slightly tacky to the touch unless you have very dry skin
  • This is lighter than Revlon Colorstay foundation, but has a more noticeable "weight" on the skin than Bourjois Healthy Skin or Mac Studio Sculpt.

LONGEVITY: 
Most liquid, gel and cream foundations are water-resistant to a certain degree these days, so I don't find this foundation particularly outstanding in this regard. It does last through a 10-hour work day, but nowhere near as well as my MAC Studio Sculpt, Revlon Colorstay or Bourjois Healthy Mix. Be prepared to touch up quite a few times with powder, especially around the eyes and T-zone. 


APPLICATION OPTIONS:
This "gel-like" foundation does dry and get tacky, so you need to work at a moderate speed to blend it nicely before things start to get too sticky. It doesn't dry as fast or set as stubbornly as Colorstay though, so you have some breathing room to smooth things out.
  • Stippling brush: Light, satin finish. Good if you want the sheerest veil of color to even out your skin. I have not tried to layer the foundation with this as it sort of defeats the purpose of using a stippling brush. If you want maximum coverage, try a flat brush or your fingers.
  • Foundation brush (flat): Light to Moderate coverage. I find after the second layer, it gets a little hard to smooth more on with the brush, as the liquid starts to dry up on the fibers by then. It also stops looking natural after the second coat, so be warned.
  • Damp sponge: Soaks up too much product for me, even when damp. If you don't mind the cost, this does give a lighter, and more matte finish than the other options. 
  • Fingers: My favorite for wasting the least amount of product, as it gets the largest amount of pigment onto your face in the least amount of time. This is also the best way to build up more layers of the product without looking too unnatural.

THINGS TO NOTE:
  1. If you apply lotion, sunblock and other skincare before this foundation, you need to let it set for a few minutes before applying the Liquid Makeup as the formula will slip and sheer out otherwise. 
  2. If you need to layer it on, fingers work best, because as the base layer starts to set and get tacky, it becomes hard to slide more product over it without smearing the bottom one off. You will need to start dabbing, not dragging, in order to build it up. A stippler and sponge can do it, but not nearly as well as your fingers.  
  3. This is like nail polish in that the areas where you apply more than one coat will take a disproportionate amount of time to dry fully. If you apply more layers under your eyes, bevery careful that whatever powder you apply over it for several minutes after will still grab and cake up on the moisture.
  4. Be warned that this will easily smear off if you spray your face with a toning mist (oil-free) and touch it before it dries.
  5. This is scented with a strange citrus-y floral fragrance. It also contains silicones and mango seed butter (so I don't see how anyone can claim it is oil-free). If you have objections or sensitivities to any of these, beware.

RECOMMENDED IF:
  1. You want sheer-to-medium or flexible coverage.
  2. You love the dewy finish and will trade off a little durability through the day.
  3. You are trying to avoid the powdery made-up look.
  4. You don't have too many raised/pitted blemishes.
  5. You don't have very oily skin.
  6. You have slightly oily or combo skin but don't have too many contoured blemishes and don't mind blotting through the day.
  7. You want people to say "You're wearing makeup??!"

Sunday, February 27, 2011

Out of The Box: How to use Make Up For Ever HD Powder (Silica Powder)


There have been so many horror stories about getting a white cast from using this infamous, much-hated, and much-loved powder.
Well, I have to say that if you do, then you’re probably applying too much and not buffing out enough. That said, I think we do deserve to have products (especially ones that cost this much) work easily for us.
MUFE HD powder is 100% silica, which is a spherical mineral that gives a silky slip to your skin, absorbs oil, and helps to diffuse light, much like a silicone primer. Brands like MAC, E.L.F., Laura Mercier also carry similar products. However, while I do love how this feels, I can say that I will never buy this product from MUFE again. This is simply because 100% silica costs a mere fraction of the price they are charging; this is a common, cheap mineral ingredient in a lot of makeup products, and we’re being grossly overcharged.
That said, I probably have to thank MUFE for introducing me to silica powder, as I love it and will probably never stop using it for its ability to set products without changing their color, mattify skin and diminish lines.

HOW TO USE IT?
As a dry primer before powder products.
If you use wet/moist products as part of your routine (creams, sunblock, serums, foundations, concealers, cream blushes, moist highlighters), you probably apply them before you apply any powder ones (mineral powder, powder blush, powder highlighters).
 Now, as some of us know, applying powder right over wet or creamy products can cause them to really cake up and grab in areas, darkening what we want to lighten up in the first places.
BUT, if you set your creams/bases with silica BEFORE applying your blusher and face powder, etc, they will not only go on really evenly, but it gets rid of any white silica cast you may have.
Of course, if you’re heavy-handed with your powders in general, anything will give you an unnatural cast, so don’t blame the silica.
Below, I have a little experiment to demonstrate.
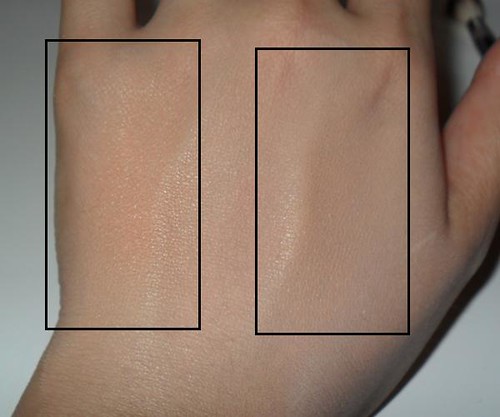
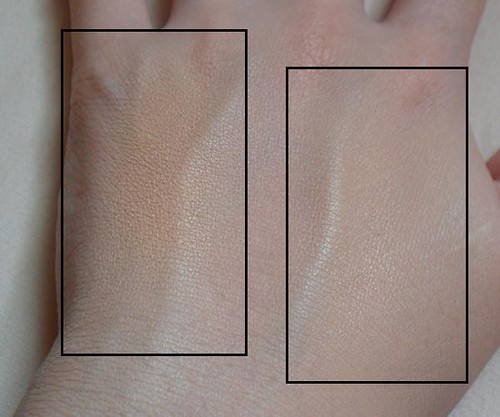
I’m applying concealer all over the back of my hand, then applying silica to set the right half.
Then I’m applying a patch of salmon-colored corrector powder (Everyday Minerals Abbott’s Perk Me Up) and buffing in with a soft fluffy eyeshadow blender.

What you’ll see in the series of pictures below is how the powder will grab on the concealer and darken in the patch (left side) that has not been set with silica.

Pic 1: Artificial light, with flash. 
See how the powder is already orange-looking. And see how the peach powder on the right side has not grabbed, and does NOT have the white silica cast that we are all so afraid of.

  Pic. 2: Natural Light, no flash. 
In natural light it’s worse. The cakiness comes out, the powder is obviously darkened, and skin texture is dull and dry-looking, which can be a disaster for the eye area and zits. (And this is right after application, before sweat and oxidation makes it worse.)
The right side, however, looks as perfect as before, regardless of lighting.


REMEMBER:
  1. Silica acts as a non-sticky surface which prevents powder from sucking up the moisture or oils in your skin and darkening in the process. This is especially important for areas where you tend to apply more products, such as zits and under the eyes. It also helps to prevent overly-strong blush as you’re forced to slowly build up.
  2. After you apply your powder foundation, etc, don’t forget to use a clean brush or powder puff to buff off any excess. Because you have a layer of silica, the excess will slip off easier, leaving you with just enough product. If you skip this step, it’s likely that there is too much powder in areas of your face, which will oxidize and cake over the day, and look horrid in photographs, regardless of what you use.