 |
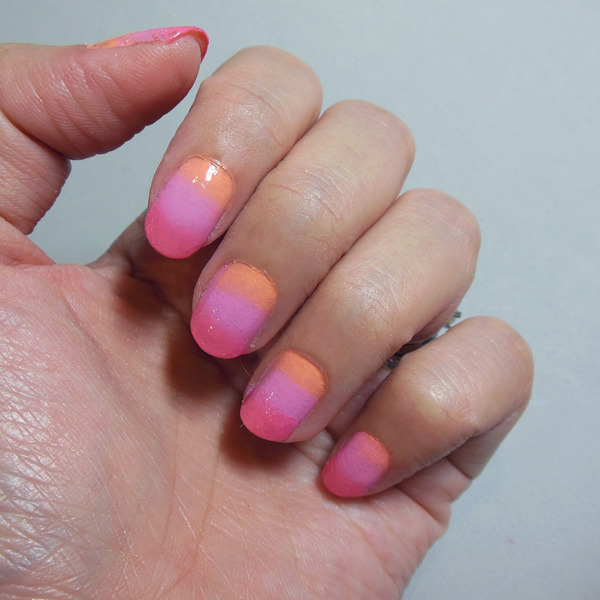
Hot pink, pastel pink, and peach ombre nails.
|
Showing posts with label style. Show all posts
Showing posts with label style. Show all posts
Saturday, March 16, 2013
Candy Crush - Tri-color Ombre Nails (Hot pink, Pastel Pink and Peach)

Tuesday, August 23, 2011
Weekend Hot Pink: NYX Cancun Pink Black Label Lipstick
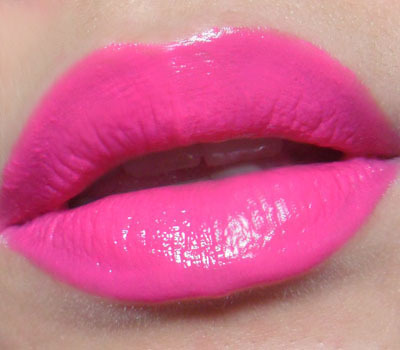 |
NYX Cancun Pink is a bright, blue-based pink that is creamy, pigmented, and (to me) extremely beautiful. While some love has been shown to Hot Pink from the same Black Label range as a creamy version of MAC Candy Yum Yum, Cancun Pink is more opaque. |
The bonus is that it also does not stain the lips the way NYX Hot Pink and Candy Yum Yum do.

| L-to-R: NYX Paris, NYX Cancun Pink, MAC Pink Nouveau |
At just under $5 from Beautyjoint.com, it's definitely more expensive than the round lipsticks, but then this has been one of my favorite NYX purchases to date, and I think it would look wicked regardless of whether you have uber-pale or very deep skin tone.
Thursday, August 18, 2011
Getting Fuller Lashes: Smoky Lash Trick
 |
| Black smoky liner with NYX Angel Blush, NYX Tea Rose lipstick (with Angel blush dusted over) |
Mascara can lengthen and thicken lashes to some extent, but if you have sparse lashes, piling on more layers of mascara is not going to fool anyone into thinking you have lush lashes.
One of the ways to make you look like you have a fuller lash line is adding dark smokiness to the base of your lashes. This trick uses few products, and can be done quickly with no need for smudging or special skills. In fact, this is a look I often wear to work (without the black along the lower lashes) because it looks polished and takes all of 5 minutes.
You need black shadow (matte is best), a firm smudger brush (pictured below), black liquid or kohl liner, and mascara.
 |
| Sephora Smudge Brush |

Monday, August 15, 2011
How to even out NYX Narcissus Lipstick, plus a tutorial!
 |
| Top-to-Bottom: NYX Narcissus Round Lipstick, Revlon Stormy Pink Matte Lipstick, layered for an even, opaque finish. |
Narcissus is one of NYX's best-sellers, but I'm one of those who feel the texture leaves much to be desired. Unlike many of the creme formulas, Narcissus is a semi-shimmery, bright doll-pink which has been compared to MACs Viva Glam Gaga.
The problem is that the very-creamy, slightly-shimmery texture does not adhere to your lips well, so it will sink into lines, and streak and smear around every time you press your lips together. With a shade this bright, any unevenness is extremely obvious.
The trick? Layer this over a matte lipstick.
The matte texture will absorb some of the grease in the texture and make Narcissus less slippery. This means it will stay more even on your lips. You can use a nude lipstick or even some concealer, but to retain the original intensity and not mute the color, a bright pink that is very similar in shade would be your best option.
 | ||
| NYX Narcissus layered over Revlon Matte Lipstick in Stormy Pink gives a more even and opaque finish, without visibly altering the color. Wine-smoked Eye Look with NYX Narcissus lipstick: (Click for tutorial!)
|

Saturday, August 13, 2011
Duping MAC Pink Nouveau
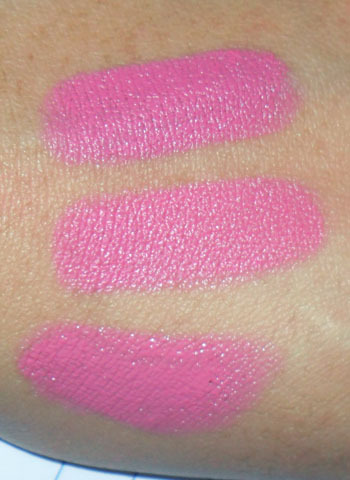 |
| Top-to-Bottom: MAC Pink Nouveau, NYX Matte Summer Breeze, and Etude House VIP Girl PK009 |
If you don’t have access, or don’t want to pay so much for MAC’s Pink Nouveau, but want a bright pink, here are 2 quick options.
NYX Summer Breeze matte lipstick and Etude House VIP Girl PK009.
Note they are not 100% dupes. I’d say they are about 90-95% similar. Both are a twinge less blue-toned than Pink Nouveau, so if you are attracted to true pinks, but find Pink Nouveau a tad too “cool”, try these other two.
Texture wise, NYX Summer Breeze is MUCH closer to the satin finish of the MAC but with a faint touch more peach in the base. The Etude House lipstick is glossy in texture, so you won't get that full-on opaque doll-pink mouth as you would with the NYX and MAC versions. If you have dry lips, or don’t like a matte finish, get this.
Cost wise, NYX wins. The Etude House lipstick might possibly be cheaper if you’re in South Korea (but then I can't say for sure). It’s a little marked up in other parts of the world. But if you are just buying ONE lipstick though, getting PK-009 from your local Etude might be cheaper than footing the shipping cost for NYX.
Tuesday, August 9, 2011
Favorite Eye Pencils
 |
| Mattes (L-to-R): Revlon Matte Kohl Eyeliner in 05 Very Violet, Make Up Store Vanilla matte pencil, Revlon Matte Kohl Eyeliner in 04 Pure White, The Body Shop Special Edition Kajal Eyeliner #01 |
- Revlon Matte Kohls are great because they are so strong and opaque, but creamy enough to apply without tugging too much on your skin. I like Very Violet along the upper lash line in a colorful kitten flick because it's deep and matte enough for good definition, but you still get strong color. Pure White can be used along the waterline. Note that matte whites tend to work better and stay stronger than pearly ones, which sheer out easily, and will not survive the water line.
- Make Up Store's Vanilla matte pencil is my absolute favorite pencil. I haven't been able to find a similar matte pale yellow-beige shade from other brands. This is the best possible color for the water line when you want to brighten and widen, without the harshness of white pencil. TIP: I also use it on any dark spots or marks that need some precision concealing.
- The Body Shop Special Edition Kajal: I liked the creaminess and the twist up tube enough to buy a backup but there are plenty of great black pencils out there, MAC Smolder being one of them. This just happens to be one I enjoy and have on hand.
 |
| Metallic liners (L-to-R): Sephora Flashy Liner in 07 Flashy Copper, Bourjois Metallise in 52 Brun Inoxydable, Bourjois Metallise in 54 Bleu Clinquant, Silkygirl Funky Eyelights in 02 Ocean Blue, MAC Eye Kohl in Rosemary & Thyme, and Bourjois Metallise in 87 Vert Eclatant |
- Bourjois Regard Effet Metallise: Great range of shades and great silky textures. These make fantastic eyeshadow bases, and come in some amazingly strong and bright shades that stay true to color when applied. (Some pencils go on duller and sheerer than they appear.)
- Sephora Flashy Liners: I did not get many shades as I already have a big collection of Bourjois ones, but I do find these very comparable to Bourjois. Flashy Copper is obviously my favorite, but I prefer it over the lids, as it can make your eyes look swollen when worn close at the water line. (It's closer to skin shade for me.)
- Silkygirl: This is a drugstore brand available in Southeast Asia. It's cheaper than the usual brands like Revlon and Bourjois, but the quality isn't entirely on par. They go on less opaque and less evenly than some other brands. Still, Ocean Blue is a lovely steel-blue leaning towards indigo that I love to wear along the lower lash line, with just a neutral wash of beige-brown on the lids. You just need to re-apply every few hours to keep the color strong.
- MAC Eye Kohls used to be the only brand of colored liners I owned, but I don't find them to be as metallic and strong in color as other brands, although they are "smokier" in tone. There are still some great shades and if you are shy of color, these are a better way to acclimatize yourself first. Draw along the lash line and smudge with a finger for a hint of smoky definition without too much color.

Saturday, August 6, 2011
Wet n Wild Coloricon "Greed" Palette (Glam Look)

This is a second look featuring the Wet n Wild Coloricon Palette "Greed". Previously, I did a softer, more colorful look using the shimmery and coral-toned shades. This time, it's more a play on shapes and contrast than washes of color.


Step 2: Using a flat, firm brush, pack the matte black shade along the liner on upper and lower lids, and then extend outward in a wing. It should be thicker at the outer halves, and not too curved.

Step 3: Apply the shimmery coral in the lid area, not extending up past the socket line. Then use a small brush to blend matte coral along the outer half of the socket lines for some subtle contouring.

Step 4: Using a clean pencil brush, run the silvery-gold shade along the inner half of the socket line. This gives shape and very interesting contrast.

Step 5: Apply black liquid liner close tot he lash line, and then false lashes and black mascara to finish the look.

Monday, July 18, 2011
Color of the Moment: Getting that Nina Ricci F/W 2011 Milky-Salmon Lip!
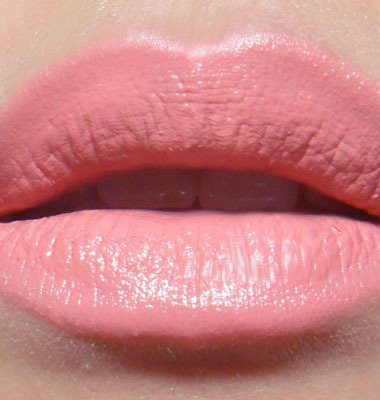
Remember the gorgeous creamy-salmon lip color on the Nina Ricci F/W 2011 catwalk
every magazine editor was raving about?
Pat McGrath just disclosed the formula.
Mix concealer with a coral shade to get that perfect blend. I used MAC NW25 (it's more pink than an NC, and it has the best opacity and texture for the lips) with 2 coral-ey colors. One is more peach and one is more pink. It just depends on your skin tone and preference.

I tried all kinds of lip concealers, nude lipsticks, etc. MAC NW25 + Revlon Kiss Me Coral Super Lustrous Lipstick (bottom swatch) is a win.

If orange is not your thing, and you want to lean a little closer to pink, Rimmel's Pink Fame Color Show-Off Lipstick (hot coral-pink at top-left) gives an even brighter, pinker dupe when paired with a concealer. Replace the Revlon with this if you want a really true-to-catwalk version.

If orange is not your thing, and you want to lean a little closer to pink, Rimmel's Pink Fame Color Show-Off Lipstick (hot coral-pink at top-left) gives an even brighter, pinker dupe when paired with a concealer. Replace the Revlon with this if you want a really true-to-catwalk version.
I do recommend using a paler or deeper concealer depending on your skin tone, and to always choose a slightly salmon shade regardless of whether your skin is warm or cool. It should not be too deep or dark or the effect is spoilt.
To mimic the matte texture that McGrath did (and I did not), layer a single-ply of tissue over your lips, and dust over with translucent powder before applying another layer. You might want to scrape some product into a small jar and pre-mixing it so that you have a consistent shade for touching up.
Pair with bronzed skin for best effect!
Pair with bronzed skin for best effect!
Wednesday, July 13, 2011
Smoked Silver-Violet with Peach-tinted Cheeks and Lips
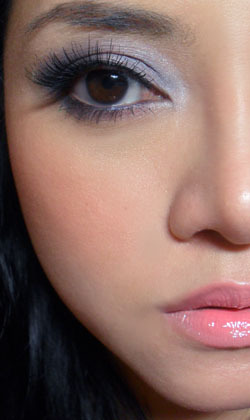
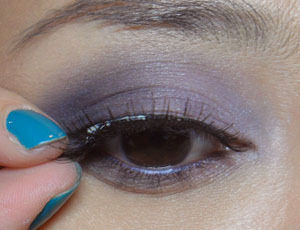
This is a look that composed of a tri-color eye, combining soft purple, grey, and navy, and the color combination is not only flattering for most skin tones, but also wicked on brown eyes.
In contrast, the cheeks and lips are a warm coral-peach in tone.
---
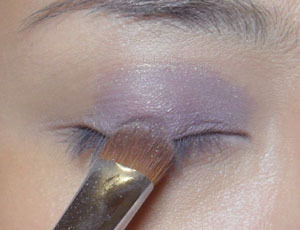
Step 1: Apply the soft purple to the inner 2/3 of the lids.
---
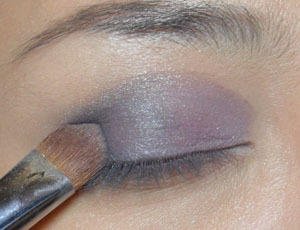
Step 2: Apply a soft grey to the outer half of the lids, blending into the purple.
---
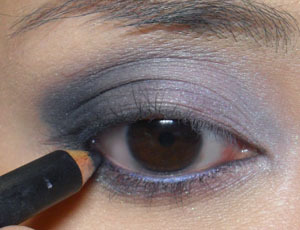
Step 3: With a dark navy, darken the outer corners and up along the socket line slightly. Then trace along the lower lash lines as well.
Finish with navy blue liner along the water lines.
---
Step 4: Curl lashes, apply fake lashes, and then mascara on the lower lashes. I used longer lashes than usual today, just to emphasize the smokiness of the look without too much heavy color.
---
And the finished eye:
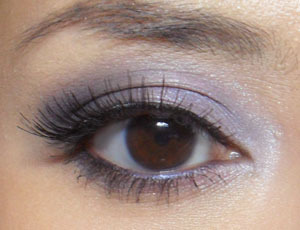
For the rest of the face, I used:
In contrast, the cheeks and lips are a warm coral-peach in tone.
---
Step 1: Apply the soft purple to the inner 2/3 of the lids.
---
Step 2: Apply a soft grey to the outer half of the lids, blending into the purple.
---
Step 3: With a dark navy, darken the outer corners and up along the socket line slightly. Then trace along the lower lash lines as well.
Finish with navy blue liner along the water lines.
---
Step 4: Curl lashes, apply fake lashes, and then mascara on the lower lashes. I used longer lashes than usual today, just to emphasize the smokiness of the look without too much heavy color.
---
And the finished eye:
For the rest of the face, I used:
- NYX Cinnamon blush (bright matte coral)
- Heavy Rotation Nude Lipstick #03 (try MAC Myth or any other pale orange-based nude)
- Revlon Super Lustrous Lipgloss in Coral Reef in just the center of the lips. Press lips together to spread and even out the color a little.
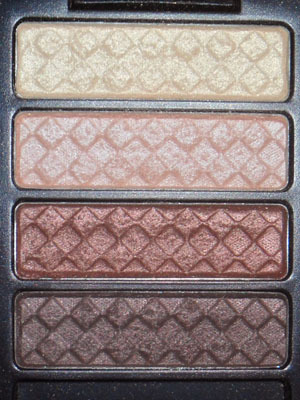
Multi-tasking: Revlon Colorstay 12 Hour Shadow #01 Copper Spice
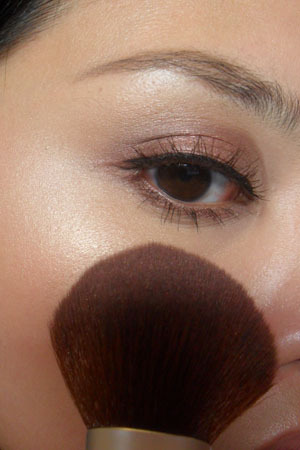
Revlon Colorstay Shadows are a bit of a hit-and-miss with me because I find they are all one texture. There is no contrast between mattes and shimmer and glitters. All of them are the same satin finish, and you don’t always get great color payoff.
But one of my favorites is Copper Spice, which consists of a champagne, a peach, a coppery-russet, and a dark cocoa. Nude Elements is popular, but I find it a little duller and less flattering than Copper Spice.
But here’s what I do with 3-4 color palettes to get maximum mileage out of the shades.
—-
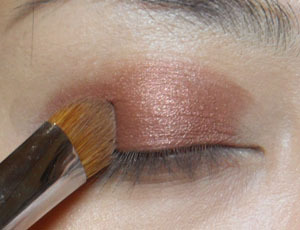
Step 1: Apply the 3rd shade, the coppery-russet, onto the outer 2/3 of the lids. Having a good base and using a flat brush to pack the color on will give you more intensity.
—-
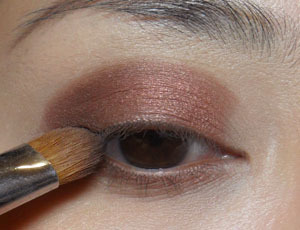
Step 2: Apply the dark cocoa along the lower lash line and outer corners of the upper lids for definition. If you have mono-lids, go ahead and sweep along the hollow of the eye socket a little.
—-
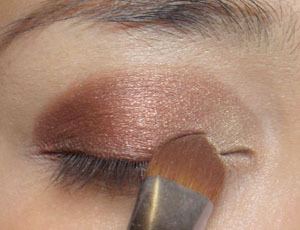
Step 3: Apply the palest champagne-gold to the inner corners of the lids, and downwards on the inner corners of the lower lash line as well. Then use a soft brush to blend out any harsh lines overall.
—-
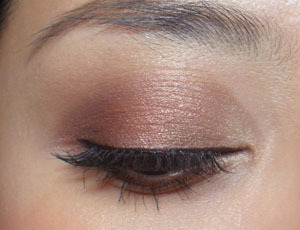
Step 4: Apply black liquid liner to the upper lash line, and then black mascara to top and bottom lashes. Put on fake lashes if you need a little extra oomph. This is a look that transits well between day and night.
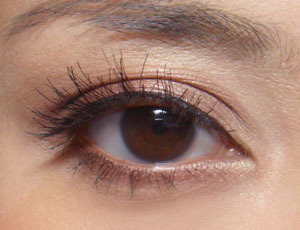
—-
Step 5: Here comes the multi-tasking step you can take with most neutral-to-warm eyeshadow palettes. With a big fluffy brush, apply the two palest highlight shades to your cheekbones as highlighter. (Yes, it doesn’t ALWAYS have to go onto your brow bone. And I DO recommend sticking with one spot, not both, if you don’t want to overdo it.)
This gives a lovely sheen and coordinates with your eye look.
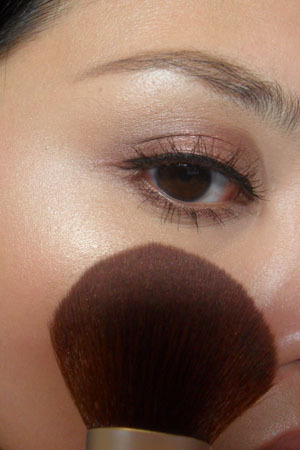
Tuesday, April 26, 2011
Lea Michele Red-Carpet Sapphire Look
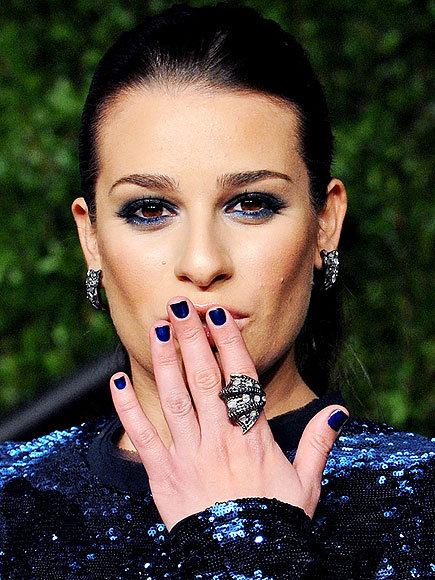
Photo credits: People.com
I don't have any particular love for Lea Michele. I happen to be one of the freaks on this planet who has only watched 1 episode of Glee, and didn't feel compelled to follow up with more doses.
But I love this deep, dark sapphire eye. It brings out the warm, rich tones of her brown eyes and complements her olive skin. I have to say it's a little bit of a navy-overload with the matching dress, makeup, AND nails, but what the hey - the eyes are gorgeous.
Current: Orchid Hush nails (L.A. Girl Robin Blue Creme)

L.A. Girl makes 2 items I love.
1. A true black creme lipstick which has a beautiful sheen and is surprisingly flattering (though I wouldn't wear it to work)
2. One of my favorite creme nail polish colors in the world, #329 Robin Blue Creme lacquer
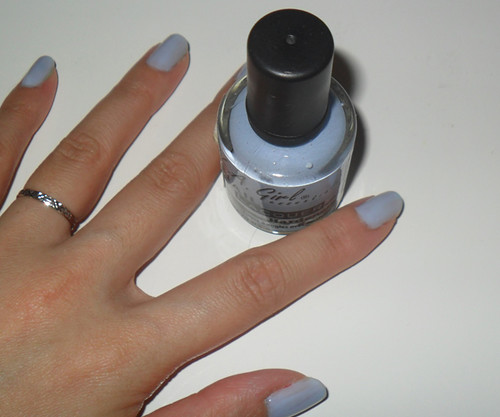
#329 Robin blue is not really a robin's egg blue. I think someone needs to do some research before naming these shades.This has lavender undertones, not green.
It's a gorgeous muted Orchid tone, that elusive hybrid between grey-blue-lavender, which is lovely on most skins. It's not a fully opaque polish, by the way, so you will need at least 3 coats to make it even. But I wear this to work all the time with no problem. It's surprisingly neutral and muted, flattering on the skin, and does not look too outlandish for a corporate environment.
At the same time, it's an interesting color to look at.
I haven't been able to find a shade quite like it from any other brand, and I love that it's cheap and comes in a big bottle.
My gripe?
It doesn't last as well as Sally Hansen or O.P.I., etc. But then it's not expensive, so I can live with that.
Velvet Brown with a Purple Twist (88 Warm and 88 Shimmer Palette)

This is a simple, flattering look which is wearable for the day, and fun for the night. You can also streamline it to just 2 shadow shades if you want. A matte medium-deep brown, and a metallic medium-purple.
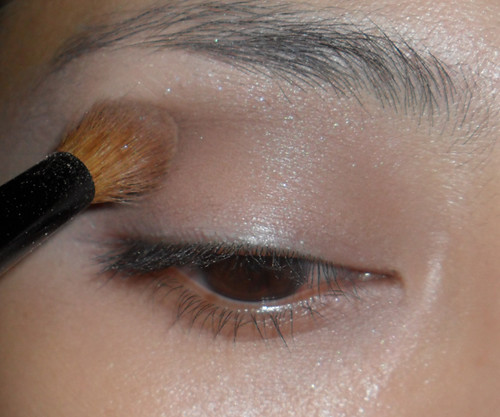
1. Apply base and then pack on a medium brown matte shadow all over the socket, and along the outer half of the lower lash line.
---
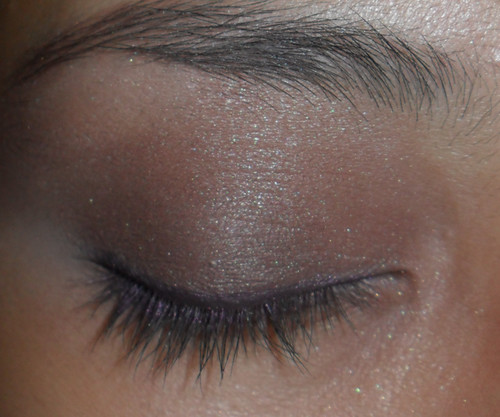
2. Fill in lid with a deep matte taupe brown and layer on a medium satin brown, blending and spreading up over the brow bones. Then line upper lash line with dark brown or plum liner.
---
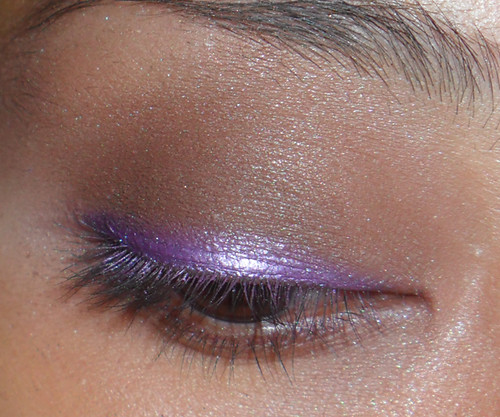
3. Apply a rich medium metallic purple wet (I used MAC Fix+ to foil my shadow for instant liner), JUST along the lashline, and layer for more dramatic sheen if needed.
---
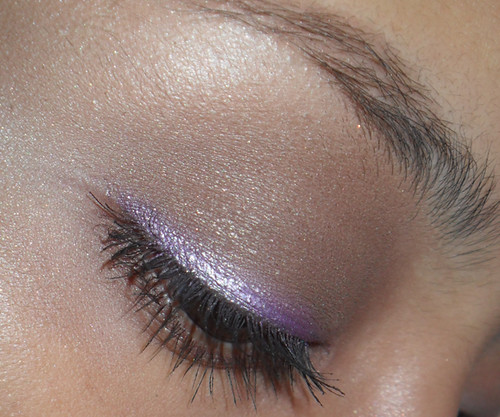
4. Apply generous amounts of black mascara on top and bottom lashes, and voila.
---
Also...
- Get a dewy glow with: Revlon Colorstay in 310 Warm Golden blended with L'oreal UV Perfect MAT SPF30
- Get big black lashes with: Rimmel Sexy Curves mascara
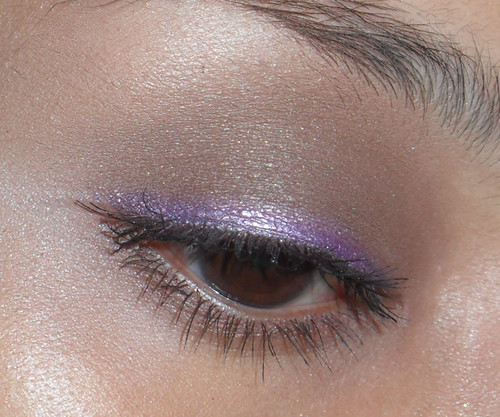
Have fun with it!
88 Shimmer Palette vs 120 Palette
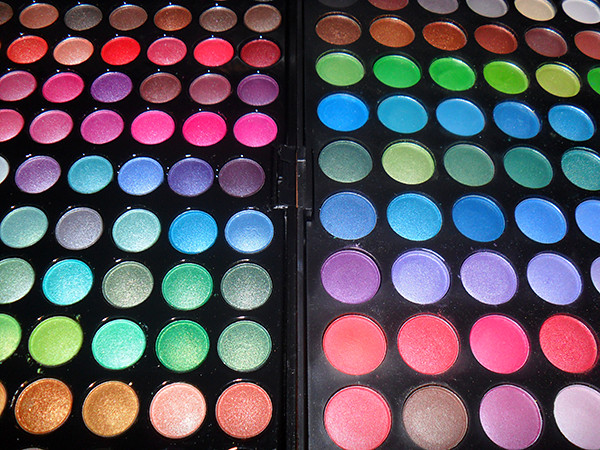
If you had to get one, how would you know which one you'd like more?
Well I did order the 88 Shimmer Palette off ebay when I purchased my 120. And it took a little longer to arrive. But now, it's time for an initial comparison of both popular palettes!
Size of Case: Similar palette dimensions, but the 88 palette has all its eyeshadows on 1 side, whereas the 120 has 2 separate palettes within, so it's thicker and heavier.
Case quality: 120 wins. My 88 neutral arrived with the latch broken off, and the 88 shimmer is hard to open. They are also thinner and less sturdy than the 120. The only con for the 120 is that each of the 2 palettes are detached from the main case itself. Some people may like being able to bring the palettes out and about, but I find it too prone to eyeshadow incidents, so I actually glued my 2 palettes to the case.
Eyeshadow Volume: 120 wins. Besides the fact that there are 32 more pans, each pan is also at least 150% the size/volume of an 88 pan. As circles go, it's probably close to double the amount of shadow. Odds are, the 120 will last you a good while longer than the 88.
Color spectrum: I have to say the 88 wins, color-wise, and the 120 wins texture-wise. Despite having less colors, there are no repeats in the 88 shimmer palette. You have all the reds, pinks, browns, blues, greens, yellow, deeps, and highlights you need. The 120 has a some duplicates (or colors close enough to be so). It does offer a variety of matte and shimmer, which is great, but the fatal flaw is it's lack of soft nudes and really rich, deep tones (coffee, navy, indigo) for contouring and definition.
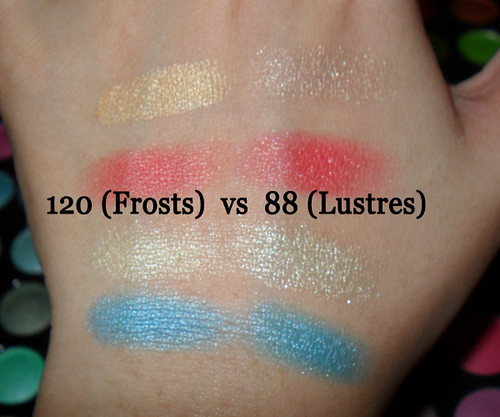
Texture/Pay-off: 88 Shimmer vs 120's non-matte Shades are like MAC's Lustre shadows vs Frosts. Frosts tend to be more opaque, with a satin-y finish. Lustres tend to be a little more translucent, but also more reflective and shimmery. It depends which sort of finish you like. Pay-off wise, the 88 is far more consistent than the 120 though. If that's important for you, get the 88.
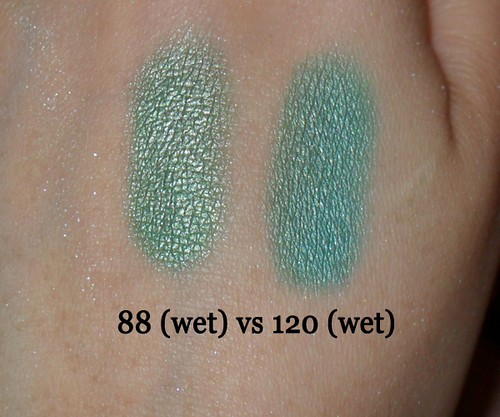
Usable Wet? Yup for both! But I find the 88 Palette works better with water or mixing medium than the 120. Pretty much the whole palette can be converted to wicked chrome-finish liners because of the intensity of these shades when wet. Below, I picked 2 almost-identical teals, but as you can see, the level of sheen differs greatly. Only a very small handful of colors in the 120 palette can give you that level of sheen.
Longevity: Both of these wear well with a primer beneath, and I'm not about to go out and about without any on, so I am not a good judge on this.
Blendability: The 88 Shimmer palette is easier to work with as far as blending different shades goes. HOWEVER, unless you're going to use everything wet, you will get a stronger contrast with the more opaque colors in the 120 palette. It takes a little more work, but you will get a more dramatic effect without having to wet any except the hardest of the matte shades.
Verdict: If you are looking for the option to spice up your existing collection of shadows without forking out a ton of money on dramatic colors, get the 88 Shimmer. If you're just starting out and need something that will be the centerpiece and mainstay of your budding eyeshadow collection, get the 120.
Review: Make Up For Ever Face & Body Liquid Makeup

CLAIMS:
This waterproof, ultra-light, water-based gel contains no emulsifiers and provides a totally natural, satin finish. Ideal for normal skin-types as well as for fine lines and large pores. Gives skin a uniform tone without accentuating imperfections. A makeup artist's favorite.
INGREDIENTS:
Aqua, Hydrogenated Polyisobutene, Sorbitan Sesquioleate, Cycolentasiloxane, Methylpropanediol, Glycerin, Butylene Glycol, Mangifera Indica Seed Oil (Mango Seed Butter), Acrylates/C10-30 Alkyl Acrylate Crosspolymer, Tetrasodium EDTA, Fragrance, PEG-8, Phenoxyethanol, Tromethamine, Potassium Myristate, Chlorphenesin, Methylparaben, Propylparaben, Caprylyl Glycol, Sodium Polyacrylate, Panthenol, Hexyl Cinnamal, Limonene, Citronnellol, Geraniol, Butylphenyl Methylpropional, Linalool, Alpha-Isomethyl Ionene. May Contain: CI 77891 (Titanium Dioxide), CI 777493 (Iron Oxides), CI 77492 (Iron Oxides), CI 77499 (Iron Oxides).
VALUE FOR MONEY:
It's a large bottle but I'll have to let you see how it goes. You do go through quite a bit of it if you use a brush or sponge, and it's not cheap to begin with. Still, I'd say I really like the natural look and lightweight feel.
You can get it with other foundations, but not quite so easily.
SWATCH WATCH:
MUFE Face and Body Liquid #32 = NC30 = Bourjois Healthy Mix Foundation #53 = (slightly lighter than) Revlon Colorstay 310 Warm Golden = Everyday Minerals Golden Medium Foundation
(This foundation is sheer and "adjusts" to your skin tone a little, so though #32 is maybe just alittle deeper than my usual shade, it's not really noticeable once applied. I have not tried #20 but it does look like I may need to mix #20 and #32 for a perfect match.)
WHAT IT IS:
A hydro-gel textured sheer-to-medium coverage foundation that stays true to color even in heat and humidity, and allows you to build up coverage in layers. While transfer-resistant, it's not transfer-proof. But fair enough. I don't want to have to take it off with a toilet-scrub.
FINISH/COVERAGE:
This foundation gives a dewy finish (not shimmery; just like natural skin), but be careful what you apply under it (mattifying primer, moisturizer, etc), as that will affect the texture somewhat. The coverage can be quite moderate if you apply and layer it with your fingers. I find it similar to Studio Sculpt by MAC in coverage, though Studio Sculpt gives a matte-skin finish instead of a dewy one.
FEEL:
- Applied over fresh moisturizer: tacky for hours
- Applied over clean skin (or after products absorb for 5-10mins): sets to lightweight feel, but will still be ever so slightly tacky to the touch unless you have very dry skin
- This is lighter than Revlon Colorstay foundation, but has a more noticeable "weight" on the skin than Bourjois Healthy Skin or Mac Studio Sculpt.
LONGEVITY:
Most liquid, gel and cream foundations are water-resistant to a certain degree these days, so I don't find this foundation particularly outstanding in this regard. It does last through a 10-hour work day, but nowhere near as well as my MAC Studio Sculpt, Revlon Colorstay or Bourjois Healthy Mix. Be prepared to touch up quite a few times with powder, especially around the eyes and T-zone.
APPLICATION OPTIONS:
This "gel-like" foundation does dry and get tacky, so you need to work at a moderate speed to blend it nicely before things start to get too sticky. It doesn't dry as fast or set as stubbornly as Colorstay though, so you have some breathing room to smooth things out.
- Stippling brush: Light, satin finish. Good if you want the sheerest veil of color to even out your skin. I have not tried to layer the foundation with this as it sort of defeats the purpose of using a stippling brush. If you want maximum coverage, try a flat brush or your fingers.
- Foundation brush (flat): Light to Moderate coverage. I find after the second layer, it gets a little hard to smooth more on with the brush, as the liquid starts to dry up on the fibers by then. It also stops looking natural after the second coat, so be warned.
- Damp sponge: Soaks up too much product for me, even when damp. If you don't mind the cost, this does give a lighter, and more matte finish than the other options.
- Fingers: My favorite for wasting the least amount of product, as it gets the largest amount of pigment onto your face in the least amount of time. This is also the best way to build up more layers of the product without looking too unnatural.
THINGS TO NOTE:
- If you apply lotion, sunblock and other skincare before this foundation, you need to let it set for a few minutes before applying the Liquid Makeup as the formula will slip and sheer out otherwise.
- If you need to layer it on, fingers work best, because as the base layer starts to set and get tacky, it becomes hard to slide more product over it without smearing the bottom one off. You will need to start dabbing, not dragging, in order to build it up. A stippler and sponge can do it, but not nearly as well as your fingers.
- This is like nail polish in that the areas where you apply more than one coat will take a disproportionate amount of time to dry fully. If you apply more layers under your eyes, bevery careful that whatever powder you apply over it for several minutes after will still grab and cake up on the moisture.
- Be warned that this will easily smear off if you spray your face with a toning mist (oil-free) and touch it before it dries.
- This is scented with a strange citrus-y floral fragrance. It also contains silicones and mango seed butter (so I don't see how anyone can claim it is oil-free). If you have objections or sensitivities to any of these, beware.
RECOMMENDED IF:
- You want sheer-to-medium or flexible coverage.
- You love the dewy finish and will trade off a little durability through the day.
- You are trying to avoid the powdery made-up look.
- You don't have too many raised/pitted blemishes.
- You don't have very oily skin.
- You have slightly oily or combo skin but don't have too many contoured blemishes and don't mind blotting through the day.
- You want people to say "You're wearing makeup??!"
Subscribe to:
Posts (Atom)