Showing posts with label pictorial. Show all posts

Sunday, May 22, 2016

Silver Lilac Lids


Here's a quick and easy but high-impact look that I've been wearing often lately. I've owned a whole set of Australis Metallix shadows for awhile and haven't talked about them much because they're a little perplexing. 

They are made of the most beautiful sparkly flecks of metallic pigments. But the pigments are suspended in a very old-fashioned creamy base that creases and doesn't set, unlike the budge-proof cream shadows we're used to today.


However, these are great for layering - and I prefer them on top of shadows mostly - as a pop of metallic sheen in the center of the lids. But for some of the deeper shades, I just use them as a base for sparkly loose pigments, like Sparklers from Make Up Geek.


One of my favorite combinations these days is a silvery violet duo; Lana Del Grey from Australis and Aurora from Make Up Geek.


One bad thing about using the Metallix shadows as base is the flecks of pigments are quite large so you often get a slightly patchier coverage and gaps if you try to blend for too long. It's a product suited for dramatic sparkle and making a statement from a certain distance.


Other products used for this look:
  • Taupe transition shadow: Innisfree Mineral Single Shadow 40
  • Black matte shadow: Bourjois Intense Extrait de Fard 10
  • Black liquid liner: KATE Super Sharp Liner in Black
  • Metallic indigo pencil: Urban Decay 24/7 Pencil in Tornado
  • Black mascara: Benefit Rollerlash Mascara


P.S. Run a little along the outer 1/3 of the lower lashes as well if you want more definition
Finish with mascara
The eye makeup looks both soft and dramatic at the same time. It mostly looks like a light silver or lavender eye depending on the light, but then when you blink and the light catches on the pigments, it looks like molten metal.

I've worn it to work a few times, and it does get attention, but I don't consider it overly dramatic compared to a full-on smoky eye or glitter.


Monday, October 5, 2015

How to look fab after a long-haul flight: Skincare and Makeup Tips plus Eye Look feat. Chanel Les 5 Ombres de Chanel Eyeshadow Palette


Face it - we may love going on vacation or visiting another country but I don't know many people who enjoy a long-haul flight. 

Besides lack of sleep and jet-lag, you need to deal with dehydrating cabin air that sucks all the moisture out of your skin, a tendency to retain water and get puffy around the face and eyes, and makeup looks terrible on top of all that.

So what if you need to hop off a flight and go straight to a social engagement? You kind have to get yourself looking as good as possible. No easy task.

Here are a few tips (and product faves) that you can consider on your next flight.

FIGHT CABIN SKIN

Cabin air sucks the life out of your skin. Which can give you a crepe-y looking skin surface, magnify fine lines, and compromise your skin barrier and put you at risk of sensitive reactions later on. Always use a product that is a bit more moisturizing than you normally need, even if you have oily skin. Your skin will thank you for it. 

My favorite in-flight skin protectants after trying tons of different lotions and potions over the past 10-15 years are oils, because they help seal and protect the skin surface longer than a water-based lotion will, and they don't contain fillers and additives that might give you a reaction after a 20-hour flight. 

You also get a bit more time to give yourself a good facial massage during application, which can help reduce/prevent puffiness.

For normal to dry skins, try more nourishing concoctions:
  • La Mer The Renewal Oil (available from Nov 2015)
  • La Prairie Swiss Ice Crystal Dry Oil
  • Kiehl's Midnight Recovery Concentrate
  • Jurlique Purely Age-Defying Face Oil
  • Clarins Santal or Blue Orchid Face Treatment Oil


If you're combination, there are lighter oils that help protect your skin while not sitting in a greasy film on your skin:
  • Kiehl's Daily Reviving Concentrate
  • Clarins Lotus Face Treatment Oil
  • Laura Mercier Rose Infusion de Rose
  • By Terry Huile de Rose
  • Elizabeth Arden Ceramide Oil Capsules

Even if you're very oily and cannot imagine applying a straight oil to your face, consider an oil-in-water serum like Chanel's Hydra Beauty Micro Serum. It will not feel oily but supplies a dose of calming camellia oil to the skin, along with other water-based humectants.


Some people also like to bring hydrating masks and sleeping masks (Origins and Laneige have some good ones) on flights. Do that if you have something on hand and prefer it to an oil, but I personally just find oils last and work better. You need less to keep your skin supple for hours and it just doesn't feel as sticky and heavy. Plus, you can use oils on your cuticles, on the ends of your hair, etc.

Reapply every few hours, and make sure you drink plenty of water.
IMPORTANT!
Keeping your makeup on for an entire long-haul flight is one of the worst things you can do for your skin. You might be able to get away with it in your teens and 20s, but as you get into your 30s and up, your makeup will look positively leathery, cakey and cracked by the end of a 10 hour flight. Putting more makeup on top of it will not help.
I'd rather have no makeup on for a few hours on the plane where few people will be looking at you (trust me, nobody will be staring at you and thinking "man she looks bad") than spend the rest of the day looking raggedy after touch-down. 
You're better off removing all your makeup after take-off so you can apply all your skincare and lip balm first, and then having a fresh canvas at the end of the flight to apply fresh makeup on.

PRE-LANDING SKIN PREP

About 40 minutes before landing time is about the time I start to prep my skin. You can't just slap makeup on and expect it to look great. Even if you've managed to keep yourself well-hydrated and smooth the past few hours, you probably still want to remove the hours of residue and dirt on the surface.
  1. A gentle wipe or a very light and non-drying cleanser is usually sufficient to refresh your face. 
  2. Then give yourself a nice gentle massage with a few drops of oil mixed with a brightening primer, like Le Blanc from Chanel. This not only brightens and evens out your skin slightly so you need less makeup, the lighter layer of oil will help your makeup to go on MUCH better.
Tip: In the cold, dry environments, foundations and concealers will all feel a lot drier and be harder to blend out. That little bit of oil on the skin surface is just going to make sure your makeup is not cakey and heavy-looking. If your makeup is feeling really dry, add a single drop of oil into a pump of foundation and it will go on beautifully.


Again, take a minute to massage your face with firm, gentle pressing/patting motions to get your circulation going a bit. It will help to drain some water and helps with absorption. What you want to be left with is plumped, smooth skin that's perfectly primed for makeup.


PACK SMART

When it comes to makeup in your carry-on bag, less is more. Honestly, heavy thick concealers and camouflage creams will not even work well in such a cold and dry environment, so look for creamier formulations. If you have good skin and minimal blemishes, a good BB cream will do fine.

If you need more coverage though, look for one of those multi-tasking serum foundations that either have great coverage, or come with a matching concealer in the cap.

Lancome's Teint Visionnaire is a classic, but La Prairie's launching a anew Skin Caviar Concealer Foundation as well. The added benefit is many of these foundations and BBs do contain sun protection, but it's minimal, so if you're going to be in a sunny environment, make sure you apply a proper sunblock first.


GET YOUR GLOW ON

Heavy thick powder foundations can look dull and chalky on the skin. If you have dry skin skip powder entirely. If you need to set your makeup still, skip the traditional powders and use a lightweight illuminating powder like Guerlain's Meteorites (I have the traditional pearls here to show you but I would recommend the pressed compact or travel-friendly brush-on containers for traveling with. You don't want to accidentally tip these over and scatter your precious pearls all over the cabin toilet floor.)

Guerlain Meteorites in 03 Medium
Many people don't quite know what Meteorites powders are for.

These are actually satiny-matte powders that help correct discolorations and illuminate the skin without looking pearly and sparkly. They are NOT highlighters in the traditional sense. They work more like brightening setting powders, but can be used alone as well.

If you're feeling tired and sallow, the warmer shades in 03 Medium work better to correct discolorations than the cooler-toned 02 Clair, which actually does not correct undertones as well (unless you happen to be porcelain pale).


For me to look alive and rested (no matter how tired I might feel), there are a few other tricks.
  • Use darker defining colors around the lash line and a matte shade in the hollows of your socket, rather than pale shimmery shadows all over, which can emphasize puffy blood-shot eyes. Well-defined sockets and lash lines are instantly eye-wideners and can help minimize the appearance of puffiness.
  • Redness-relieving eye drops like Visine or Prefin will remove the bloodshot appearance in minutes. Filling in brows (naturally), and applying mascara can also make a huge difference.
  • Groom your brows. They instantly lift and frame the face and make you look more alert and put-together.

KEEP IT LIGHT

I'm talking about your makeup bag. Your makeup should allow you to do both more dramatic looks as well as more natural looks. But you shouldn't have to bring lots of it.

Here are some favorites, many of which have been my trusty companion for years.


  • My trusty travel companion for brows is Shu Uemura's Hard Formula 9 Pencil (above). One shave in the sword style lasts for weeks and weeks so I can be sure I don't need any sharpening on a trip. It's an investment as these cost more than most pencils. But they do last a year each, so purchase them at Duty Free and save some money.
  • Benefit Gimme Brow - these tiny tubes of brow mascara actually hold your brow hairs in place amazingly well. And they're so small they don't take up any space.
  • Dual-ended eyeliners like Urban Decay's 24/7 Double Ended pencil in Naked 1 is perfect because it's not only creamy and easy to use, but has 2 shades that would go with most looks.

  • A perfect neutral palette that's not too large - not too small, and has both very deep, as well as pale shades in a variety of textures. It will carry you from day to night, and can work with pretty much any lip color you choose to wear.

This gorgeous thing is Chanel's Entrelac palette from the Autumn 2015 collection. It's sadly a limited edition, but again - this is one thing that you should pick up at Duty Free if you see it because it's so much cheaper than retail. (In Singapore at least.)

I love the Naked palettes but this is so much sleeker, smaller, and sharper.

THE LOOK

Tuesday, May 19, 2015

A quick FOTD tutorial: stained coral pink lips and soft lids


Shared a simple FOTD on Instagram and Dayre and was requested to do a tutorial on the look, so here it is!

It's really all about bright "stained" lips, and the eyes are kept quite soft so that the lips can be the focus. And I call them stained lips because they're quite translucent and soft, like you applied a strong color and then blotted it away a bit. It's not ombre lips where the lip color is a different tone in the center or between the upper and lower lips. 

You can do this with pretty much any strong lip color  that you don't want to apply full-on. The only color that wouldn't work for this sort of look would be those dark, almost-black purples. Those would sheer out quite grey and deathly because there isn't enough red or pink undertones in them.


Because we're working with metallics, it's always a good idea to prime the lids well. A good base catches onto shimmery pigments and brings out the intensity and shine.


For the shadow color, try any beige-golden champagne tone like MAC Naked Lunch, Tan pigment, The Balm Mary Lou Manizer highlighter if you are pale, etc. I'm using that bronze-beige pigment which is from the now-defunct brand I Nuovi. But this sort of color is easy to find.


Good brown transition colors like MAC Omega, etc are great. I used a Body Shop shadow called 215 Coconuts About You, which is affordable and a fantastic taupe transition color for the socket. If you have small lids or eyes and apply a shimmery beige all over, it can make your eyes look flat and smaller than they really are, so it's important to add definition back.


Here I simply applied a stroke of Mary Lou Manizer frmo The Balm down the center of my lid with my finger. This way of having a darker shade, and a lighter shade helps to re-establish that 3D contoured look of the eye. 


I used Benefit They're Real mascara and Innisfree Gel Liner pencil in No 9 for the final bit of definition around the lash line. Again, this just helps to add some strength back to the eyes. Pale soft colors can really wash out your features. 


The final effect you want is that of gleaming lids. As if your eye lids were slightly wet/dewy. You don't want the focus to be on the color of your shadow or the strength of your eyeliner.


Next the lips! I'm using OCC's Lip Tar Stained Gloss in New Wave, a bright neon warm pink. And the trick to a long-lasting stained lip is to have layer of nude pencil (I used Make Up Store Nude Beauty) beneath as a base.


This step is optional but I actually often apply a taupe/grey pencil (a brow pencil is perfect) right along the outer edges of the lip to expand them slightly. This works better than using a nude or a colored lip liner, in my opinion, because what you want to do is create that "shadow" that appears on the edges when someone has naturally curved, pouty lips.


The actual color I dab on evenly with a finger, and remove any access. You are aiming to stain the lip liner beneath and create a rose-buddy, soft effect. Not apply a thick coat of color. (That's a nice look too but that's not what this tutorial is about.)


Then to finish I wanted a blush that had similar rosy, warm, and tawny tones in it, so I went for Givenchy's Le Prisme blush 22 Vintage Pink.


Tuesday, February 10, 2015

Tom Ford Spring 2015 Eye Color Duo Eye Looks


Tom Ford's Spring 2015 eye makeup colors are iridescent, rich, mysterious and smoky. Similar to what we saw on the Tom Ford runways, these eye color duos will give you intense smoky rock'n'roll eyes. But despite how pared down and possibly dull they look in the pan, they are actually very pretty on the lids. 

This is because each of the 3 duos, Raw Jade, Ripe Plum, and Crushed Indigo, have a white "interference" shadow paired with a deep jewel-tone. This interference shade shifts to a duochrome pearl color when applied. 

In Crushed Indigo, it is an icy blue, in Ripe Plum, a sugary pink, and in Raw Jade, a mint green.

Tom Ford Spring 2015 Eye Color Duo duochrome swatches


Out of the 3, I had the opportunity to pick out 2 duos to try out for myself, so I went with Raw Jade and Ripe Plum, just because they looked more unique to me.


All I did for these eye looks is apply the dark shade to most of the lid, smoking up to the socket line, and running along the lower lash line as well. Then I packed the pale iridescent "white" shade into the inner 1/3 of lids and along the lower lash line. 

To finish the look, I went with what the models wore on the runway. Black khol along the inner rims of their eyes, and lots of black mascara. 

Tom Ford Spring 2015 Eye Color Duo in Ripe Plum
As you can see, the shadows look quite different on the lids from what you might think in the pan. They are very rich and dimensional, and easy to blend, as with all Tom Ford shadows.


Ripe Plum is the closest to a smoky neutral out of the 3 because the deep burgundy is very brown. But once the shimmery pink iridescent shade goes on, the whole thing transforms to a gossamer pink/plum.


I do love all 3, but I daresay I'll get the most wear out of Ripe Plum. I do love a rich wine-brown eye as an alternative to the standard neutrals. 

To recreate the look, just follow the simple steps below!

Step by step guide to achieving this look with any of the 3 palettes!

Wednesday, December 11, 2013

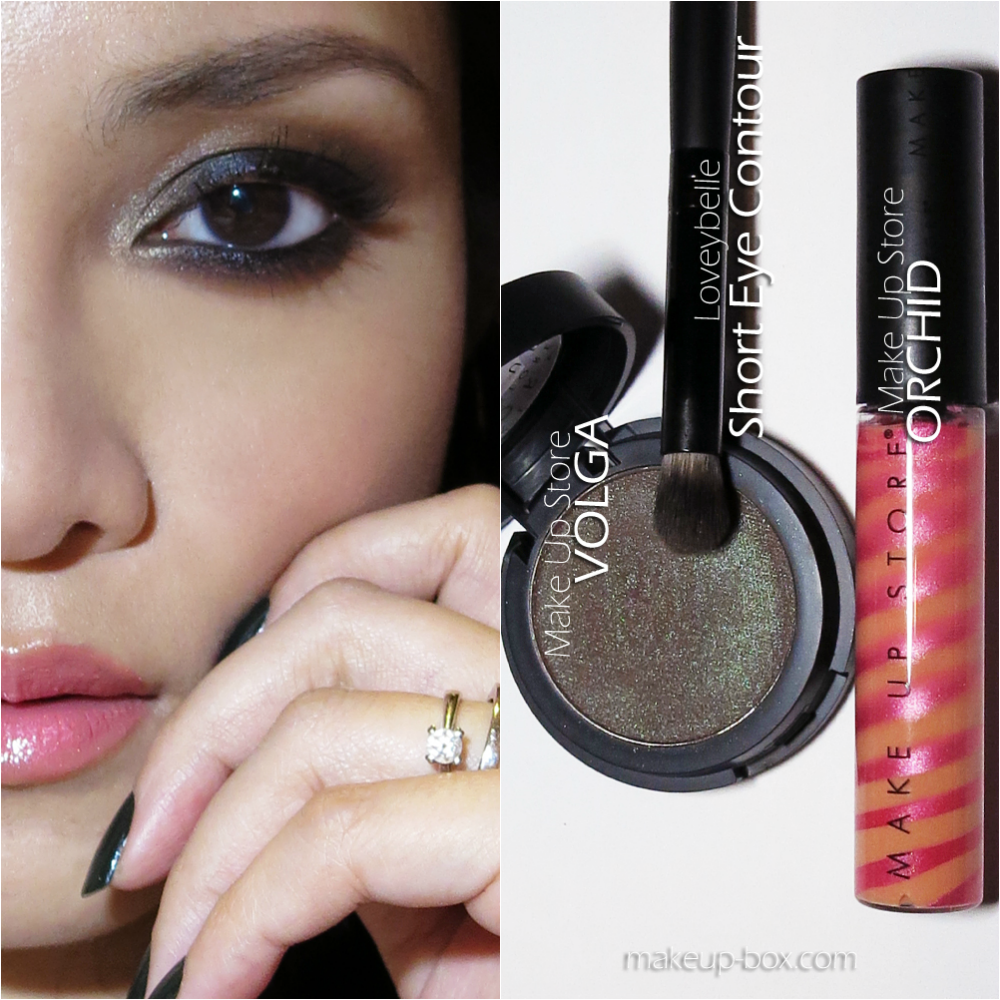
Holiday Look #4: The “Dense brown smoky” (Make Up Store Volga Shadow)


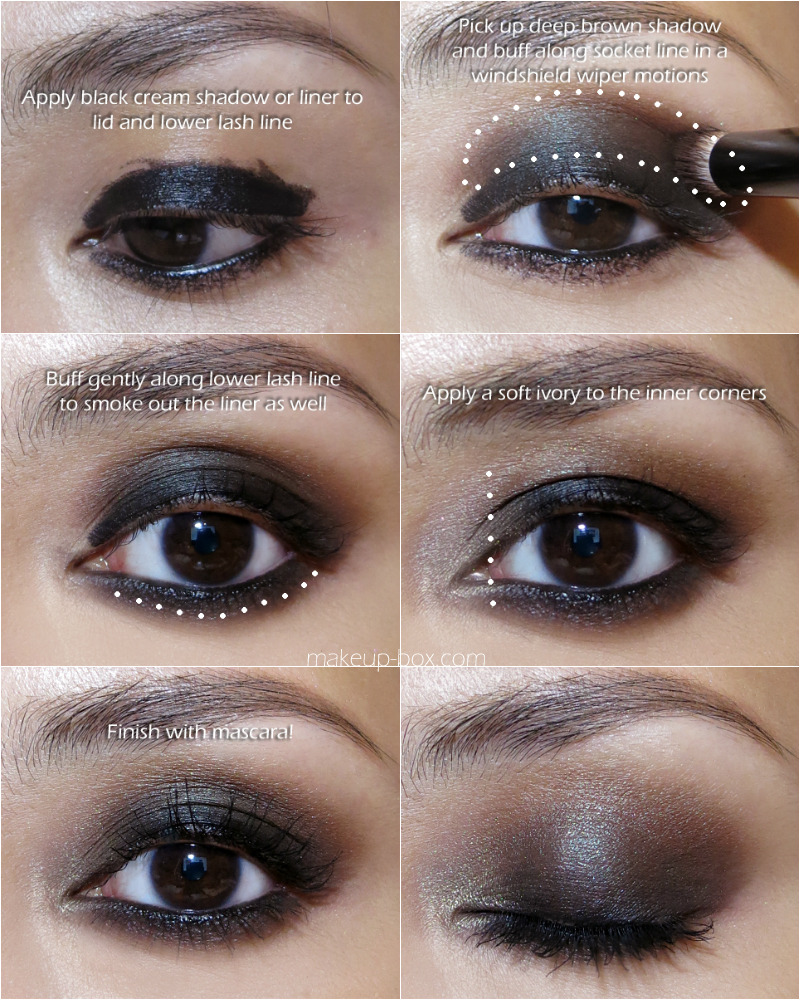
Trust me when I say this is one of the most intense - AND the quickest - smoky eye looks ever. In fact it’s slightly slapdash, and you can swop out the brown shadow for pretty much any color you want as long as it’s not pale.

The trick is not to cover the entire black base with shadow, but to leave just a bit at the lash line so there’s a natural gradation from black to brown as you smoke the shadow outwards.
The star here is the rich brown duochrome shadow, Volga. This MAC Club lookalike is less red-toned, so if Club makes you look like someone’s socked you in the eye while you were partying, this is a fantastic alternative.

You need only:

  1. 1 brush - a rounded synthetic eye buffing/contouring brush like the Loveybelle small eye contour brush, which I used here
  2. 1 matte black khol or cream liner - anything very soft and intense and creamy
  3. 1 deep brown shadow - I used a satiny duochrome from Make Up Store called Volga - which is like a less red version of MAC Club shadow - for a bit of dimension (the black base will deepen and make it more matte, so choose something slightly brighter or more metallic than you intend)
  4. 1 pale ivory/beige shadow [optional; I used an ivory shade in my Tarte Call of The Wild palette]
  5. Mascara
  6. A soft pink-toned blush - I used Benefit Rockateur, which is my go-to daily blush when I’m lazy to think!
  7. A soft pink shimmery lipgloss - Make Up Store’s Orchid is a frikkin’ gorgeous beige-pink that isn’t too sheer or too frosty.


P.S. On nails, I am wearing Erik from Make Up Store, a blackened-green creme that looks like Japanese kombu (dried seaweed).


Sunday, November 24, 2013

Glam smoky toffee-gold eyes with tawny-nude cheeks and lips

This look works like the classic smoky eye, with
  • the lash line being the darkest and most intense
  • color fading as it goes outwards
  • smoky shadow blended quite far down along the lower lash line
 The rest of the face is very monochromatic, with nude tones on the cheeks and lips, topped with a little warm gold-toned sheen.


Very into smoky neutrals right now, and it’s great for the holiday season because they’re flattering for everyone, go with most outfits and are a quick way to add some glamour to the face.


Skin:
Maybelline Pure.Eraser Mineral Foundation OC2
The Body Shop Concealer Pencil 02
ClearLast Face Powder in Medicated Ochre (this is a range of pressed powders in different finishes by Mandom Japan that I love, love, love for setting makeup because they give additional coverage and don’t grab and darken over concealer, and also never look too matte or cakey).
The Body Shop Bronzing Powder in Light Matte 01 (for contouring)
The Body Shop Shimmer Waves in Coral for a soft sheen and a trace of warm color
Brows: 
Shu Uemura Hard Formula 9 Pencil in Seal Brown
Canmake brow mascara 01
P.S. sorry for the duplicate image in the pictorial image below!
Smoky toffee-gold eye pictorial

Eyes:
Instead of a typical pencil, use a soft black kajal or an intense black cream shadow stick like Bobbi Brown’s Long Wear Cream Shadow Stick (these are easier to smoke out)
Bobbi Brown Metallic Eye Shadow in 9 Burnt Sugar (or any caramel-toned brown that isn’t too shimmery)
MAC Pressed Pigment in Flicker (or Lustre shadow in Retrospeck) patted on with damp fingers for precise sparkle
Clinique High Impact Mascara in Black
Lips:
The Body Shop Colour Crush lipstick 220
Bobbi Brown High Shimmer Lip Gloss in Candlelight