Thursday, July 11, 2013

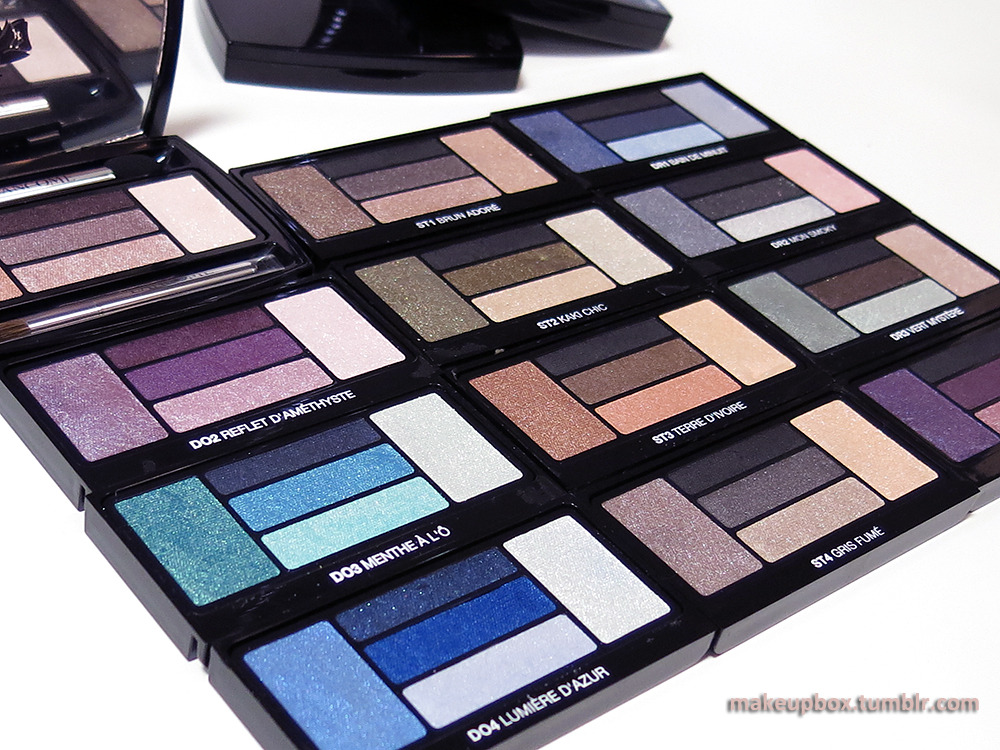
Serious Eye Candy: Lancome Hypnôse Palettes Overview and Swatches

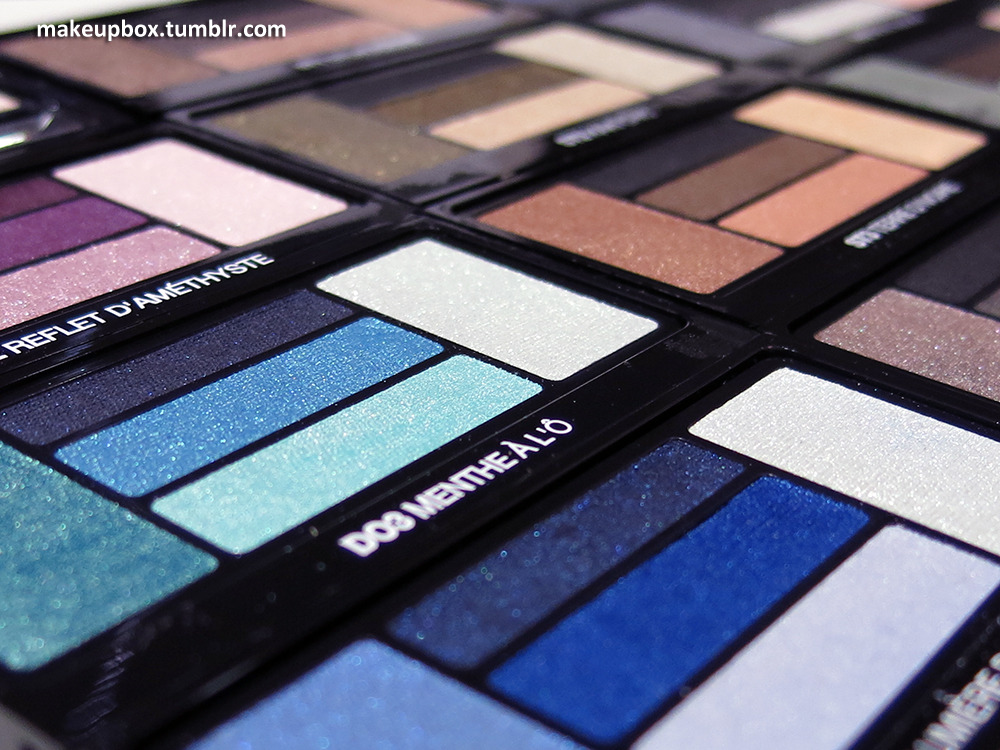
Lancome Hypnôse Eyeshadow Palettes (open images in new tab to enlarge)

No I don't have a whole set of these beautiful 5-color eyeshadow palettes. I wish I did.
The shots were taken at the Lancôme office, and I had a bit of time to do some serious swatching with some of the palettes I really liked. The new range comes in 3 "types".
  1. Doll Eyes: Softer, easier-to-wear colors and textures
  2. Star Eyes: More glamorous, and often more sparkly
  3. Drama Eyes: Intense, high-contrast, with some darker shades
Each palette also comes with a visual tutorial insert with eye looks you can try.

There are 12 different palettes in this range, and aside from the 4 I swatched above, there is also a beautiful deep purple I'd highly recommend, in the Dramatic range (DR4 Violet Magnetique). BUT - I seem to have accidentally deleted the shot of the swatches. :/
I'd recommend just picking colors you like or that suit your lifestyle rather than being restricted by which category they are labeled under. As with any high-end luxury brand, these are high quality shadows you want to be getting a  LOT of use out of, if you decide to invest in them.
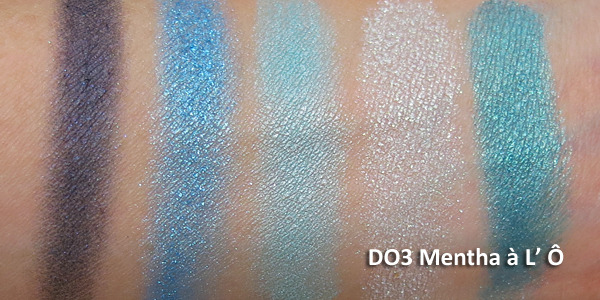
Doll Eyes 3: Mentha a L' O is a beautiful marine/teal collection with shades that remind me of MAC's Tilt and Steamy.

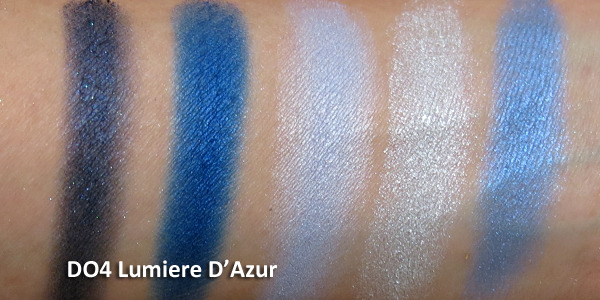
Doll Eyes 4: Lumiere D' Azur is a beautiful collection of blues from navy to cobalt to azure and ice-tones.

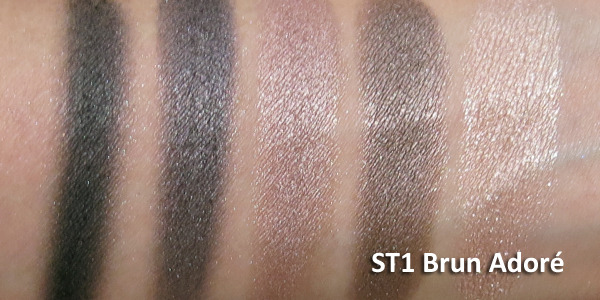
Star Eyes 1: Brun Adore is a perfect neutral smoky-brown set, perfect for Victoria's Secret style bombshell eyes.

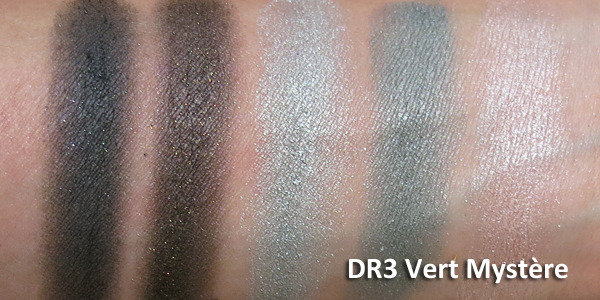
Drama Eyes 3: Vert Mystere is composed of khaki-toned cloudy greens and some neutrals. A very unique palette.


Texture
Up close and personal with Lancôme Hypnôse Eyeshadow Palettes

I'll let the swatch images speak for themselves. I took these right there without professional lighting, and I wasn't wearing any base on my arm, so you can see how intense they are. 
NOT all the palettes were equally pigmented though (e.g. DO2 Reflet D' Améthyst was not nearly as pigmented as most of the other palettes), so depending on whether you like stronger or softer shades, it's best to test them out in person before you decide.


Packaging
The layout of the shades has changed a little from the previous Hypnôse palettes but you still get:
  • 5 coordinated shades, including a dark definer shade (always very important by my book)
  • Magetized wells so you don't need to constantly worry about losing your applicators when you pop your compact open or flip it about
  • A brush applicator (blending) and a dual-ended sponge tip with a wide end (packing on shadow),and a thin end (lining).
The applicator wells are magnetized so the sponge applicator and brush don't fall out every time you tip the palette.

 Do you NEED these?

Let's just get it out there; these are expensive!
Each Hypnôse eye palette is US$51 or SGD90 for 2.7g (0.09 oz) of product. They are right up there with the Diors and Chanels.
If you are just starting to experiment and want tons of color to try lots of looks with, you might be better off spending this amount of money on a number of budget palettes with tons of shades.
If the below conditions apply to you,
  1. it's a luxury gift to pamper someone special (this could include yourself),
  2. you don't change up your makeup a lot and would rather invest in a few quality items rather than in a lot of cheaper things that you won't use,
  3. you're splurging on yourself for a very special occasion like your wedding, 
then you might get a lot of mileage out of one of these, because they ARE very good shadows.

Wednesday, July 10, 2013

Metal Decals: What they are, and tips for using them in your nail art!


Metal decals are a pretty cool way to accessorize and customize your nails because they share the intricate designs of nail stickers but are WAY more bling and cool to look at, besides being relatively simple to work with. 
They are made of a very soft, thin metal, can be used on acrylic nails or natural nails, and are usually pretty small in size (below 5mm or 2/8"). At this point, I've never seen colors other than silver and gold. 

Purchasing:
They're very affordable (120 pieces in a mixed set usually cost no more than about US$2.50 - 2.99) and come in tons of different shapes.
  • If you're just trying them out and don't NEED to get the hello kitty inspired ones I used, I'd recommend skipping the shipping cost and buying a mixed pack from lightinthebox or bornprettystore.
  • If you can't IMAGINE not using hello kitty metal decals and don't mind paying shipping, then I'd point you to reputable sellers on good ol' ebay who ship internationally.

How To Use:
First you want to apply your base polish of course. Because I'm doing a Hellow Kitty theme, I had to use a hot jelly pink. Try something like China Glaze Heat Index. (I actually toned it down slightly by applying this over a slightly less neon jelly pink I got from Hong Kong beauty supply store Sasa, but you don't need to.)

Now get your decals out. The bigger the decal, the trickier they are to work with, because you need to bend them slightly so they will fit snugly over the curves of your nail. Flat ones would just stick out. 
Tip: It's easier to pre-bend them by pressing them around the curved side of a pen.

Now you can place each piece over the designated nail to see if the curve fits properly. Make sure you leave minimal gaps underneath or it will pop off.

When you're ready to apply it, you can use a bit of clear polish, OR my preferred nail-art adhesive, repositionable craft glue. Just smooth it on where you want the decal to go, and before it's dry, place the decal on.
This is because you might need a bit of time to move it around until you get it into the perfect position or angle, and if you wait for the glue to dry, it would be too tacky to shift the decal.

I seldom ever do uniform fingers, so on my middle finger, I decided to do 2 diagonal stripes using gold holographic striping tape (#28 here). 
Tip: Striping tape has a tendency to lift and start peeling off at the edges after a day or so. To minimize this, always cut off the tape BEFORE the edge of your nail and make sure you apply a thick layer of top coat.

On the thumb I combined both, by using a bow on the top right corner (a la Hello Kitty herself), and 2 additional gold stripes along the bottom.
Tip: Finish by applying 2-3 coats of topcoat just to make sure everything is secure, and the surface is smoothed out so there are no sharp edges. Especially important if you're doing this on a child as they could scratch themselves or rub their eyes.


One Other Idea: 
Use these to bling up your cell phones!

Saturday, July 6, 2013

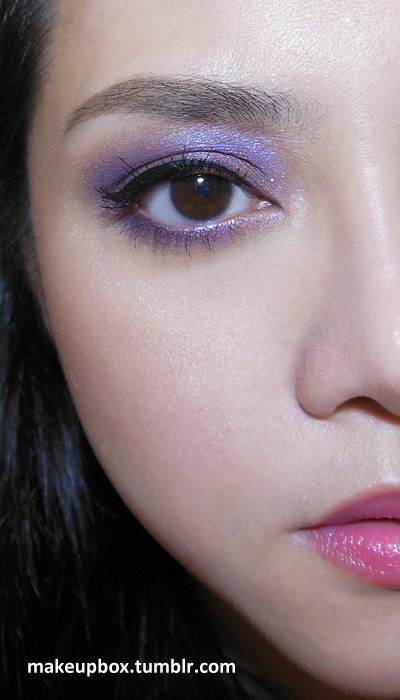
Club E: Smoky purple look feat. VDL cosmetics


At present, VDL has confirmed it is not internationally available (bummer...) but if this ever changes you will be the first to know! In the meantime, you are free to substitute similar colors.

image
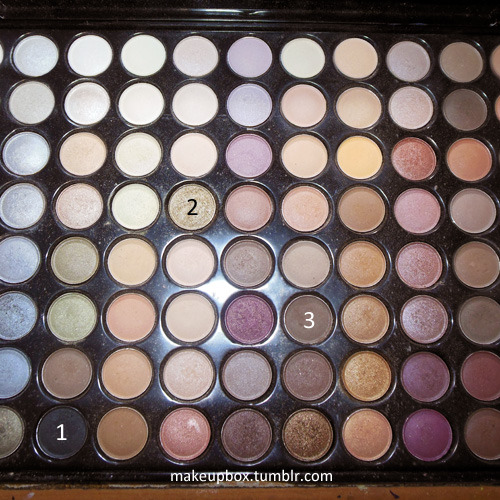
This is a browny plum. If you can't find VDL, CoastalScents.com's Tyrian purple is a slightly cooler version.

image
Alternate options: Coastalscents.com's Violet Echo or  NYX Purple. 
(read more below)

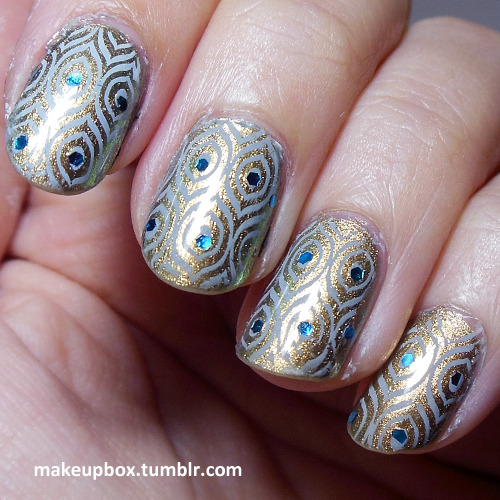
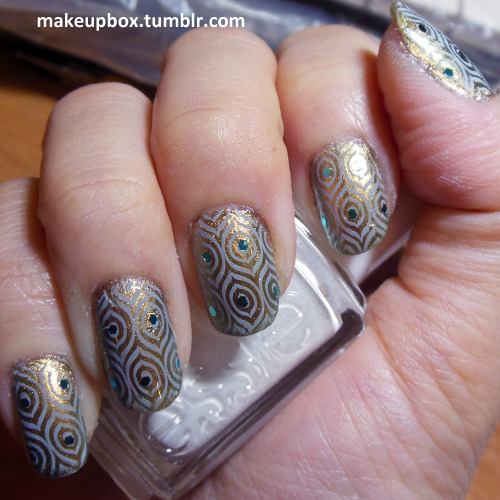
"Antique Bronze Relic" Manicure

I was looking at one of the prints on an XL stamping plate and saw one design that I thought looked really interesting. It's a geometric pattern that looked kinda organic (peacock) and kinda tribal/sci-fi in a rather 5th Element or WoW Iron Dwarf relic kinda way. Nerd, I know.


I used:
  • A beautiful duochrome polish olive-green from China Glaze that's a dupe for Chanel Peridot, called Rare & Radiant.
  • A white Essie polish as stamping color. I didn't use a Konad stamping polish as it was too stark and opaque a white and I wanted something softer.
  • An XL stamping plate in design "B" that you can get from cheeky-beauty.com
  • Konad stamper and scraper
  • Turquoise/Teal hexagon glitter
  • Repositionable glue (if you have foil glue that works; anything that dries clear and tacky)
Tutorial below!

Monday, July 1, 2013

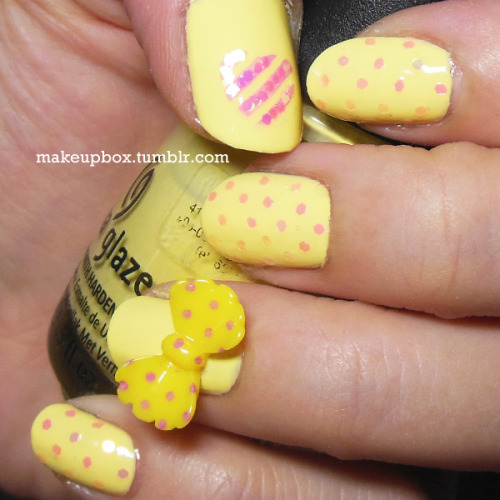
The “Yellow Polka-Dotted": Lemon Fizz Nails with Acrylic Bow and Pink Glitter Spots

Yellow polka-dotted nails with acrylic bow on accent finger and sequin heart on thumb.

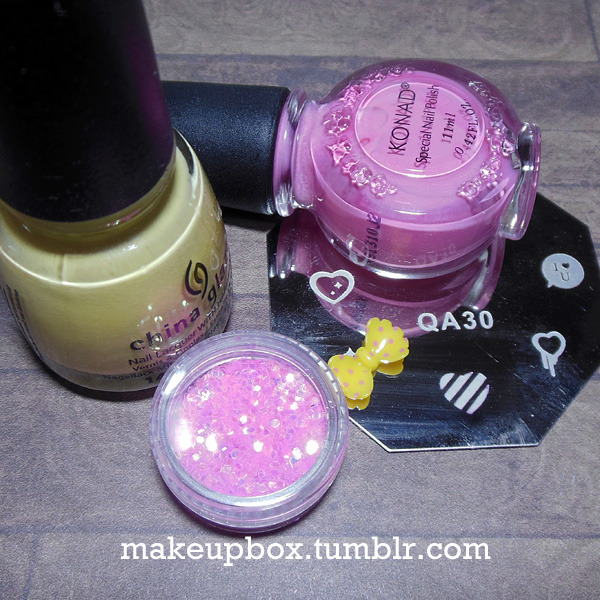
Items used from left: China Glaze Lemon Fizz, Konad pink special polish, yellow acrylic bow with pink dots, and pink translucent glitter. QA30 stamping plate from eBay.


I was inspired by a pretty yellow acrylic bow and decided to do matchy-matchy nails to go with the theme. 
Apply pale lemon-yellow polish until opaque, and let dry.

Use nail glue (or indeed, super glue) to apply the yellow bow to the ring finger. Remember not to use too much. This type of glue is stronger with just a thin layer. 

Make sure your repositionable glue dries a bit before you start dotting on the glitter with a toothpick or dotting tool, or they won't stick. Simply dip the tip of your dotting tool in a tiny bit of glue and let dry so the surface is tacky and it can pick up glitter easily.
 Repositionable glue is available from arts n crafts stores (scraperfect.com has a really good one called Best Glue Ever if you prefer to shop online; they ship internationally). They're really the perfect thing for applying small pieces of nail art and glitter to your nails. 
For pink glitter, you can simply use any translucent duochrome pink glitter like the one I have above. It shouldn’t be too small in size or the dots won't be visible.

I used a random plate that was provided free when I bought a bunch of polishes from a seller in China. I'm not sure how you can get the exact same one but I 

Remember to let the glue dry before applying glitter!


I used Seche Vite topcoat.
Feel free to change the color scheme around and use different combinations! (Red and white, pink and black, blue and aqua, etc.)