Thursday, November 3, 2011

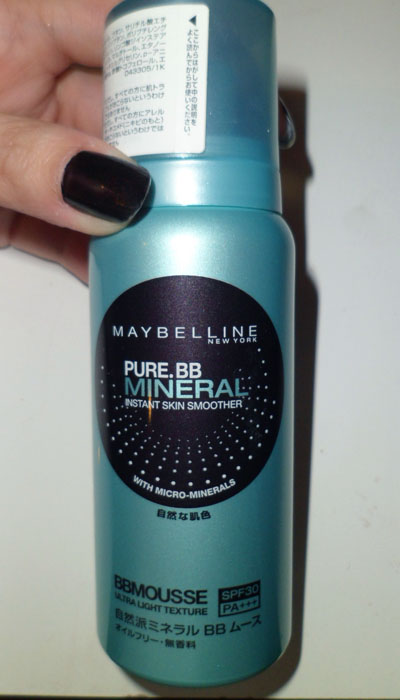
Review and Snapshot: Maybelline Pure BB Mineral BBMousse (SPF30)


I had to pick up a cannister of the new Maybelline Pure BB Mineral BBMousse the other day. I'm not certain if this is generally available around the world or if it's an Asian exclusive.

For the complete post, visit my Tumblr here!

    Sunday, October 30, 2011

    Easy 20's-inspired Siren Look


    A dark lip and dramatic eye can be overly-dramatic when paired together, but if you're going to be dressing up as a flapper girl for either Halloween or any other fancy occasion, this is a simple look that can help you channel the 20's with minimal fuss.

    Regardless of skin tone, what you'll need are:
    • Matte foundation and powder
    • Black shadow (matte)
    • Dark russet/wine shadow (shimmery)
    • Contouring powder (matte)
    • Very dark black-purple or black-brown lipstick

    ---
    Step 1: Begin by applying matte foundation and powder over your face. If you need to be really dramatic, make sure you REALLY apply the powder. If you just want a 20's-inspired look like I did, leave a slight glow to your skin.

    Step 2: Brows. For a dramatic look, you can cover your brows with Prit stick (UHU, or any other water-based stick glue). Rub it on and smooth away any excess, let set for a bit, and then apply foundatino over it. I don't recommend this unless you are an expert at brow-drawing, because you'll need to draw in entirely new brows and most people can't get both sides even.
    If you want to go the easy route like I did, just use the matte black shadow and a fine angled brow brush to shape it gently and make sure you have a pronounced arch. Don't make it thicker than it naturally is.

    Step 3: Creating the doe-eye. Lay the base by packing matte black within the lids. Note that the color only goes up into the socket at the INNER half of the eye. At the outer half, it slopes down and ends right at the outer ends of the eye. No wings, flicks, or smokiness. 
    On the bottom lid, DO THE REVERSE, and concentrate color on the outer half of the lash lines. At this point, it will look very odd and panda-like, but don't worry.
    This creates the exaggeratedly rounded eye look of 20's screen sirens.

    Step 4: The fun part; smoking it all out. Use a dark rust or maroon colored shadow on a blending brush, and smoke out the edges of the black. Carry the color up to the bottoms of your brows on the inner portions of the eye. At the outer ends, it should slope downwards and not wing out.
    Repeat on the lower lash line, concentrating the smokiness on the outer halves instead of inner this time.

    Step 5: To finish up, apply black gel liner along the upper and lower lash lines. No need for precision. You just want to darken up the lash line.
    Then apply mascara to finish. If you want to be more dramatic, wear spiky false lashes with gems or rhinestones near the TIPS. Women in those days liked to apply little balls of glue right on the tips of their lashes, but since I don't have any black glue to mimic the effect, I had to do without.

    Step 6: Cheeks. Instead of a blush, which would spoil the whole Noir look, go for subtle contouring using a matte powder along the cheekbones.

    Step 7: The final touch is an uber-dark lipstick (I used MAC Prince Noir but you can just darken any magenta or plum lipstick with a black one (L.A. Girl has an affordable and good-quality black lipstick). Focus on your cupid's bow, while leaving the outer corners of your lips just a hair thinner than you'd usually draw them, but not too much unless you're going for a dramatic interpretation. 
    This gives that exaggerated curvy lip of the 20's but still remains flattering for most lip shapes.
    Wednesday, October 26, 2011

    Smoke and MIrrors - Sparkly Smoky Eye Tutorial

    A single, flat grey shade on the lids can make the skin look dull and sometimes a little sallow, so the trick to wearing it is to wear a few shades of grey for some contrast. 

    Step 1: Apply a smoky metallic grey all over the lids from lash line to socket line. 

    Step 2: Use a deeper grey to extend and wing out the outer corners in a V shape. Then run this dark grey along the outer half of the lower lash line as well.

    Step 3: With a pale pearly lilac, fill in the innermost corner of the eye for some brightness there.

    Step 4: Moisten a brush with some mixing medium or eyeshadow sealer and then dab translucent white glitter over it. 

    Then apply mascara and there you have it!

    Sunday, October 23, 2011

    Poison Orchid: Too Faced Exotic Color Intense Eye Shadow

    Too Faced Exotic Color Intense Eye Shadows


    Too Faced Intense Eye Shadow in Poison Orchid
    I snapped up just this one shadow from the new Too Faced Midnight In the Garden of Glamour collection. This midnight amethyst shade is a smoky dark grey with oodles of magenta sparks, and was the instant standout shade for me, because I haven't found anything else quite like it, and the camera just can't capture how beautiful it is in real life (the sparkles are actually more pink/red than they appear on the images). 

    If you already have tons of shadows in your collection, DEFINITELY just check out Poison Orchid as it's unlike any other color I've seen or owned.


    To better showcase the shadow, I did a very simple eye look that enhances and elongates the eye using this smoky, duo-chrome purple.
    Step 1: Use a matte black shadow and a smudger brush to line the outer half of upper and lower lash lines. Don't worry about getting it neat. Just get it really dark at the lashes.

    Step 2: Using a flat brush, pack Poison Orchid on top of the black, diagonally upwards from the inner corner, so it flares up into a wing. (An easy way to do this is to hold the brush at the outer corners and sweep in, and downwards.
    Also add smoky purple outside the black that you drew along the lower lashes.

    Step 3: Add a matte beige on the inner half of the lids, diagonally inwards, wherever the purple isn't. To shew the contrast better, I took the above picture with flash. (The eyeshadow shifts to a smoky indigo violet in flash!)

    Step 4:  Finish with black liquid liner on the tide line (under your upper lashes), and then 2 coats of black mascara. 

    Saturday, October 22, 2011

    D.I.Y. Liner/Sealant Formula

    The good thing about a sealant is that it can be used to suspend pigments and glitter, so that you can apply an intense swatch of it as glitter or just foiling your pigments and shadows for a more dramatic look. There are ready-made formulas around from many brands but if you can't get hold of them easily, or at a convenient price, you can always make your own with the below ingredients.


    Water:
    • Cheap
    • Works on pigments but not on glitters
    • Not long-lasting (pigments and glitter will fall off easily once the water evaporates)
    Eye Drops
    • Gentle
    • Not too cheap but not very expensive either
    • Works on pigments but not on glitters
    • Does not seal makeup although it sticks better than water
    Glycerin Solution:
    • 1/4 to 1/3 parts with water
    • Affordable
    • Does not suspend or cling to glitters
    • Does not seal makeup although it sticks better than water
    Oil-free Makeup Remover: 
    • Foils shadows very well
    • Not expensive but not cheap either
    • Works on pigments but not on glitters
    • Does not seal makeup although it sticks better than water
    Eyelash Glue:
    • extremely longlasting
    • gives very intense glitter liners
    • works with glitters but not with pigments 
    • have to apply the glitter AFTER you apply glue, which may be messy
    • pain to remove
    • expensive to use in large quantities
    Experimenting with various glitters and pigments.

    My Formula?
    Gum Arabic solution.
    Gum arabic is a natural gum of plant origin, and is used in pill coatings, confectionary coatings, painting and a whole variety of other uses. (But as with anything, if you tend to have sensitivities, just swipe a little on the inside of your elbow to see if you are allergic before use. I don't have any problem with it.)
    • This sealant sets into a "glaze" and will not rub off until you wash it (liners in top image are actually completely dry and budge-proof but look "glossy" and wet) 
    • You can easily get it from most Art Supply stores (usually the watercolor paint section) for a few dollars
    • You'll need to dilute it for use, which means 1 bottle will last forever
    • Don't use this if you need to smudge or blend anything. This will really set it.
    Diluted gum arabic solution (30% concentration) in dropper bottle.

    Get a dropper bottle and mix your formulations as per below:
    • 25-30% concentration - good for making liners and you will get a more budge-proof and glazed texture
    • 10-20% concentration - good for pigment or shadow foiling (do NOT wet your brush with this and touch it to your pan shadows as this will SEAL them)
    • 2-5% concentration - put a tiny bit into a spray bottle with toner and make your own makeup setting spray
    Be sure to test on your hand the first time too. If your liner cracks or feels a little too thick after it dries, you'll know your formula is too concentrated.


    Step 1: Apply black liquid liner to the lash line just to keep some definition. This will also serve as a guiding line for your glitter or metallic liner. 
    Step 2: Add pigment or glitter slowly to a tiny drop of your sealant, and mix with your liner brush until the formula looks almost like it is becoming clumpy.

    Step 3: Use a fine brush to apply your glitter liner just above and slightly overlapping the black liner applied earlier. You can use either a gel liner brush (small tapered flat brush) or a pointy super-fine brush like the one I used (get these at an art supply store).
    Don't worry about applying an opaque and even line in a single stroke. You will likely have to make several passes as there won't be enough formula on the brush to finish your line. 


    Step 4: Apply mascara last to finish the look. There will be no messy fall out to clean up, and your liner will last for hours and hours.


    Cleaning up:
    Gum arabic solution is water soluble, so if you get any on your hands, counter, etc, water will get it right out easily. However, like any makeup, the glitter and pigments themselves will cling to your skin, so to really remove it from your skin at the end of the day, make sure you use a proper face wash or makeup remover and rub gently to dislodge everything.

    Wednesday, October 19, 2011

    Featured Shade: Matte Purple Shadow

    Colors to pair a matte purple shadow with!

    A good matte dusty-purple is hard to find. Purple is one of those colors that I find to be more flattering in a matte or satin finish. Sparkly or metallic purple can look a bit too garish for work and school, but a dusty lavender grey is a much better option.

    My favorites are Everyday Minerals Matte Eye Shadow in Tide Pool (limited edition, unfortunately), and Urban Decay Matte Eyeshadow in Cult (slightly deeper purple). This is a quick run down of some foolproof shades to pair matte purple with.

    Everyday Minerals Tide Pool Eye Shadow (Matte)


    Purple on Purple: Pale silvery-purple with a deeper smoky purple look great together.  Swatches: MAC Crystal (left), and Tide Pool (right)

    Champagne and Purple: The contrast of a pale glimmering gold with a smoky purple is gorgeous. Swatches: MAC Retrospeck (left) and Tide Pool (right).

    Chocolate and Berries: Nothing goes with purple as well as a rich cocoa when you want a more sophisticated look. Swatch: MAC Cement (left), and Tide Pool (right).

    Bronze on Purple: For instant drama, an ambery, metallic bronze shadow or glitter  paired with a matte purple  can really play up your eyes.  Swatches: NYX Pearl Mania in Oro Pearl (left) and Tide Pool (right).