Showing posts with label pink eye shadow. Show all posts

Friday, September 28, 2012

Punky-Pretty (Fluorescent Hot Pink with Smoky Cut-Crease)


This is a very dramatic look pairing hot pink with a smoky dark russet brown. Definitely more for the clubs or a party than a day out with the girls!
I used new shades from my BH Cosmetics shadows:
WM20 - An true matte hot pink
MS12 - Dark sparkly blackened red-brown
WS07 - A mid-tone satin mauve pink


Step 1: First run a black khol along your upper and lower water lines.


Step 2: Using a pointed brush for control, first draw a line diagonally up and out at the outer corner of the eyes. Then pick up more shadow and run it along the socket line, stopping before you reach the inner corners. 
Smoke the entire line out to get a really thick brown swatch.


Step 3: Pack a neon hot pink along the entire lid, leaving only the inner corners empty. Then run the pink along the outer halves of the lower lash line as well, extending the line up and out, right under the dark brown wing created earlier (below).


Step 4: To illuminate the eyes a little, apply a paler mauve pink to the inner corners of the lid. 

Step 5: Finish by checking to see if you need to touch up your black liner. (To help it last longer and look more intense, dab a matte black shadow over the pencil to set it.) 
Then finish by curling lashes and applying black mascara.

Sunday, August 19, 2012

Tips for Wearing Pink Shadows

Wearing pink (especially any shimmery pink) around the eye area can sometimes end up making you look like you have pink eye or swollen eyes. It's not the easiest color to wear, and I tend to avoid it mostly.

But ironically, pink CAN be flattering on just about ALL skin tones because it's a color that is naturally occurring on our bodies.
There are just a few tips to wearing it well.
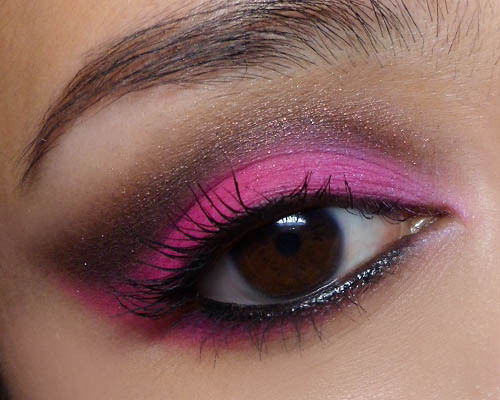
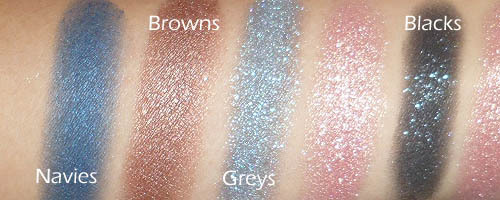
  1. Pair it with a slightly deeper shade in the crease or socket line. Think neutrals like greys, browns, navys, blacks. Many softer pinks are too light to give you any definition around the eyes, so you need to add a bit of contouring back into your socket mostly. 
  2. Always keep your lash line dark. Without some black or brown at the lash line, and dark lashes, you can look like you have rabbit-eyes when you wear pink.


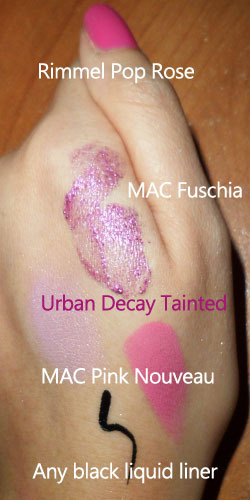
Good pinks: Softer pinks with a peachy-gold sheen are universally flattering on most skin tones. The gold keeps it from looking like discoloration or broken capillaries. Cooler-based pinks and magentas can be nice too, but they don't go with as many looks and lip colors as a golden-toned pink.
  • L'oreal Infallible 004 Forever Pink is a beautiful pink with a peach-gold tint
  • MAC Swish, Da Bling, are nice light pearlescent pinks
Mattes are fine as well; in fact mattes are vibrant without looking flat. Locating a good matte pink is harder than applying it well. Avoid any pink that is too plummy or brown. You can look like you haven't slept for 3 days.


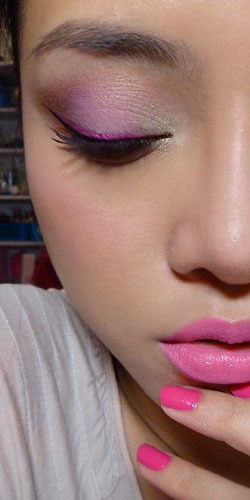
Quick Tutorial on a basic defined-crease look
Step 1: Important thing to do is to always set a nice darkness around your lash line first. Your pink shadow is going to go on top of it, but having some black below keeps things smokier. Make the black thicker on the upper lash line, and very light and only halfway inwards along the lower lash line. 
(Leave the inner lower corners clean.)


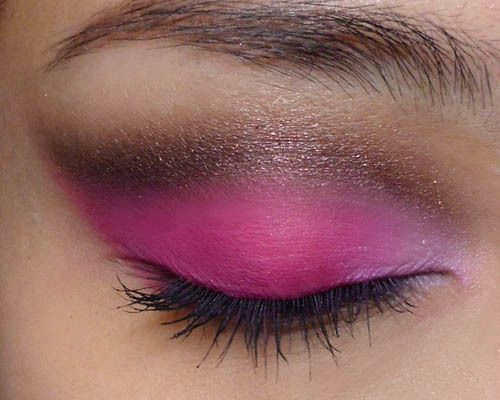
Step 2: Pack on the pink. Nothing complicated here. Just go up to the hollow of your socket line, but don't  go to far up.


Step 3: Reapply the black at the lash line. Keep things smoky and soft. Don't try to get any thin precise line there.


Step 4: Use a small pointed brush to lightly run the black shadow along the hollow of the socket line. (If you have hooded eyes, small lids or monolids, make sure you follow along the deep line right above your eyeball, NOT the fold of your eye lid.)


Step 5: Finish with black liner along the inner rims of the eyes (option) and black mascara.
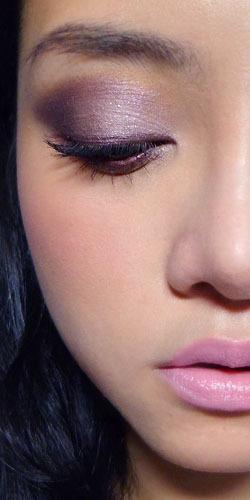
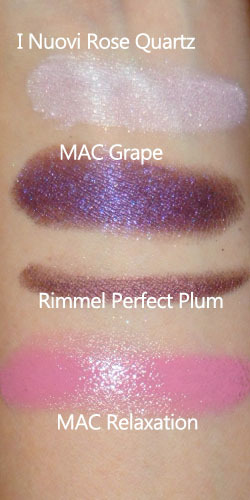

Regarding Colors:
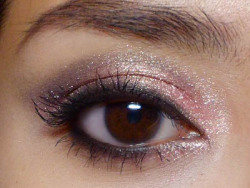
You can replace the black shadow with greys, browns, charcoals, navy blues. The only thing is to make sure the other shade you use is deep enough to give some definition. 
Whatever contouring color you use, stick with black liner and mascara.

Sunday, June 17, 2012

Pop Rose: Pink Makeup with Metallic Stacked Liner

We don't often wear pinks on the eyes, lips, nails AND cheeks all at the same time, but I thought the Summer Season might be a good time to give it a go.


The trick is NOT to try and match all the pinks. I used a mauve (pink-purple) shadow, with a magenta toned liner, and a bright pink lipstick. For the nails, I used a hot Barbie pink.
On the lids, I also reined it in and used warm/neutral shades for highlights and contour, instead of more gradations of pink.


Step 1: Apply a soft mauve shadow on the lids. This can be matte or slightly satin-y, but should not be full-on metallic if you can help it. I used a limited edition shade from Urban Decay, but if you don't own the 15 Anniversary palette, you can use one of the lighter shades from the Wet n Wild Petal Pusher palette.


Step 2: Use a pale gold on the inner corners of the eyes (I also used Urban Decay's limited edition color but it's an exact dupe of MAC Vanilla pigment and Coastal Scent's Elven Gold Hot Pot which is super-cheap.)


Step 3: I don't own any metallic pink liners, so I used a pigment mixed with a drop or two of liner sealant. You can use eye drops with MAC Fuchsia Pigment or any electric pink pencil to get a similar effect.
Make sure the flick is parallel to the outer corners of your lower lash line (see dotted line).


Step 4: Probably the most tricky part. Trace over your lash line with a black liquid liner. This is what will pull the whole look together without letting the pink overpower everything. If you don't have a steady hand, use a felt tip liner for more control.


Step 5: Finish off with black mascara.


Step 6: For the cheeks, I just used a very matte pink blush, and then applied Pink Nouveau (my absolute favorite summer pink) lipstick from MAC. Barry M and Wet n Wild have some really good bright pinks as well if you're on a budget.

Thursday, June 14, 2012

Soft Pink and Purple Evening Look


So many women love purples and pinks in the day, but we often forget it's possible to get it quite dramatic for an evening out as well. The general rule of thumb is, the greater the difference between the darker and lighter shade you choose, the more dramatic it can look.


(I paired a dark bruised purple with a pale, almost-silver pink here.)

The shape of the eye is also more dramatic than usual, with a more angular and elongated wing than I would normally wear. The good news is, it's actually very simple to do and doesn't require many products.

All that's left is to keep the lips and cheeks soft and complementary.

Brush suggestion:


Step 1: Apply a deep purple to the outer 2/3 of the lower lash line, then apply it to the outer half of the upper lids. Following your socket line, extend the outer corners into a wing.


Step 2: With a soft silvery-pink, fill in the inner half of the lids, blending the pale shade into the purple you applied earlier. 


Step 3: The finishing touch is applying a plum metallic pencil (plum works better than pure purple because it's a little more red/pink toned, which works with the purple and pink you applied) to the upper and lower lash lines. 
If you need, re-assess the shape and decide if you might need to extend your wing a bit more at the outer corners. 
When you're satisfied with the shape, curl your lashes and apply lots of mascara to finish! (This look works with false lashes of course.)


Step 4:  For the cheeks and lips, I kept it simple with a Lip and Cheek cream (MAC Casual Color in Weekend Getaway) in a soft pink. I apply it to the center of the lips with a finger first, and then distribute the remainder onto my cheeks. You need very little on the cheeks, so if you start by applying the product there, you're likely to end up with too much.


I Nuovi and MAC are cruelty-free brands. Visit PETA.org for more information regarding animal testing and brands.