Showing posts with label eye shadow. Show all posts

Friday, October 12, 2012

Soft Glamor: Easy Evening/Party/Prom Neutral Eye


Note: Leaving everyone with a look while I pop off to NYC for a holiday!
Posts will be a bit sparse for the next 2 weeks. Hope you all stay well and have a great Halloween!

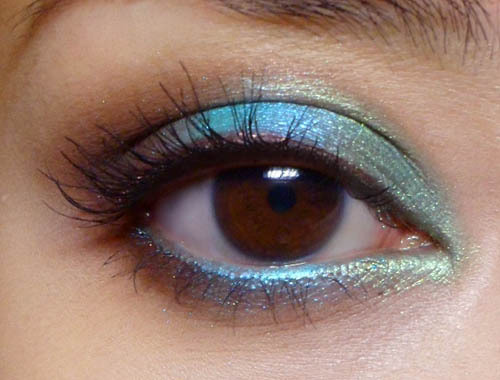
For everyone who is relatively new to eye makeup and not sure how to add some flattering glamor for formal occasions, this is a look you can try.
It's comprised of neutrals, so it goes with pretty much any outfit, although you can change the lid shade from a smoky brown to any other color and retain the shape and application.
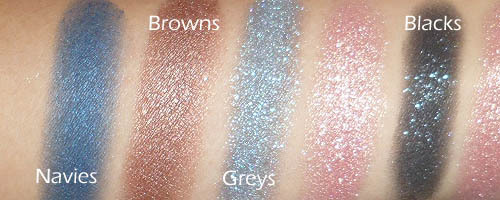
I used a:
  • Matte black
  • Smoky taupe brown (semi-matte)
  • Coppery-beige shimmer
  • Silver-white shimmer
Also, a black eye pencil, black mascara, and a single strip of wispy lashes cut into half.


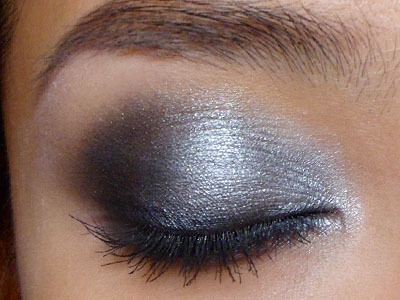
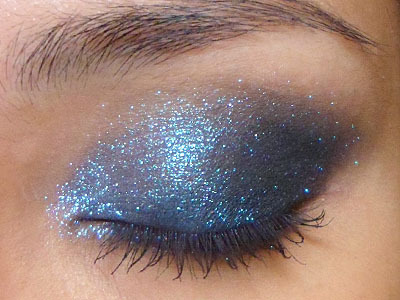
Step 1: First use a firm smudge brush or angled brush to apply black to the lash line, like you would apply a thick swatch of liner. As always, draw in the outer flick first, parallel to the angle of your lower lash line, and then extend the line inwards to the inner corners.


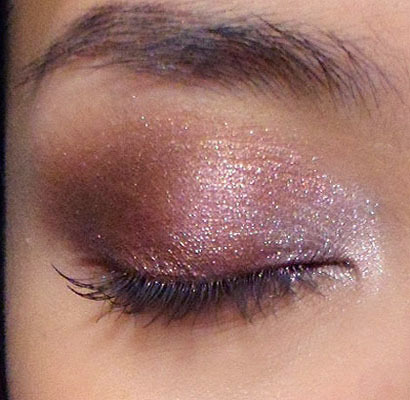
Step 2: The main lid shade for the smoky look. I used a deep taupe brown (BH Cosmetics MS17; use MAC Satin Taupe if you have it) above the black earlier, and gently filled in the entire lid EXCEPT the inner corners. Follow the line of the black and wing the brown out at the outer corners.
On the inner corners, run it along the socket line only.


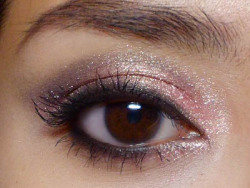
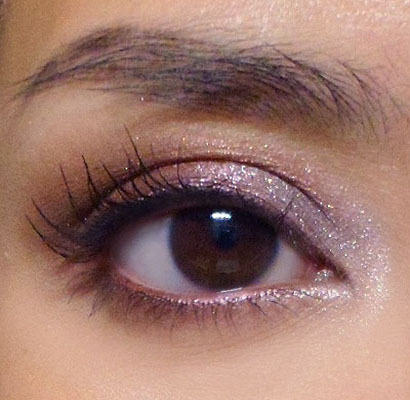
Step 3: On the inner 1/3 of the lids, apply a peach-tan shimmer. MAC Tan pigment or BH Cosmetics CS09). This doesn't show up that well on camera but in real life both these shades are very intensely metallic.


Step 4: [Recommended for the very pale to medium-fair skins; Optional for everyone else] Dab a bit of silvery-white shimmer right in the inner corners just to brighten things up a little. This is only needed if the tan shimmer is the same tone or darker than your natural skin tone. You'd need a little more brightness at the inner corners for a more flattering effect. 
If you have caramel to dark chocolate skin, the peach-tan shade should already pop against your skin.

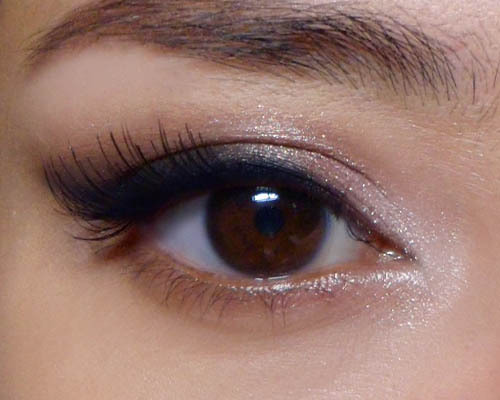
Step 5: The lashes. I cut a pair of wispies (fluttery, irregular, natural-looking) into 2 halves and then used one half on the outer lash line. This beefs up your lashes only on the outside, and emphasizes that sultry, catty effect. You want to curl your natural lashes before you apply falsies.

Let the glue dry at least 30 seconds or until you see a bit of the glue going grey or transparent. Then place the inner corner in the center of the lid, and then tuck the outer corner down.
(Half strips are a much easier way to apply false lashes for those who aren't familiar with it, and cutting a single pair of lashes into 2 is cheaper than buying a single pair of half strips for the same price!)

 
Last step: Finish by applying black pencil along the inner rim of the lower lids to just intensify the lash line further, and then you can apply some mascara just to weave your natural lashes into the false ones.


Tips on cutting lashes:
  1. Look for lashes that are symmetrical, with longest hairs in the center, and outer hairs equally short. 
  2. The best lashes for cutting have short outer hairs and much longer hairs in the center. This helps if your natural lashes are short, because the short end of the false lashes should more or less blend in with your own instead of sticking out obviously in the center of your eye.


Sunday, September 9, 2012

Paradise Colors: Summer-inspired Eye look


It's time to jazz things up with some brighter colors, inspired by the runways. I'm doing a tropical-paradise color scheme, with lush emerald green, rich brown, and a glowing turquoise.
You will also need a brown pencil for definition and an aqua/turquoise (optional) colored pencil to echo the blue on the waterline.


I used Coastal Scents Hot Pots on the lids and Bourjois pencils, but do use any alternatives you have. You can do a look with similar colors; they don't need to be identical.


Step 1: Instead of following the color-wheel (blue, green, brown), I wanted a little extra contrast by putting the brightest color in the center of the lid, where it will pop against the dark brown.
Apply along the inner 1/3 of the lower lash line as well. 


Step 2: Pick up the bright aqua or blue and pack it down the center of the lid. Don't blend it out too much as you want the color to be quite intense.
Apply the same along the center portion of the lower lash line.


Step 3: Pack the dark brown into the outer 1/3 of the lids, and then gently run it inwards along the socket line, until you reach about the center of the lids, above the bright aqua.
As before, run the dark brown along the outer 1/3 of your lower lash lines to finish.


Step 4: Here's the fun part. Run a brown pencil along the upper lash line for definition and some extra contrast against the aqua blue.
On the lower lash line, I actually used a bright turquoise blue pencil (Bourjois 54 Bleu Clinquant) to match and intensify it.

Then I finished with black mascara.


Sunday, August 19, 2012

Tips for Wearing Pink Shadows

Wearing pink (especially any shimmery pink) around the eye area can sometimes end up making you look like you have pink eye or swollen eyes. It's not the easiest color to wear, and I tend to avoid it mostly.

But ironically, pink CAN be flattering on just about ALL skin tones because it's a color that is naturally occurring on our bodies.
There are just a few tips to wearing it well.
  1. Pair it with a slightly deeper shade in the crease or socket line. Think neutrals like greys, browns, navys, blacks. Many softer pinks are too light to give you any definition around the eyes, so you need to add a bit of contouring back into your socket mostly. 
  2. Always keep your lash line dark. Without some black or brown at the lash line, and dark lashes, you can look like you have rabbit-eyes when you wear pink.


Good pinks: Softer pinks with a peachy-gold sheen are universally flattering on most skin tones. The gold keeps it from looking like discoloration or broken capillaries. Cooler-based pinks and magentas can be nice too, but they don't go with as many looks and lip colors as a golden-toned pink.
  • L'oreal Infallible 004 Forever Pink is a beautiful pink with a peach-gold tint
  • MAC Swish, Da Bling, are nice light pearlescent pinks
Mattes are fine as well; in fact mattes are vibrant without looking flat. Locating a good matte pink is harder than applying it well. Avoid any pink that is too plummy or brown. You can look like you haven't slept for 3 days.


Quick Tutorial on a basic defined-crease look
Step 1: Important thing to do is to always set a nice darkness around your lash line first. Your pink shadow is going to go on top of it, but having some black below keeps things smokier. Make the black thicker on the upper lash line, and very light and only halfway inwards along the lower lash line. 
(Leave the inner lower corners clean.)


Step 2: Pack on the pink. Nothing complicated here. Just go up to the hollow of your socket line, but don't  go to far up.


Step 3: Reapply the black at the lash line. Keep things smoky and soft. Don't try to get any thin precise line there.


Step 4: Use a small pointed brush to lightly run the black shadow along the hollow of the socket line. (If you have hooded eyes, small lids or monolids, make sure you follow along the deep line right above your eyeball, NOT the fold of your eye lid.)


Step 5: Finish with black liner along the inner rims of the eyes (option) and black mascara.


Regarding Colors:
You can replace the black shadow with greys, browns, charcoals, navy blues. The only thing is to make sure the other shade you use is deep enough to give some definition. 
Whatever contouring color you use, stick with black liner and mascara.

Monday, July 30, 2012

Silver Smoke: MAC Electra


I think every makeup collector should "shop their own stash" once in awhile, as a way of rediscovering and digging out items that they have forgotten.

Electra was one of the very first shadows I ever bought from MAC (along with Vex) and my first pan has been with me years and years because I've worn it probably less than 10 times.

It's a steely silver that has enough depth and sheen to still look dimensional when worn alone on the lids, while playing well with other colors. The main reason I haven't used this much in the past is probably because it's not exactly a subtle shade to wear on a daily basis. 

Beautiful it certainly is though.

Classic smoky eye shades (L-to-R): MAC Carbon, Knight Divine and Electra


I'm bringing out the sheen and texture by pairing it with a matte black and a darker charcoal grey. If you have any silver-grey-black palette you will be able to recreate this look. (Maybelline Charcoal Smokes and L'oreal Blackened Smokes would both work. Just avoid picking any silver that is too white/platinum unless you are extremely fair-skinned.)

Step 1: First apply black cream shadow or base over your entire lid and along the lower lash line as well. This is a step that can help to intensify the whole look. If you don't have black cream shadow, just use black pencil or kajal to get the same look.

Step 2: Begin by packing the bright silver shade over the inner 2/3 of the lid, leaving just the outer corner and socket area dark.

Step 3: Using a dark charcoal grey (if you don't have anything this dark, mix a black with the silver you used earlier) and apply that in the outer corner and along the lower lash line where there isn't any silver shadow.

Step 4: Run black pencil or kajal along the inner rims of the lash line, and then use a flat angled brush to run black matte shadow along the upper lash line. This adds definition to the lash line. These 2 steps intensify the lash line without an overly-defined line that a pencil or liquid liner would give.

Step 5: Finish by curling your lashes and applying black mascara. If your silver shadow has faded a bit by now, you can always touch up a bit more. Make sure you add a little silver to the inner corner of the lower lash line as well.

Cheeks and Lips:
This look works fab with softer lips and cheeks like nudes or soft pinks and peaches. I'd just avoid anything overly metallic on the lips since you don't want to distract from the strong-textured eyes.

You CAN apply a strong red lip as well for a look that's a little more 70s/80s. Totally up to you!


Saturday, June 23, 2012

5 Minute Eye: Sparkly Colored Smoky Eye


I recently got some requests for smoky eyes that weren't the traditional grey, brown, or black. 
Instead of just doing the typical colored smoky look by replacing the black/grey/brown with a green, blue, violet, etc, I wanted to shake it up a bit and give you a fun option that has maximum impact and takes about 5 minutes to do, and can be re-created with just black shadow and any sparkly shadow or pigment.
If you've ever looked at sparkly, dramatic shadows like MAC Sketch, NARS Night shadows, etc but wished the sparkles were visible in real life, this is a way to get that effect.

You will need to look for 3 products:
  • A dark/black base
  • A matte black shadow
  • A translucent, high-sparkle pigment or shadow (something like MAC Reflects pigments or Lustre shadows give the right amount of drama without requiring glitter glue or sealants)


Step 1: Apply a black base and blend/fade up past your socket line. Extend outwards slightly past the outer corners into a short wing as well. This is important because matte, black shadows can go on a bit uneven and patchy otherwise.


Step 2: Apply the matte black shadow alongh the lash line, thickening and angling upwards as you reach the outer corners, until you end right at the socket line.
Then run the remainder along the lower lash line from outside fading in.


Step 3: The fast, fun way to jazz everything up. This is especially fun because it can make you look as if you spent an hour on your eyes instead of 5 minutes. Gently pat a translucent sparkle/shimmer from the inner corners out, so the color is more concentrated on the inner corners. (Try something like MAC Reflects Transparent Teal.)
Run the remainder along the lower lash line from inside out.


Step 4: Finish with black mascara.
Because of the sparkly colored shadow "floating" over the very dark base, you transform the shadow into an extremely unique shade and texture that you can't replicate using a single product. The best thing is you can swop out the sparkle to pink, purple, gold, blue, whatever you like!

Friday, June 1, 2012

Multi-faceted Silver-Wine Eye Tutorial (feat. Body Shop Shimmer Bricks 07)


This is a softer smoky eye that is quite subtle but multi-faceted so there are nuances of shimmery color, but nothing too loud, too contrasting, or too overpowering for your face.


As always, you don't need to use the same product if you can't get hold of The Body Shop where you are. I swatched all 4 shadows so you can look for similar tones as substitutes. 
You need 4 shimmery shades:
  • Bronze brown
  • Petal pink
  • Dark eggplant
  • Pale silver/platinum


Step 1: I used a brown pencil all around my upper lid and smudged it out with a finger to fill in the lids. This will be your base.


Step 2: Apply the rich bronze-brown along the center of the lids, leaving only the inner corners bare.


Step 3: Apply the petal pink shade from the inner corner outwards, overlapping some of the brown, until you reach the center of the eye. 


Step 4: Finish the upper lash line with some dark aubergine to the outer part of the crease/socket line. Then run along the outer halves of the lower lash line with a flat angled brush as well.


Step 5: After you're done with the shadows, apply a plum metallic pencil to the top and bottom lash lines. (I used Rimmel Exaggerate Waterproof Eye Definer in 220 Perfect Plum.) Then apply mascara to finish!