Wearing pink (especially any shimmery pink) around the eye area can sometimes end up making you look like you have pink eye or swollen eyes. It's not the easiest color to wear, and I tend to avoid it mostly.

But ironically, pink CAN be flattering on just about ALL skin tones because it's a color that is naturally occurring on our bodies.
There are just a few tips to wearing it well.
- Pair it with a slightly deeper shade in the crease or socket line. Think neutrals like greys, browns, navys, blacks. Many softer pinks are too light to give you any definition around the eyes, so you need to add a bit of contouring back into your socket mostly.
- Always keep your lash line dark. Without some black or brown at the lash line, and dark lashes, you can look like you have rabbit-eyes when you wear pink.
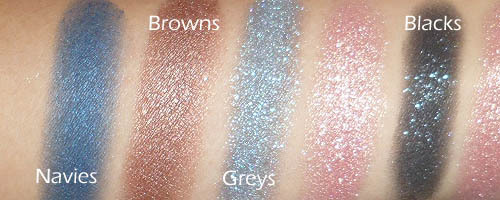
Good pinks: Softer pinks with a peachy-gold sheen are universally flattering on most skin tones. The gold keeps it from looking like discoloration or broken capillaries. Cooler-based pinks and magentas can be nice too, but they don't go with as many looks and lip colors as a golden-toned pink.
- L'oreal Infallible 004 Forever Pink is a beautiful pink with a peach-gold tint
- MAC Swish, Da Bling, are nice light pearlescent pinks
Mattes are fine as well; in fact mattes are vibrant without looking flat. Locating a good matte pink is harder than applying it well. Avoid any pink that is too plummy or brown. You can look like you haven't slept for 3 days.
Quick Tutorial on a basic defined-crease look

Step 1: Important thing to do is to always set a nice darkness around your lash line first. Your pink shadow is going to go on top of it, but having some black below keeps things smokier. Make the black thicker on the upper lash line, and very light and only halfway inwards along the lower lash line.
(Leave the inner lower corners clean.)

Step 2: Pack on the pink. Nothing complicated here. Just go up to the hollow of your socket line, but don't go to far up.

Step 3: Reapply the black at the lash line. Keep things smoky and soft. Don't try to get any thin precise line there.

Step 4: Use a small pointed brush to lightly run the black shadow along the hollow of the socket line. (If you have hooded eyes, small lids or monolids, make sure you follow along the deep line right above your eyeball, NOT the fold of your eye lid.)
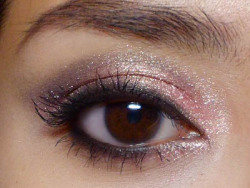
Step 5: Finish with black liner along the inner rims of the eyes (option) and black mascara.
Regarding Colors:
You can replace the black shadow with greys, browns, charcoals, navy blues. The only thing is to make sure the other shade you use is deep enough to give some definition.
Whatever contouring color you use, stick with black liner and mascara.