Showing posts with label false lashes. Show all posts

Monday, May 20, 2013

[Requested] 88 Matte Palette Smoky Brown Evening/Prom Eye (a la Bruno Mars "Just The Way You Are" Music Video)


Perfect opportunity for me to combine 2 requests; one for a dark brown prom-makeup done using the 88 Matte Palette (the Warm palette has the same shades needed), and one for the smoky eye look worn by the gorgeous model in Bruno Mars' Just The Way You Are video.

Dissecting the Look


The lighting in the video is extremely orange/yellow and the moving images aren't crisp and clear (you can click on the images for a closer look at my screen grabs). From what I can tell, she is wearing:
  • a matte chocolate brown smoky eye
  • a very flared and winged-out eyeshadow shape that emphasizes the outer halves of her socket line, quite similar to the classic smoky wing Pam Anderson might wear
  • very defined and thick black liner but it's not a very hard and precise line (i.e. does not look like liquid liner)
  • full false lashes that are a "rounded" shape, longer in the center instead of at the outsides
It's a very straightforward and flattering look as long as you can get the shadow shape correct, and it doesn't matter if you had mono-lids, hooded eyes or double lids; blue, green brown, hazel or grey eyes. But in real life, it probably works better for an evening out clubbing or at the prom than to school.

Wednesday, May 8, 2013

Butterfly Fields: Fantasy-Green Eyeshadow Look (with Paperself Lashes)


I got requests for brighter or more dramatic color, and something green, so here's one that's kinda all those rolled into one.
I whipped out my 88 Shimmer palette for this. (I always forget I love this baby. It's not dusty and the colors are beautiful.) But like most shadows, it's very important to wear a primer or some kind of base on your lid for the pigments to cling to, if you want to get the most intense effect.
For this look, I used 3 shades circled below:
  • A nice bronze-brown near the top right
  • A deep emerald green near the bottom left
  • A saturated lime green shimmer along the same row as the emerald, 4th from top
I also used the following:
  • MAC Studiofinish Concealer over the lids as a base (a lot of these solid concealers work very well as a shadow primer if you have normal or dry lids like me)
  • An emerald green pencil (Catrice Khol Kajal in 060 "Don't Be Mean to Green!" 
  • Black liquid liner (Heroine Make Impact Liquid Liner) and pencil (Shahnaz Husain Kajal)
  • Black mascara (L'oreal Voluminous Carbon Black)

Sunday, May 5, 2013

Jelly Ombre Lip and Big Doll Lashes (feat. Shu Uemura Gloss Unlimited)

Huge lashes, lavender cheeks, and a berry-stained "jelly" lip!

Shu Uemura Gloss Unlimited in WN 20 S (top), PK 70 C (bottom)
Apparently, two-toned lips are in this season. (Apparently, I've been doing them for 2 years while they were completely out of fashion; boohoo...) I don't usually use glosses to do ombre lips, because there usually isn't enough of a visual contrast. But when I saw a very dark shimmery wine shade in the Shu Uemura Gloss Unlimited range, I immediately thought "stained jelly lips!"


The Lips
In the grand tradition of the great Uemura-san himself, I swopped things around and did my lips before my eyes. Uemura believed a lip color could be applied first and thereafter be the deciding factor for the eye and cheek makeup you choose.)

Step 1: I applied a soft beige pink, PK 70 C (translates to "Pink 70 Cream" for you and me) over the lips. (Try MAC's Please Me Lipglass if you can't find this in your country.)


Shu Uemura Gloss Unlimited in PK 70 C
Step 2: Next, I applied a deep berry gloss (you need to use something quite pigmented or it won't have this level of contrast) WN 20 S (translates to "Wine 20 Shimmer"). (Try MAC's Desire or Rebel Lipglass if you can't find this.) 
Shu Uemura Gloss Unlimited in WN 20 S
*The US range seems to be slightly different from Asia (is anyone seeing a recurring pattern here???) so I listed alternatives with a similar color if not the same texture.

---

The Eyes
The modus operandi is "doll-like". Rounded, widened, with huge lashes. You can apply lower lashes if you want, but this isn't meant to be a super-dramatic look, so I skipped that.
image
 Step 1: To create a rounded eye shape, I used the 88 Warm Palette and mixed up a few of the medium browns just to create a warm matte tone that's about 2-3 shades darker than my skin color. This I applied to the entire lid in a rounded shape, blending upwards almost to the brow near the center.
Then on the inner corners, I applied a little pale beige.

image

Step 2: Line your lower eye rim with a pale yellow liner like NYX Yellow. Next, use a dark grey or charcoal pencil to create definition and emphasize a rounded shape. You want to line it such that it's thick at the center of the eye, and then tapered to a thin point at both ends.
On the lower lash line, run the charcoal pencil along the outer half of the eyes, making it thicker at the outside.

image

Step 3: Here's one trick to easier eyelash application. Apply the glue directly along your lash line. This can be done if you're using one of the brush-applicator lash glues, or with a liner brush if you're using regular tube glue.

image
Step 4: Apply long, dramatic clustered lashes (I used Red Cherry #16s) and push them up at the center of the eye for doll eye.


The Cheeks
I wanted a "glowy" sort of effect to go with the eyes and lips, so I used a lavender blush (MAC Full of Joy just on the upper areas of the apples and up long the cheekbones.


Why don't you pick a lip and then decide your makeup today? ;)

Friday, October 12, 2012

Soft Glamor: Easy Evening/Party/Prom Neutral Eye


Note: Leaving everyone with a look while I pop off to NYC for a holiday!
Posts will be a bit sparse for the next 2 weeks. Hope you all stay well and have a great Halloween!

For everyone who is relatively new to eye makeup and not sure how to add some flattering glamor for formal occasions, this is a look you can try.
It's comprised of neutrals, so it goes with pretty much any outfit, although you can change the lid shade from a smoky brown to any other color and retain the shape and application.
I used a:
  • Matte black
  • Smoky taupe brown (semi-matte)
  • Coppery-beige shimmer
  • Silver-white shimmer
Also, a black eye pencil, black mascara, and a single strip of wispy lashes cut into half.


Step 1: First use a firm smudge brush or angled brush to apply black to the lash line, like you would apply a thick swatch of liner. As always, draw in the outer flick first, parallel to the angle of your lower lash line, and then extend the line inwards to the inner corners.


Step 2: The main lid shade for the smoky look. I used a deep taupe brown (BH Cosmetics MS17; use MAC Satin Taupe if you have it) above the black earlier, and gently filled in the entire lid EXCEPT the inner corners. Follow the line of the black and wing the brown out at the outer corners.
On the inner corners, run it along the socket line only.


Step 3: On the inner 1/3 of the lids, apply a peach-tan shimmer. MAC Tan pigment or BH Cosmetics CS09). This doesn't show up that well on camera but in real life both these shades are very intensely metallic.


Step 4: [Recommended for the very pale to medium-fair skins; Optional for everyone else] Dab a bit of silvery-white shimmer right in the inner corners just to brighten things up a little. This is only needed if the tan shimmer is the same tone or darker than your natural skin tone. You'd need a little more brightness at the inner corners for a more flattering effect. 
If you have caramel to dark chocolate skin, the peach-tan shade should already pop against your skin.

Step 5: The lashes. I cut a pair of wispies (fluttery, irregular, natural-looking) into 2 halves and then used one half on the outer lash line. This beefs up your lashes only on the outside, and emphasizes that sultry, catty effect. You want to curl your natural lashes before you apply falsies.

Let the glue dry at least 30 seconds or until you see a bit of the glue going grey or transparent. Then place the inner corner in the center of the lid, and then tuck the outer corner down.
(Half strips are a much easier way to apply false lashes for those who aren't familiar with it, and cutting a single pair of lashes into 2 is cheaper than buying a single pair of half strips for the same price!)

 
Last step: Finish by applying black pencil along the inner rim of the lower lids to just intensify the lash line further, and then you can apply some mascara just to weave your natural lashes into the false ones.


Tips on cutting lashes:
  1. Look for lashes that are symmetrical, with longest hairs in the center, and outer hairs equally short. 
  2. The best lashes for cutting have short outer hairs and much longer hairs in the center. This helps if your natural lashes are short, because the short end of the false lashes should more or less blend in with your own instead of sticking out obviously in the center of your eye.


Sunday, August 5, 2012

Marina and The Diamonds Nude Lip Look: Retro with a Twist


This is a rather Classic look which would suit anybody. 


You would just need to adjust the colors you use depending on how pale or deep your skin tone is. You would need:
  • 2 matte shadows: a pale beige (you can use a pressed powder) and a dark brown (Revlon Rich Sable)
  • black gel liner (Maybelline is a good option)
  • 2 sets of false lashes; a natural-looking full-strip for the top lashes, and a strip of separated clusters on a clear strip, like below
  • a soft beige-pink blush (NYX Angel) or anything that doesn't really stand out too much on your skin
  • a nude lipstick (I used Lime Crime Coquette)
  • a pale mauve-pink glass (Revlon Colorburst in Crystal Lilac)

Step 1: Apply the pale beige all over the entire lid from lash line to brown bone.


Step 2: Apply the deep brown shadow along the hollow of the socket line. 


Step 3: Smoke the brown upwards towards the brow. Leave just the brown bone clean. Wing it out slightly at the outer corners. If the beige on the mobile lid (near the lashes) has been muddied, simply reapply the pale shade again.


Step 4: Apply your gel liner along the upper lash line and end it in a flick. Follow the lashes all the way, down and then out in a soft curve at the outer corners. Marina's flick starts quite low so the look is more retro and isn't that "catty".


Step 5: Marina doesn't have any skin showing below her lashes, which means you will need to run the gel liner along the tightline, under the upper lashes. Make sure you don't see any skin there.
Then run a matte beige (Nars Rue Bonaparte) or white liner along the lower lash line.


Step 6: Apply full strip lashes to the upper lash line. (I used Ardell 120 Demis, as usual.)


Step 7: The fun bit is the lower lashes. You can buy a box of clusters, but it is far easier (and looks nicer) to cut up the full strip of cluster lashes above, so you have individual chunks with a wide, flat base rather than a point or a knot.
Begin from the outside and work your way in, pasting the lash clusters top-down over your natural lash line. If you need to shift any clusters so they're spaced evenly, just reapply glue and place them back on. Don't paste them them on the waterline itself.


Step 8: Apply a nude lipstick to your lips and then blot lightly.


Step 9: Top your lips with a pale pink-mauve gloss just for a bit of a cool-toned sheen.


Step 10: Using your liner brush and the gel liner again, draw a V to place the base of Marina's signature "heart"-shaped beauty mark on the left side of your face. It's easier that trying to draw a heart from the bow shape at the top.


Step 11: Simply fill in, and you're done! If you need to edit any mistakes, use a tiny lip brush dipped in a little oil-free makeup remover and gently clean up the edges.

Sunday, January 1, 2012

False Eyelash 101: How to Apply Cluster Lashes

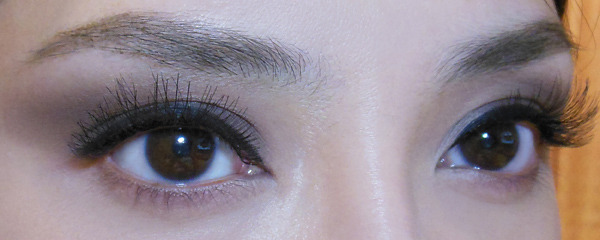
In an age where girls would rather sell their left arm than leave the house without their big, thick strips of false lashes, there are still many women who prefer to not look like they're trying too hard.

Cluster Lashes are a favorite for brides and those who want to avoid looking like they are wearing obvious false lashes.

They look tricky and time-consuming to work with, but can actually be easier to apply for those who can't seem to get strip lashes to work. Plus, they are the ultimate lash "cheat", by helping to bulk up your natural lash volume while being pretty much undetectable to those around you (when applied properly).

The items you'll need are:


1. Flared lashes just a bit longer than your natural lashes. This usually means you need a box of Shorts, and a box of Mediums for the outer ends.
(Unfortunately, I can't locate my box of Mediums for some reason, so I'm doing the demo using Shorts, but you'll get the point.) Ardell has some of the best.

Ardell Duralash Naturals in Flare Short Black
 2. Tweezers (It's going to be hell trying to get these on with your fingers)
3. Lash Glue. These come in 2 varieties. I'm using the normal ones that you'd use to apply strip lashes because these can come off at the end of the day. When you're familiar with the application, you might want to try permanent glues (e.g. Ardell LashTite). More on this later.

Lash glues for clusters; Duo Adhesive (temporary), and Ardell Lash Tite (permanent).

The Procedure:

1. You can apply clusters BEFORE or AFTER makeup, unlike strip lashes. Applying them after makeup will allow you to reuse them more often, but the lash clusters will usually not look as "natural" as when applied before eye makeup.

2. Line up about 6 clusters with the knots facing you (exactly in the direction shown below) and dot some glue onto the TOPS of the ends, where the hairs are knotted together. I usually use 3 shorts, and 3 mediums as my natural lashes are a bit long for the Shorts, especially at the outer corners.
MAKE SURE YOU LET THE GLUE DRY FOR 45-60 SECONDS! If you see the glue on one or two of the clusters starting to go a bit grey, that's the time to start applying them. Applying before the glue is tacky will make this sooo much harder.

3: [IMPORTANT] Curl your lashes and apply mascara if you're doing your makeup before. If you curl them after you apply clusters, you may bend or pull them out of place.

4. With a pair of tweezers, pick up the lash clusters by the tips and then apply them one by one from the center of your eye outwards. And here's the big tip. GO UNDER YOUR LASHES, AND APPLY THEM ON THE TIDE-LINE, right where your lash roots meet your skin. Then use your tweezers to push them firmly upwards so they curve and meld into your natural lashes.

Many people apply them from the top down, but your own lashes will just get in the way and make it so much harder. Also, applying on the tide line makes them more invisible. When you close your eyes, nobody will see any knots or clumps of glue because the clusters are hidden below your natural lash line.

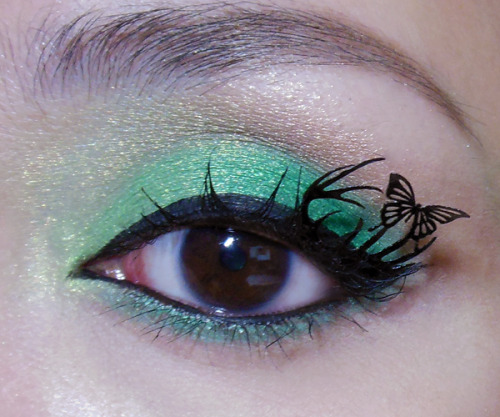
5. If you want fluttery, wispy lashes that look natural, space each cluster such that the outer tips of the clusters just touch each other. Imagine each cluster as a "V". You want to make sure the points of the V's touch each other. For a fuller, more dramatic look, let them overlap more.

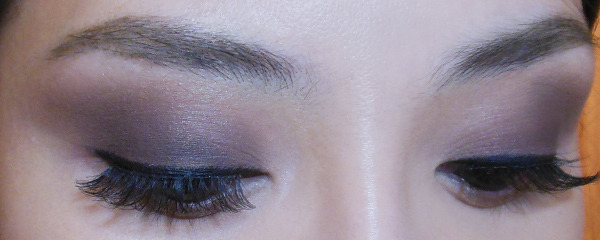
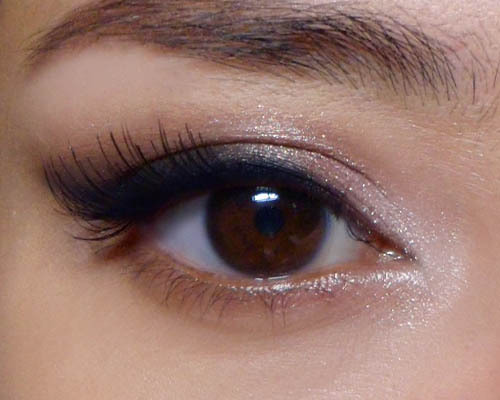
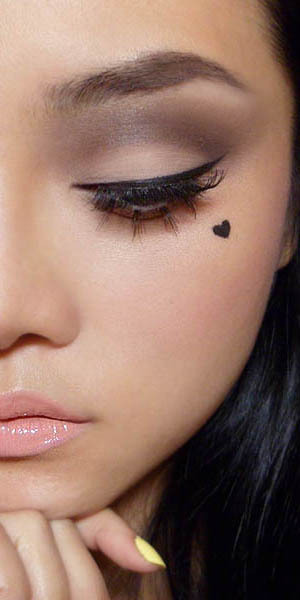
6. I applied black mascara just to finish the look and show you how the clusters aren't even really visible unless someone is staring hard and searching for them 3 inches away from your face. Results would be better if I had used the Medium length Duralash clusters, but well - I guess I'll have to buy a new box.


The Alternative: "Single lashes". These are finicky to work with as you must get them pointing in EXACTLY the right direction to look good. And that's harder than it may seem. Also these will not meld into your lashes as well as flares, and are better used with permanent adhesives.


Which brings me to the note on Permanent Glues:

 These seem like a great idea, especially if you want to just put on your flares, and leave them be for a whole work week. The permanent glues work by adhering lash clusters to your natural lashes, so until the glue wears down or your natural lash sheds, the cluster will stay on. Theoretically.
Well, it does work.

However, as it goes through daily wear and tear as you apply and remove makeup, curl your lashes, etc, the glue will wear down a bit and you will find some clusters shedding earlier. This can easily be fixed by reapplying them. The bad part is where the glue loosens but does not come off. Then 2 things can happen:

  • the cluster shifts, tilts and points in the wrong direction. It's hard to apply more glue at this point, so you will most likely have to remove it and reapply.
  • the cluster is no longer stuck to your skin but is still glued to your lash. Removing it is a pain - literally, as the glue remover is not always able to dissolve it completely. I've had to cut off many a lash just to get rid of the lash cluster it's attached to.

 I personally find it much easier to just apply clusters with the regular temporary adhesives, but that's just me. A lot of women just use the permanent glue every week and replace lashes as they come off or get loose.

Thursday, December 29, 2011

Fresh Bloom: Indigo and Green with Orange Lips (Lime Crime My Beautiful Rocket)


What goes with a bright orange lip? 
Well warm Fall colors like russets and golds would look good, but you can also swing the other way and do contrasting shades in bright tones. To keep things soft, I am using shimmer instead of matte, which would be a bit stronger.

Step 1: I'm using a shimmery dusty-purple for the outer 2/3 of the lid. 

Step 2: Using a soft golden green, I fill in the inner corners of the lid, blending just slightly into the blue. (The Body Shop #44 Single Eyeshadow)

Step 3: Line the upper lash line with a purple pencil (Bourjois Regard Effet Metallise #78 Bleu Chatoyant). Add a pale golden green pencil (Bourjois Contour Clubbing Liner #44 Golden Grey Session) to the lower lash line.

Step 4: Apply black liquid liner along the upper lash line and then add a pair of false lashes. (Any that are not too cat-like and flared at the outer corners will do.)

On the cheeks:
NYX Cinnamon Blush -  a matte vermillion orange

On the lips: 
Lime Crime My Beautiful Rocket - a bright true-orange lipstick