Showing posts with label tkb trading. Show all posts

Friday, March 11, 2016

Oceanic Halo: TKB Trading Aquatic Blue Pigments


I'm a big fan of loose pigments, and I've mentioned TKB Trading a few times as being my default place to get supplies because of the big selection of colors, and the very reasonable prices. The pigments are sold for use in polishes, mineral makeup, and craft projects by indie sellers, so they are priced for bulk purchase.

You can get good sized 6g sample-sachets that fill up a disposable sample jar (more than typical MAC pigment jars with 4.5g) for just US$1.50 each. The only problem is you won't be able to decide which to buy.

The only thing to note is these pigments are raw ingredients. They don't contain fillers and additives, which can mean more intense vibrant colors, but also poorer adhesion and lasting power. I just get around that problem by using a good primer base or a mixing medium so the pigments stick.


When you dampen your brush with a drop of sealing liquid (e.g. Ben Nye, Mehron, Illamasqua, Inglot and more artist brands have their own versions of these) before dipping into pigment, and apply these like liquid shadows, you get incredibly intense color that is also budge-proof. You can't easily do that with powdered shadows because the liquids will seal the surface of pressed shadows and ruin them.

With loose pigments, you don't have to worry about that.


For this eye look, I was going for maximum pigment intensity, so I had 
  • a layer of black matte cream as a base all over the lids
  • a deep bronzer as a transition shade in the socket (don't feel you always have to buy a separate eye shadow pan - bronzer is more economical and multi-purpose)
  • a rich duochrome aqua blue with a green shift (TKB Trading Capricorn Sea, which is discontinued now - Indian Blue is a nice alternative)
  • a paler translucent blue with gold sparkle as a highlight shade (TKB Ocean Green)


A couple of tricks to getting a more dimensional look with loose pigments:
  1. Use a dark base - this helps grab pigments and intensify them; the only time to avoid a black base is when you are using a pigment that is quite translucent.
  2. Use a matte transition in a contrasting tone - here I used a very warm bronze to contrast against the blue and bring out the green tones more.
  3. Apply a first layer of the loose pigment dry, THEN foil a bit with a mixing medium and pack a damp layer of just inside the edges of the first layer as a liquid shadow, so the color goes from soft outside to maximum intensity in the center.
  4. The best highlight shade to complement an intense duochrome is one that echoes the color of the duochrome when it hits the light. In this case, Capricorn Sea has a pale aqua shift, so I picked Ocean Green to be the pale center shade for the halo eye look, and also to apply around the inner corners.


It doesn't really look like I am wearing 2 blues - the paler shade is there just to add more depth and complexity to the main turquoise shade.

Friday, July 31, 2015

Shade Highlight: TKB Trading Luna Blue Pigment


I love pigments. And I've been trying and collecting them since before I started blogging. TKB Trading is my default place to go for pigments, and some of my faves in recent years have been the multidimensional synthetic fluorophylogopite formulas. 

Don't be scared off by the name. These are synthetic pigments which have a slight edge over natural mica in the sense that they have stronger shine, beautiful translucence, and can be shaped in a spherical way to give holographic effects in nail polishes and eye shadows. They're also used in lots of glosses. Natural mica pigments are unable to throw off so much shine and color when blended with other pigments. They often get muddy and dull. But not these synthetic ones.


Which makes them FANTASTIC for layering over other shadows or mixing into other loose shadows. And they are also great mixed into top coats and applied over other polishes. It's magic - try it.

It's hard to capture on camera; these look so much cooler in real life or when suspended in nail polish formulas. In real life, Luna Blue shifts from rosy-violet to blue to teal. I couldn't capture that on camera swatched on the skin, but I did manage to get a shot below where Luna Blue is throwing off 2 shades (blue and green) at least. You can probably see all 3 colors by looking at the sacket above; rose (center), green (bottom), and blue (top) tones.

This is what makes them different from natural duochrome/interference mica, which can only reflect 1 different color.


Synthetic Mica is more expensive than natural mica. It's $15 for a 1oz bag, compared to other pigments which can cost only a few dollars. But most people will typically only need to get a sample size sachet, which costs $2.95 and will last you ages and ages. Highly recommend you check it out if you love playing with fairy dust.

This type of sparkly mica will dust off your skin easily, so especially if you're layering it over other shadows I suggest dampening your finger in something like an alcohol-free toner, then dabbing it in a small amount of pigment, and gently rubbing and pressing it onto your lid. This helps the pigment to adhere instead of all falling off onto your cheeks, and also helps you get a more intense shine right where you need it.


In this look, I actually have a deep dark brown shadow on most of my lids and a bronze gold around the socket and inner corners.
I rubbed Luna Blue around just the center of my lids and along my lower lash line (I love the dewy sparkly gleam below the eyes), and left my inner and outer corners alone.

This gives a very unique, hard to describe effect, because you have a warm smoky eye, but depending on the angle of the light, your shadow will suddenly shift to blue, then back to bronze, then to teal, then sometimes violet.

Absolute magic.
There are 5 shades in the Moon Dust collection, and I love all of them. You can go on the site to search for individual colors but I recommend getting a whole set of sachets for just USD$12.

Sunday, July 22, 2012

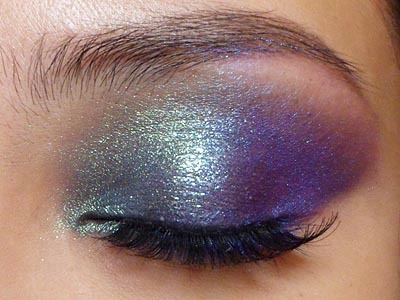
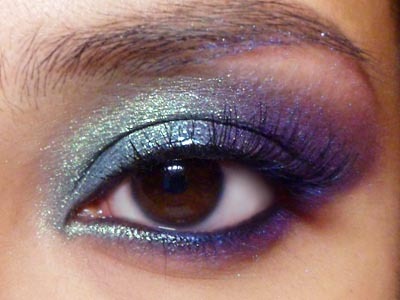
Twilight Fae: Dramatic Hologram Eyes


For those of you craving some excitement for Summer nights, here's a colorful and dramatic smoky eye which is actually pretty easy to create. To tone it down for day, just keep the shadow within the socket area instead of blending it out and up as far as I did.
There were 3 main products I used:
  • Black kajal (any very creamy and smudgy black cream shadow or pencil will work)
  • Translucent green sparkle (I used a discontinued mica from TKB called Starlight Green, which has been replaced with Starbright Green. The Body Shop also has a single shadow highlight #08 which is exactly the same thing but in pressed form.)
  • Pink/purple duochrome with blue sheen (I Nuovi Amethyst dust; this is like a loose version of MAC Stars n Rockets shadow.)

And yes, these swatches above look NOTHING like how they appear on my lids, but that's why it's so fun working with duochromes and a black base!


Step 1: First apply black kajal or paint very thickly all over the lids, up to the socket line. 
--
Step 2: Using a synthetic concealer brush (or any synthetic paint brush), softly smoke out the edges so there are no hard lines, and bring the color up and out. 


Step 3: Apply the kajal to the lower lash line and water line as well, and smudge out lightly. The finished look should now be like the above image, which is a typical winged smoky eye shape.


Step 4: From here, we move on to the fun stuff. Lightly dust the translucent green highlight all the way from lower lash line up to the brow, but ONLY ON THE INNER HALVES of the lids.


Step 5: The shade that's going to make everything look holographic is the pink/violet/blue duochrome on the outer half of the eyes, top and bottom. When you pack it over the black, you will no longer see the pink, but the violet and blue is going to take on a sort of glow which is going to stand apart from the green and give the most interesting effect.


Step 6: This step is optional. I wet a flat brush with a little liner sealant (Ben Nye Liquiset), dabbed it into some aqua green translucent glitter, then pressed it right down the center of the lids. This echoes the green shadow, but adds a "wet" effect and gorgeous sparkle when you blink.


Step 7: To finish the look, I curled my lashes and then applied a strip of wispy lashes. Any type of lashes would work, including plain black mascara.