Showing posts with label duochrome. Show all posts

Saturday, January 5, 2013

Grey with a Lavender Twist: Duochrome Sparkle Eyeshadow Tutorial


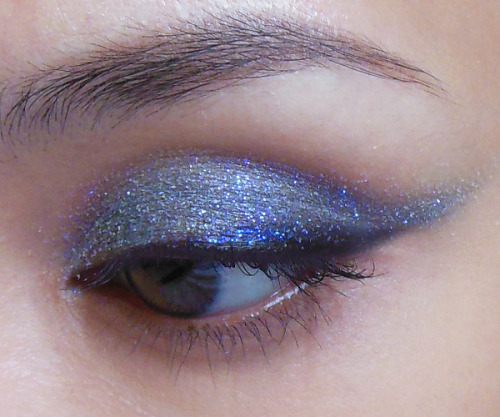
Because Maybelline's Color Tattoo shadows were SUCH a great product to use as glitter base, I couldn't resist doing a second version in a slightly winged out kitten-eye shape. This time, I used a grey base (Audacious Asphalt) and a crystalline white glitter with a violet sheen on top.
I had a lot of trouble capturing the true color of the glitter (Virgo by Lime Crime) in flash. It kept showing up white in the camera, although it's a violet in real life.

You will need:
  • Black pencil
  • Grey cream shadow or base
  • Pale white glitter with lavender sparkle (you can actually use any pale glitter; it doesn't need to be a white with violet duochrome, but if you can get hold of some, it adds a twist to the look)
image
Step 1: First, I did a simple black liner swatch along the upper lid. Do it in a rough triangle so it's thick at the outer corners.


Step 2: Here's the fun step. You apply the grey shadow using a synthetic concealer brush, and you want to line it up exactly above the black liner you did earlier (overlapping a tiny bit is fine) and then drag it out past the outer corners of the eye. 
This actually scrapes the black and pulls it out into a nice sharp wing.
The grey should go up to the hollow of the socket line, so continue to apply if that stroke with the brush did not cover everything.


image
Step 3: The simple part is the glitter. Just quickly use the same brush to press a thin layer of pale white/violet glitter over the grey cream shadow.


Step 4: Finish with black mascara. Because the glitter doesn't really go down to the base of the lash line, you can easily wear half-strip lashes with this look for some extra drama.
It's quite a neutral look but there's just that bit of extra sparkle in a different color when your eyes catch the light.

image
To show you how the duochrome looks, I have an image taken in shaded interior lighting (daylight) as well. Grey, but not grey!

Sunday, July 22, 2012

Twilight Fae: Dramatic Hologram Eyes


For those of you craving some excitement for Summer nights, here's a colorful and dramatic smoky eye which is actually pretty easy to create. To tone it down for day, just keep the shadow within the socket area instead of blending it out and up as far as I did.
There were 3 main products I used:
  • Black kajal (any very creamy and smudgy black cream shadow or pencil will work)
  • Translucent green sparkle (I used a discontinued mica from TKB called Starlight Green, which has been replaced with Starbright Green. The Body Shop also has a single shadow highlight #08 which is exactly the same thing but in pressed form.)
  • Pink/purple duochrome with blue sheen (I Nuovi Amethyst dust; this is like a loose version of MAC Stars n Rockets shadow.)

And yes, these swatches above look NOTHING like how they appear on my lids, but that's why it's so fun working with duochromes and a black base!


Step 1: First apply black kajal or paint very thickly all over the lids, up to the socket line. 
--
Step 2: Using a synthetic concealer brush (or any synthetic paint brush), softly smoke out the edges so there are no hard lines, and bring the color up and out. 


Step 3: Apply the kajal to the lower lash line and water line as well, and smudge out lightly. The finished look should now be like the above image, which is a typical winged smoky eye shape.


Step 4: From here, we move on to the fun stuff. Lightly dust the translucent green highlight all the way from lower lash line up to the brow, but ONLY ON THE INNER HALVES of the lids.


Step 5: The shade that's going to make everything look holographic is the pink/violet/blue duochrome on the outer half of the eyes, top and bottom. When you pack it over the black, you will no longer see the pink, but the violet and blue is going to take on a sort of glow which is going to stand apart from the green and give the most interesting effect.


Step 6: This step is optional. I wet a flat brush with a little liner sealant (Ben Nye Liquiset), dabbed it into some aqua green translucent glitter, then pressed it right down the center of the lids. This echoes the green shadow, but adds a "wet" effect and gorgeous sparkle when you blink.


Step 7: To finish the look, I curled my lashes and then applied a strip of wispy lashes. Any type of lashes would work, including plain black mascara.


Thursday, April 12, 2012

Spring Night: Smoky Duochrome Eye (all drugstore products!)


A smoky eye and false lashes do not necessarily mean a heavy look if you layer on some shine and subtle color.
Here, I used:
  • elf Black Licorice cream shadow duo (black shade)
  • Wet n Wild ColorIcon in Greed (sparkly black and gray-gold shade)
  • Essence Colour & Shine eyeshadow in 03 Wear It (baked sparkly purple)
  • Bourjois Liner Pinceau 16 Hour liquid liner in black
  • Ardell 120 Demi lashes

Step 1: Apply the black base in an even layer, sheering out above the socket line.

Step 2: Dab the tips of a brush into black shadow and then pack it gently along the lash line. Don't run this over the entire crease area as you need to leave space for the silver-gold.

Step 3: With the silvery-gold shade in the Wet n Wild palette (or any soft grey you have), run just above the black shadow in a thin strip. You may need to go over a couple of times to build up intensity. Try to keep the color within the socket line.

Step 4: Run a sparkly purple along the socket line, framing the rest of the eye makeup. You can smoke this color out a bit more since it's the outermost shade.

Step 5: Apply black liquid liner at the base of your upper lashes, and then apply wispy false lashes. To keep the look lighter and more lifted upwards, I'm not applying anything on the bottom lash line. Not even mascara.