Friday, October 7, 2011

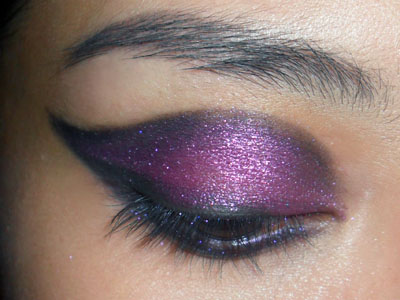
Fall Look: Dramatic Purple and Black Winged Eye

Dramatic purple and black winged eye with Revlon Soft Nude Colorburst Lipstick.
This is a super-dramatic look inspired by images of Fall's dramatic eye liner looks, as well as Swarovski's Wings of Fantasy campaign visuals. It's something of a creative look, but if you're playing a mythical Black Swan for Halloween (not the movie version) this is a simpler and more wearable way to go about it.

Step 1: Use a pointed pencil brush to apply a line of blackened purple along the socket line. (I used a pigment I mixed up myself, but any black will do. Bring it almost to the inner corners but not quite so there's a bit of gap if you have a double-lid. If you have a mono-lid, you will probably need to carefully trace the hollow of your socket with a very light pencil first, as you can't follow your natural crease line as conveniently.

Step 2: The easier part is applying lines along the upper lash line (thickly) and lower lash line (thinner). IMPORTANT: Don't let the lower line touch the inner corner as well. We want a "wispy look" with this, so just end off a little under your natural eye line rather than right on it.
At the outer corner, extend the lower line straight up and out at the same angle as your eye line. Then just simply stop when it meets the top line at the crease. If you need to clean up around the lines, do so with a Q-tip dipped in oil-free remover.

Step 3: Fill in the space in between the 2 dark lines on your upper lid with a sparkly magenta or pink. Dampen your brush slightly so the pigments will adhere better.
Try MAC Reflects Pink if you want this look. If not, any other color and finish would work just as well, including mattes. Just make sure the color can be packed on intensely.

Step 4: Now the black at your lash line is probably faded and diffused, so go over it again with a smudge brush to reinforce the darkness.

Step 5: After applying pale yellow or white liner to the water line, add dramatic false lashes if you want. I used Eylure Nicola lashes, which are flared outwards at the outer corners, and add to the whole winged cat eye look.
Go over the lash band with black liquid liner to hide it if you need.

Finished Look: Note how the pale liner on the water line helps to keep the eye looking "open",. This is especially important if you don't have large eyes.
Also, I love how the dark smoky liner along the lower lashes tapers off slightly without touching the inner corner. This adds drama, and is also a trick to look like you're an expert at applying tapered lower liner. (Makeup artists draw this with a free hand and dip slightly downward at the inner corners, which can be really difficult to get even on both eyes.)

Tuesday, October 4, 2011

Makeup Brushes 101: Eye Brushes

My most-used brushes from L-to-R: Fine gel liner brush, flat angled brush, smudger brush, blender (oval), flat shader, pencil brush, small blender, and regular tapered blender.

I used to be a fan of "finger-painting". I.e. applying most of my eye shadows with my fingers. Part of it was laziness, and part of it was just ignorance about how the heat, moisture and oils from your fingers can destroy your shadows by sealing the surface over, and/or breeding and re-applying bacteria to your face.
If you've ever seen the surface of your shadow going darker, shinier, or sort of bumpy like tarmac after a few uses, you'll know what I'm talking about.

Unfortunately, this usually means the color pay-off (intensity) of the shadow is gone.

Now, I only use my fingers for loose pigments because those do not contain absorbent fillers like titanium dioxide and talc, which are the main reasons eye shadows "seal over" when touched with your fingers. For pressed shadows, there are plenty of good brushes you can find that will not break the bank or make a mess on your face.

The trick is getting familiar with how each shape and type of bristle works. The rule of thumb is you get more precision with firm, tightly packed brushes (smudgers, flat angled liner brushes, gel liner brushes), but you need looser, softer brushes for blending and smoking out colors. Brushes with a combination of these (soft bristles packed tight in a flattened/oval ferrule) is a great multi-tasker. More on this below.
---
If you're starting out in makeup or want to keep things simple and fuss-free, these are the essentials:

  • Small pointed liner brush (synthetic hair)
  • Smudger brush (natural)
  • Soft shader (natural/synthetic)

---

  • If you're starting out in makeup, gel liners are the easiest way to get very strong and controlled lines without a whole lot of skill. Pencils tend to be less long-wearing and don't always give as strong a line.
  • A good gel liner brush should have a small, tapered tip with a flattened ferrule (point of the barrel that holds the brushes) so you can use it flat for a thick line or side-ways for a thin one. Of course, this is only applicable if you use gel liners. For a good sense of relative size, look at the left-most brush (in a cap) in the top image. 
  • These are more versatile than the long ultra-fine brushes sold by many makeup brands, because those are harder to handle in general.
  • My ALL-TIME favorite is the one that comes with the Maybelline Lasting Drama gel liners. Good as the high-end brands, and so much cheaper because you're getting 2 products for one!


TIP: These are FANTASTIC as concealer brushes for hiding spots and blemishes because they are firm enough to pack on product, but small enough for precision.
---

  • This type of brush deserves a whole lot more love than it does. The name "smudger" is slightly misleading because I find it much more useful as a tool for applying dark shadows close to your lash line as a smoky liner. They usually have a flat, wide ferrule (barrel) and firm, natural bristles.
  • I feel that defining your lash line is very important when you're wearing lots of colors or shimmer on your lids, because all that makeup can really overwhelm your lashes and make your eyes less defined.
  • A good one should be firm when you press down on the tips, and the bristles should not bend easily, or you will get a mess when you try to apply shadow to small areas.
TIP: You can use this to apply a cut crease in your socket line.
---

'
  • Shader brushes are a staple for packing on color, as well as blending and softening looks. These are usually flattened and cut in a rounded paddle-shape. The bristles should be soft enough to hold and deposit a lot of pigments onto your lids, but firm enough to grab a lot of color. The most famous shader is probably MAC 217, but you can find this from most brands and price ranges.
  • Take note that the size can vary greatly from brand to brand, so I'd suggest something no wider than than your thumb nail as the really huge ones can mess up your eye look by muddying everything together.
TIP: Some makeup artists like to use these brushes to apply concealer for a very natural finish.

---
OPTIONAL BRUSHES DEPENDING ON YOUR NEEDS:

  • Flat angled brush
  • Flat shader brush
  • Fine detail brush
  • Tapered blending brush


  • Used similarly to the smudger brush, this gives a more precise line, but the short, stuff fibers tend not to grab as much pigment, so it works better (in my opinion) as a brow brush when I want to avoid overdoing my brows.

 ---

  •  The big, flat older-cousin of the soft shader, this type of brush is also good for packing on softer colors and pigments. Unlike the soft version above, the flat shader is not good for blending out colors and harsh lines because it's good for packing colors down, not ruffling them up.
---

  • A pointed tip is great for aplying color to the crease. Just dip the tip into shadow, then into the hollow of your socket and then sweep in and out along your socket line. Also good for applying highlight to the inner corners of eyes.
  • The second-last brush from the right looks like a rounder, softer version of the pencil/detail brush, but functions more like a mini-version of the below blending brush.
---

  • A staple for many people, the longer, tapered blender brush is very soft, and better for smoothinng and blending out color than for applying color because the super-soft bristles will not grab much pigment. My favorite alternate use for this is applying mineral powder concealer onto spots by lightly stippling down. 
---
Do note that I collected my brushes from a whole mix of places, including Sigma and Sephora, and these are the ones that I consider to have good brushes for good value, although Coastal Scents has a good range of smaller detail brushes and smudgers.

Saturday, October 1, 2011

The Glory of Royal Raspberry Lip Paint from Barry M: Lip swatch and review!

I got a surge of comments regarding Barry M Royal Raspberry Lip Paint after posting the below haul picture on my Tumblr.
Barry M Lip Paints (from left): Royal Raspberry, Vintage Rose and Dolly Pink

It's not a surprise considering it's an absolutely gorgeous black-cherry metallic.

I'm happy to report that after giving it a couple of goes, I can safely say Royal Raspberry is undoubtedly glorious. Creamier and silkier than the other Barry M Lip Paints I own (which tend to be sticky or more matte due to the high pigment density), this slips on to an effortless opaque finish, and does not bleed. If you find Barry M's semi-matte lipsticks too dry, this is a great finish for you, but it will not stay on quite as well as the more matte and tacky ones.
Barry M Royal Raspberry Lip Paint, close up.
Royal Raspberry comes at the commoners' price of £4.49 and shipping was extremely fast (I got my package within a week of ordering) despite it traveling 1/3 of the way across the globe from the UK to Asia. I'm happy to report that nothing was melted, broken, or smooshed against the sides in this second purchase either.

Shade-wise, metallic reds aren't exactly rare, and many brands from drugstore to high-end do carry a variation or two. But this shade is a hair deeper and cooler toned (which I believe makes it more flattering) than shades I've tried from L'oreal and PUPA. Unfortunately, I tried to swatch it on my hand, but the flat surface just makes it almost impossible to bring out the metallic tones and the contrast of light and dark properly.
Swatches don't do this lipstick justice! L-to-R: PUPA lipstick in New Chic (metallic), Barry M Royal Raspberry (metallic), and Bourjois Sweet Kiss 54 Rouge Glamour (creme)

For that, you need contours, so here is a close-up lip swatch for the full effect.
Lip swatch: Barry M Royal Raspberry up close and personal
The overall effect this black-cherry metallic shade gives is more vamp than sex-pot, and perfect if you like to channel the "quietly-mysterious icon" more than the "loud and fabulous starlet".


Tips:
Barry M Lip Paint in Royal Raspberry, worn with a sheer silvery-grey wash on the lids

  • In the look above, I wanted to adapt the traditional sex-pot look (black kitten liner, white pencil on the waterline), since the lipstick is a dark metallic cherry rather than a glossy red. I simply smoked out black kitten-flick liner by running over it with a soft grey wash so it becomes less obvious, and retained the pale waterline by running a matte pale-yellow pencil along it.
  • I do not wear this with lip liner, because I feel that would weight down the whole texture and make it very thick-looking and less metallic. I just rub a bit of lip concealer into the edges of my lips and then carefully apply the lipstick straight from the tube, for maximum intensity.
  • Deep metallic lipsticks are great when worn sheer as a stain. Apply balm or whatever nude/muted lip color on your lips, and then rub this right in the center of your lower lip, and "smoosh" your lips together to get that "just-ate-cherries" pout.
  • Do wear a bit of color on the cheeks with this, as it will liven up your face and prevent you from looking sallow.

Friday, September 30, 2011

Black Comet: Smoky Eye with Candy-pink Lips (MAC Lustreleaf and Lime Crime Great Pink Planet)

Black smoky eye with Lime Crime Great Pink Planet on the lips and Barry M Baby Pink Lip Paint worn as blush.

I had to name this the "comet" eye, because I was inspired by how a comet starts at a hard intense point, and then trails out to a smoky soft finish. This look is the reverse of most shaded eye looks, in that the hardest and darkest point is the inner corner of the eye rather, and then shades out and softens to another color at the outer ends.

Step 1: Using a flat, firm brush for precision, apply a matte black shadow to the inner 3/4 of the eye. With what remains on the brush, sweep along the outer 3/4 of the lower lash line as well.

Step 2: With a soft, shimmery silver-green (MAC Lustreleaf)extend the shape from the outer corner outwards in a winged shape, blending and smoking out.

Step 3: Return with the matte black using the flat brush, and extend the black outwards along the contour. Then gently smoke the line upwards under the brow bone to remove the harshness of the line.

Step 4: At the outermost ends, smoke the green and black together for a smoky wing. Then apply black mascara to finish.
---
For the cheeks and lips, I wanted to keep things colorful, so I dabbed Barry M Lip Paint in Baby Pink (100) onto the apples of my cheeks, and Lime Crime Great Pink Planet on the lips for a really bright candy-pink touch.


Wednesday, September 28, 2011

Fall 2011 Lipstick Recommendations and Swatches

L-to-R: NYX Iced Honey, Make Up Store Magic, and NYX Chic Red lipstick

Some of the shades that have been showing up for the Fall fashion season include a mixture of soft, dark, and strong shades. Here are some of my favorites.


SOFT:
Gone are the concealer lips of last season. The new "nude" lipsticks are kittenish (they make your lips look much more pouty) with a warm peachy undertone so they give your face some color without grabbing too much attention. These lips will go with pretty much any look.
Swatches (L-to-R): NYX Iced Honey (Round) Lipstick, and MAC Kinda Sexy (Matte) lipstick.

NYX Iced Honey lip swatch

STRONG:
Strong shades make your lips the focal point of your face. This season, the liner has been jazzed up, but the lips remain strong. Just keep the eye color neutral for the day, and any of these shades would look fantastic as a pop of color when you're wearing a whole suit of dark colored clothes.

Swatch (L-to-R): NYX Chic Red (Round), and MAC Up the Amp (Amplified) lipstick

Lip swatch: MAC Up the Amp is a creamy, strong purple mauve.

VAMPY:
Super-dark lipsticks have been popping up in many collections. The common variations are those that are brown based, red based, and purple based. The tricky bit is avoiding looking too Goth when wearing these lip colors, but you don't have to pair it with pale eye shadows either. Just keep the lids a soft smoky shade for a more modern touch.
Swatches (L-to-R): MAC Prince Noir (matte) lipstick, and Make Up Store Magic lipstick.

Lip swatch: Make Up Store Magic lipstick gives an interesting metallic purple twist on the dark vamp lip.

Sunday, September 25, 2011

Fall Evening: Cherries and Violets (NYX Chic Red Round Lipstick)


Rich, crimson lips can brighten up your complexion, and you don't necessarily need to pair it with pale, neutral eye makeup or kitten liner. For nice Fall evenings (or just any night out on the town), you can pair colored eye makeup with strong lips if the application remains soft and smoky.

Step 1: To soften the overall look if you have dark hair, lighten your hair a tad  with either light-colored brow mascara. I didn't have any so I applied clear mascara, and then used a disposable wand to apply a metallic beige pigment over the coated brows.
Step 2: I  wanted to keep the look smoky so I chose a smoky purple instead of a bright (that would look too 80's). Try The Body Shop Shimmer Cubes Palette 07 in Ruby, which is a shimmery eggplant.

Step 3: Apply a deep purple metallic liner along the lash lines and water line as well. To keep the lash line dark, apply liquid liner along the tide line (under the upper lashes) to cover up any white underneath. Skip this if you have runny eyes.

Step 4: Apply full false lashes to finish the look.

For a little extra pop, you can always add a bit of brighter purple right in the inner corners. 

There are many great dark red lipsticks, but one of the best and most affordable deep crimson shades that is not too orange, not too plum, not too brown, and not too black, is NYX Chic Red. It's highly-pigmented, very creamy, and just a hair cooler-toned than a true scarlet, which makes it flattering on most skin tones.

For this look, I skipped powder and used just a bit of deep rosy blush (NYX Dusty Rose) because when I'm wearing a lot of stronger colors, dewier skin keeps everything from looking too old-fashioned.