Saturday, December 10, 2011

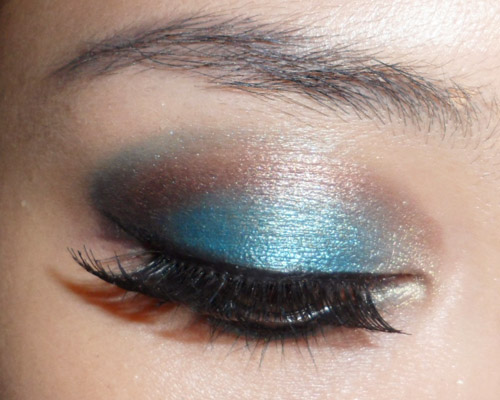
Dragonfly Wings: Iridescent Smoky Eye


For those of you who want to veer away from the usual stately, smoky colors this holiday season, an iridescent, multi-faceted smoky eye can work just as well with that little black dress. (In fact, it would probably be the focal point of your entire look.)

I'm using some shades from the Urban Decay 15 Year Anniversary Collection and The Body Shop, but feel free to use alternatives you own.
What you'll need to get this look:
  • A creamy black base: I used the black half of ELF's Cream Shadow Duo in Licorice
  • A medium purple with blue highlights (Urban Decay Omen)
  • A deep gunmetal grey shadow (Urban Decay Ace)
  • A translucent duochrome white with pale green sheen (The Body Shop #08)
Step 1: Apply a dark base to the lid, going up just above the socket line. This does not need to be very dark or opaque. You just need a base for shadow to cling to.

Step 2: Apply a blue-violet shade to the outer edges of the black base, along the upper areas of the socket. Run along the lower lash line with a fine brush as well.

Step 3: Pack the dark metallic grey to the lid under the purple. Smoke out the edges between the grey and purple so there are no harsh lines.

Step 4: The fun part is applying a wash of iridescent green over the dark grey to transform the color. I used The Body Shop's Single Eyeshadow in #08 which is a white with a green sheen (similar in effect to MAC Vanilla or Pink Opal pigment) on the inner half of the grey shadow only. Reach around the inner corners to the bottom lash line slightly as well.

The finished eye lid should look something like this, with green on the inner halves, dark grey on the outer halves, and soft purple framing everything.

Step 5: Apply black kohl along the water line and black mascara on the top and bottom lashes. Voila!

Thursday, December 8, 2011

Day Look: Golden Brown with Violet Crease


This is a simple way to add a twist of color to warm or neutral shades for day looks. 

Step 1: Use a thin, firm pointed brush to apply a rich violet shade to along the crease of the eye and slightly above it. 

Step 2: Then with your choice of a rich golden brown (I chose MAC Brass Pigment, but if you're not able to locate this use MAC Woodwinked or Urban Decay Baked), fill in the inner portions of the lid and use a soft blending brush to blend the edges a little so there are no obvious demarcations between the two shades.

Step 3: Pack on the golden brown once more right along the lash lines to intensify the color, as the blending will have taken away some of the intensity and shine. The purple would at this point be just a smoky trace at the edges of the brown.

 Step 4: Apply mascara and pale liner (beige or yellow) along the waterline to finish the look! Easy-peasy.
MAC Brass Pigment on the lids, I Nuovi Ultraviolet Dust in the crease

On the cheeks and lips, I wanted to keep everything fresh and sweet to go with the eyes.
  • Cheeks: NYX Pinky Blush applied a little more intensely than I usually do, for a flush.
  • Lips: Etude House Darling Ultra Shine "Strawberry Milk" lipstick (I highly recommend this if you like baby pinks but find Saint Germain or Viva Glam Gaga too blue or white. If you don't have retail stores near you, I think they're still sold here or on ebay here.)


Wednesday, December 7, 2011

Lazy Face: The 5 Minute Makeup Routine

There are days when you just DON'T have any time to spend 20 minutes getting your full face on.

Here are the essential steps and tips (for me) to get out the door looking put-together:

Step 1: Pick a good medium-coverage foundation (Dior Nude and Bourjois Healthy Mix are my favorites for being lightweight+good-coverage) with a great skin-like finish. This will even out your skin and minimize time needed for your concealer application later. Dab it on around the areas where you need the most evening out, as the coverage will be thickest in that spot.
For me thats under my eyes, and around my nose. 
And - IMPORTANT - use your clean hands! This is the fastest way to get foundation well-blended into your skin.

Step 2: Conceal any redness, discolorations, spots.
A wax based concealer (pots or sticks) will be easier to spot apply and build up than liquids. I'm trying out Revlon Photoready Concealer but MAC Studiofinish is my staple on most days. If you have really dark pigmentation or circles, get something with peach undertones. Apply with a brush, but press with your ring finger until it blends seamlessly into your foundation.
Don't rub or it will take you forever to build up precise coverage, and DON'T try to erase every single flaw you have. It's too much work and never really hides anything that well.

Step 3: Set with a powder. If you need something with a little more color, try something like MAC Mineralize Skinfinish Natural, because if you've got the shade that matches your skin tone, this is a powder that gives extra coverage without taking the glow away from your skin.

Step 4: Blush. Go for something that's a nice fresh pink (or stronger if you have a deeper skin tone) like MAC Well-Dressed if you're fair, and NYX Pinky if you're medium-toned. (I mixed both here!) Very lightly dab on with a loose, soft kabuki to add the base layer of color first. Then check to see if you need more, before buffing lightly to build up a bit of color.
If you tend to be heavy-handed, my suggestion is to go for a lighter shade than you would normally wear.

Step 5: Set your brows with pencil or powder (or brow mascara), and move on to your eyes. You need 2 basic shades. A deeper, matte shade, and a lighter (shimmer is optional) which can be neutral or otherwise.
With your ring finger, pick up some dark shadow (MAC Concrete) and smear it firmly along the lash line from OUTSIDE-IN so it's darkest near the roots. Don't worry about precision or blending.

Step 6: Next trick; pick up the lighter shade (MAC Mineralize Eye shadow in Snow Season) and use a clean finger to smear it INSIDE-OUT from the inner corners, until it slightly overlaps the darker shade in a sheer wash. That's your eye shadow done!

Step 7: Apply mascara (Bourjois Volume Glamour Max) and comb out if you need to.

Step 8: On the lips, pick your favorite everyday lip color (MAC Faux for me), apply straight from the tube, then kiss the back of your hand to remove excess. Lip gloss (DiorAddict Ultra Gloss #557 is a sheer candy pink with blue reflects) is optional!

And finally, a more presentable face in 5 minutes!


Sunday, December 4, 2011

Banded Smoky Eye: Urban Decay Deep End and MAC Copper pigment


This is a twist on the traditional colorful eye, created by alternating 2 shades concentrically outwards. It's definitely a dramatic look, and plays on subtle color and a very strong, defined eye line. The shape of the look means it will only work if you have a crease. If you don't, but want to recreate this look, you will need to use lid glue to create a fold or the colors will not show up.

I'm not categorizing this as an Urban Decay 15 Year Anniversary Look, as one of the key shades is a russet metallic brown pigment from MAC called Copper. 

Products Used (All Urban Decay shadows are from the 15 Year Anniversary Palette: 
  • A teal blue shadow (Urban Decay Deep End)
  • Rich russet brown shadow (MAC Copper -  you can also use MAC Sable)
  • Matte black shadow (Urban Decay Blackout) 
  • Pale sheer-gold shadow (Urban Decay Vanilla - you can use MAC Vanilla pigment)
  • Black kajal (The Body Shop)
  • Black liquid liner (Bourjois Liner Pinceau 16 Hr)
  • False lashes


Step 1: Pack the teal blue right in the center of the lid, leaving just the innermost and outermost corners bare as other colors will be packed in there. 

Step 2: With a pointed brush, run a coppery brown shade along the crease, stopping short of inner and outer corners as well. You can use a normal brown for the crease color, but a red-toned one stands out better against the teal blue on the lids.

Step 3: Fill in the outermost corner with matte black. Do not pull up into a wing or flare. This is important for the next step.

Step 4: With a pointed pencil brush, pick up the teal blue shadow again, and run it lightly around the rims of the deep copper shade, blending into the black at the outer most corners. Then with a very soft blending brush, blend the outer corner gently so you don't have any overly-harsh lines.

Step 5: On the inner corners, apply just a touch of pale, translucent gold and very gently blend in and up just to tie the colors together. Then apply black kajal generously to the water line. You can use any black pencil but I recommend kajals if you can get hold of them, as they have this beautiful creamy sheen to them.
IMPORTANT: After applying kajal along the water line, use a fine pencil brush to run teal blue shadow right under it, along the bottom lash line. This sets the outer edges of the pencil and prevents smearing. Repeat at innermost corner using the pale gold.

 Step 6: Apply black liquid liner along the upper lash line, then curl lashes and apply falsies to complete the look.

Definitely pair this with muted or nude lips, and just a touch of blush. The drama should all be on the eyes.

Friday, December 2, 2011

Dark Golden Olive

For most women, green shadow is something they love or hate. It's not always the easiest color to wear, but those who love it swear by its ability to be both brightening and sultry in turns.

Of the scores of greens out there, the one that is possibly the easiest for women of all skin tones to wear is a golden pistachio/olive tone that is part green, part gold, part bronze. If you want to buy just one single green shadow that you can throw on in the sheerest wash and get a beautiful, bright effect with minimal technique and skill, my suggestion would be MAC's Golden Olive pigment. If you're still a bit shy of green, then something a little more brown (e.g. MAC Sumptuous Olive would be better as a starter shade).


Of course, these 2 are just shade suggestions. I actually own neither. There are plenty of green shadows but as MAC is readily available in most countries I use it as a point of reference if you want to check out the kinds of colors I'm talking about.

Step 1: I began by using an olive green base spread very sheer over the lid (MAC Moss Scape Paint Pot). A neutral or translucent shade would work just as well, but layering green over green intensifies the color a bit.

Step 2: On the outer corners, I applied a smoky brown (literally any smoky deep brown will do) and then lightly blended the color up along the socket line for definition.

Step 3: On the rest of the lids, apply a deep, metallic olive (Coastal Scents Hot Pot in Dark Golden Olive), blending up just above the socket line.

Step 4: This is where I intensify the color. I used a very sheer, pale lemony-olive shadow (Too Faced Eye Shadow Duo in Rich Bitch blended together) in a wash all over the eye to bring out the golden sheen of the look. (MAC Gorgeous Gold or Golden Olive pigment would work just as well.) Without this step, the look would still work, but be a little less dimensional.

Step 5: To add definition back to the lash line, I applied matte black shadow to the lash line, concentrating on the outer halves.

Step 6: Run the first smoky brown shade along the lower lash line, and the  finish the look with black mascara.

---
Other products used:
  • Foundation: Bourjois Healthy Mix Foundation #52
  • Concealer: Amazing Cosmetics Concealer in Fair
  • Setting Powder: Silica
  • Brows: Maybelline Eyestudio Brow Pencil
  • Mascara: Bourjois Volume Glamour Max in Black
  • Cheeks: NYX Dusty Rose blush (applied very sheer)
  • Lips: Bourjois Effet 3D Max Gloss #63 Rose Eclat

Holiday Glam: Smoky Blackened-Gold with Crimson lips


Most of the time, we pair dark smoky eyes with muted lips to keep things in balance, but it does not mean that you can't pair it with a strong lip for the holiday season. 
To keep the eyes sultry but not overly heavy and severe, I adapted the traditional black eye with 2 things:
  • A pale gold on the lid (I mixed a blend of translucent silver and gold mica to get that specific "cold-gold" shade, but any gold pigment would work as long as it's very metallic (e.g. MAC Gold Metal Pigment) or applied with a dampened brush for a foiled finish.
  • Pigmented matte black shadow (you can get this from inexpensive brands with strong pigments such as Wet n Wild, Sleek, etc. as they work just as well as MAC or other high-end brands)

Step 1:  Using a firm, pointed pencil brush or a flat angled brush, apply a stroke of black along the lower lash line, starting ALMOST from the inner corner (leave the inner-most corner clean so you don't close off your eye totally) and pull out past the outer corners slightly.  You'll likely need to re-dip your brush to get an even stroke of color as firm brushes give precision but do not pick up a lot of product.
 

Step 2: With the same brush, draw another line along the socket, but don't touch the inner corners of your eyes. (If your eyes are very close set, you might want to start the line nearer the middle of your eye,)
The outer corner of the upper line should meet the lower line in a rough wing shape. Do not worry about getting neat lines. 

Draw a third stroke along the outer half of the upper lashes as well.
The finished look will be something like the below. Look straight ahead into the mirror or take a picture to check that the top line looks more or less symmetrical on both eyes.

Step 3: Smoke it all out! Dip a soft blending brush lightly into the black shadow so there is just a bit of color, and then run it briskly along the top socket line to smoke everything out. This is where you add more black to even out the amount of color on both eyes until they are roughly equal.

Step 4: The fun part. Use a flat brush to pack gold pigment onto the lids. Any shade of gold, bronze or deeper silvers would work for this, but I do recommend loose metallic pigments for the most dramatic effect against the black. Fill in all the bare areas from the inner corners of the lids outwards.
A less shiny shade will give less contrast so if you're worried about looking too dramatic, by all means choose a softer finish.

Step 5: Add definition back.
  • I applied black liquid liner along the top lashes and then use the pointed or flat brush to run black shadow along the line. This smokes it out and keeps it from looking too precise and harsh.
  • pale yellow pencil to the waterline (my trusty Make Up Store Vanilla Matt pencil), and then 
  • went back in the soft blending brush dipped in black. Start to intensify the black and blend into the edges of the gold. Remember the overall look is predominantly smoky black, with a flash of gold.

Step 6: Finish by curling lashes and applying mascara (Bourjois Volume Glamour Max in Black). You can wear lashes with this look, but I chose not to as it might obscure the trace of gold but if you have very big lid space, it would totally work.

---

Step 7: On the cheeks, I applied a bit of MAC Mineralize Skinfinish Natural in Dark as subtle warm contour just under the cheekbones, and skipped blusher as it would just compete with the lips and eyes.

Step 8: On the lips, I applied a full-on deep-red matte lip using MAC Russian Red lipstick (this is actually not a blue-based red despite what some say; it's more of a dark true-red). I don't have a dark, cooler-toned black cherry shade or that would look even more dramatic with this eye.

---
Other Products Used:
  • Foundation: Bourjois Healthy Mix Foundation #52 for a velvety matte glow
  • Concealer: Amazing Cosmetics Amazing Concealer in Fair for a slightly brighter under-eye since the makeup is so smoky and dark
  •  Setting Powder: MAC Mineralize Skinfinish Natural in Medium
Recommended nail shade: Black creme, to keep things edgy but refined!