Showing posts with label trend. Show all posts

Monday, August 29, 2011

Lime Crime Countessa Fluorescent Dupe: Barry M Vibrant Pink Review and Swatches!

 Barry M Lip Paint 62 Vibrant Pink


I've always considered Lime Crime's Countessa Fluorescent the Queen of Barbie Pinks. It's different from hot electric pinks and fuchsias like MAC's Candy Yum Yum in that it is a truer pink (as opposed to blue-based), not as deep, and almost highlighter-bright on the lips. 


Imagine my delight when my Barry M package included one that was extremely similar in shade. 
 Meet Barry M Vibrant Pink (left) and Lime Crime Countessa Fluorescent (right).


Barry M Vibrant Pink is something of a satin finish (similar to MAC Pink Nouveau), which means it is opaque and tacky, with a muted sheen - which I love. This is my favorite texture of all MAC lipsticks because it imparts great color, lasts really long, but doesn't feel as dry as a full matte lipstick.


Swatch comparison; Lime Crime Countessa Fluorescent (left) and Barry M 62 Vibrant Pink (right)


The right side of my hand is a little more shaded, or the two swatches would look even more similar. I was quite surprised to realize the Barry M was actually more opaque and intense than the Lime Crime, which is more of a creamy Amplified finish. If you like demi-matte finishes that last a long while, get Barry M Vibrant Pink. If you want a bit more moisture, get Lime Crime Countessa Fluorescent.


The other difference is also that if you want to be really picky about it, the Barry M is just a hint deeper and more cool-toned. But just worn on the lips individually, the difference is not visible at all.


Barbie Pink vs Hot Pink: Barry M Lip Paints in 62 Vibrant Pink (left) and 52 Shocking Pink (right).

Just for purposes of comparison, here is Barry M's Vibrant Pink swatched against Barry M  Shocking Pink, the widely-acknowledged Candy Yum Yum dupe. As you can see, Vibrant Pink is more lustrous and reflective, whereas Shocking Pink is a deeper, cooler-based, more intense matte-pink. 


Do note that all the neon pinks do stain the lips, without exception. (If you've found any of these neon pinks that don't stain, let me know!) I believe it's the nature of the liquid dyes needed to get that intense highlighter-pink effect, as more subdued pinks I own, like MAC Pink Nouveau, do not do this.


The main drawback for this lip shade? It can make teeth look dull and yellow, so watch out there!

Barry M Vibrant Pink can be purchased internationally on Barrym.com for £4.49 each.

Thursday, August 18, 2011

Getting Fuller Lashes: Smoky Lash Trick

Black smoky liner with NYX Angel Blush, NYX Tea Rose lipstick (with Angel blush dusted over)

Mascara can lengthen and thicken lashes to some extent, but if you have sparse lashes, piling on more layers of mascara is not going to fool anyone into thinking you have lush lashes. 

One of the ways to make you look like you have a fuller lash line is adding dark smokiness to the base of your lashes. This trick uses few products, and can be done quickly with no need for smudging or special skills. In fact, this is a look I often wear to work (without the black along the lower lashes) because it looks polished and takes all of 5 minutes.

You need black shadow (matte is best), a firm smudger brush (pictured below), black liquid or kohl liner, and mascara.
Sephora Smudge Brush
 Step 1: Use the smudger brush to apply black shadow to the lash line. Instead of dragging the brush left and right, pack the color in sections, in a downwards motion, like you are painting your nails. If you want to keep it subtle, just leave the black near the base of the lashes.


Monday, August 15, 2011

How to even out NYX Narcissus Lipstick, plus a tutorial!

Top-to-Bottom: NYX Narcissus Round Lipstick, Revlon Stormy Pink Matte Lipstick, layered for an even, opaque finish.
Narcissus is one of NYX's best-sellers, but I'm one of those who feel the texture leaves much to be desired. Unlike many of the creme formulas, Narcissus is a semi-shimmery, bright doll-pink which has been compared to MACs Viva Glam Gaga.

The problem is that the very-creamy, slightly-shimmery texture does not adhere to your lips well, so it will sink into lines, and streak and smear around every time you press your lips together. With a shade this bright, any unevenness is extremely obvious.

The trick? Layer this over a matte lipstick. 
The matte texture will absorb some of the grease in the texture and make Narcissus less slippery. This means it will stay more even on your lips. You can use a nude lipstick or even some concealer, but to retain the original intensity and not mute the color, a bright pink that is very similar in shade would be your best option.

NYX Narcissus layered over Revlon Matte Lipstick in Stormy Pink gives a more even and opaque finish, without visibly altering the color.

Wine-smoked Eye Look with NYX Narcissus lipstick: (Click for tutorial!)

Wet n Wild Coloricon in Knock on Wood, NYX Blush in Silky Rose, and NYX Narcissus lipstick


Tuesday, August 9, 2011

Favorite Eye Pencils

Mattes (L-to-R): Revlon Matte Kohl Eyeliner in 05 Very Violet, Make Up Store Vanilla matte pencil,  Revlon Matte Kohl  Eyeliner in 04 Pure White, The Body Shop Special Edition Kajal Eyeliner #01

  1.  Revlon Matte Kohls are great because they are so strong and opaque, but creamy enough to apply without tugging too much on your skin. I like Very Violet along the upper lash line in a colorful kitten flick because it's deep and matte enough for good definition, but you still get strong color. Pure White can be used along the waterline. Note that matte whites tend to work better and stay stronger than pearly ones, which sheer out easily, and will not survive the water line.
  2. Make Up Store's Vanilla matte pencil is my absolute favorite pencil. I haven't been able to find a similar matte pale yellow-beige shade from other brands. This is the best possible color for the water line when you want to brighten and widen, without the harshness of white pencil. TIP: I also use it on any dark spots or marks that need some precision concealing.
  3. The Body Shop Special Edition Kajal: I liked the creaminess and the twist up tube enough to buy a backup but there are plenty of great black pencils out there, MAC Smolder being one of them. This just happens to be one I enjoy and have on hand.


Metallic liners (L-to-R): Sephora Flashy Liner in 07 Flashy Copper, Bourjois Metallise in 52 Brun Inoxydable, Bourjois Metallise in 54 Bleu Clinquant, Silkygirl Funky Eyelights in 02 Ocean Blue, MAC Eye Kohl in Rosemary & Thyme, and Bourjois Metallise in 87 Vert Eclatant
I don't use my metallic liners as much as I should, but I'm not funky enough to wear these all the time. Liners DO need touching up over the course of the day, ESPECIALLY along the lower lash line and water line, and these are where I tend to apply my metallics.


  1. Bourjois Regard Effet Metallise: Great range of shades and great silky textures. These make fantastic eyeshadow bases, and come in some amazingly strong and bright shades that stay true to color when applied. (Some pencils go on duller and sheerer than they appear.)
  2. Sephora Flashy Liners: I did not get many shades as I already have a big collection of Bourjois ones, but I do find these very comparable to Bourjois. Flashy Copper is obviously my favorite, but I prefer it over the lids, as it can make your eyes look swollen when worn close at the water line. (It's closer to skin shade for me.)
  3. Silkygirl: This is a drugstore brand available in Southeast Asia. It's cheaper than the usual brands like Revlon and Bourjois, but the quality isn't entirely on par. They go on less opaque and less evenly than some other brands. Still, Ocean Blue is a lovely steel-blue leaning towards indigo that I love to wear along the lower lash line, with just a neutral wash of beige-brown on the lids. You just need to re-apply every few hours to keep the color strong.
  4. MAC Eye Kohls used to be the only brand of colored liners I owned, but I don't find them to be as metallic and strong in color as other brands, although they are "smokier" in tone. There are still some great shades and if you are shy of color, these are a better way to acclimatize yourself first. Draw along the lash line and smudge with a finger for a hint of smoky definition without too much color.


Saturday, July 30, 2011

Ondine (Featuring Everyday Minerals "Tide is High" Shadow)

Ondine was a water nymph who gave up her immortality for love, but was eventually betrayed by her faithless husband. In vengeance, she cursed him so that he would cease breathing if he ever fell asleep. The story has no happy end, but the mythological figure has always been one of dark and elemental beauty for me.

This is in no way related to the movie of the same name (although I enjoyed it). The bleak and harsh beauty of the Irish landscape and the haunting atmosphere and music did partly inspire the choice of colors and an eye look that's equal parts dreamy and heavy.

Everyday Minerals Tide is High (Shimmer), and Make Up Store Moss (Microshadow)
Read here for the step-by-step!

Monday, July 25, 2011

Dawn Storm: Wet n Wild “Greed” Palette


I’m a little late on the Coloricon train, but I finally got a few from Nonpareil.com, and I’ve been loving them so far.
The first one I decided to try was the 6-color #246 Greed palette, below. I think the shades are gorgeous. The pigmentation of the matte shades is higher on touch, but if you apply them with a brush, over primed lids, the metallics perform just as well, and are really gorgeous.


(Wet n Wild Coloricon 246 Greed)


One tip: Try to avoid applying or touching these with your fingers or you could end up hardening and “sealing” the metallic shades.

Click here for the step-by-step!

Wednesday, July 13, 2011

Multi-tasking: Revlon Colorstay 12 Hour Shadow #01 Copper Spice


Revlon Colorstay Shadows are a bit of a hit-and-miss with me because I find they are all one texture. There is no contrast between mattes and shimmer and glitters. All of them are the same satin finish, and you don’t always get great color payoff.
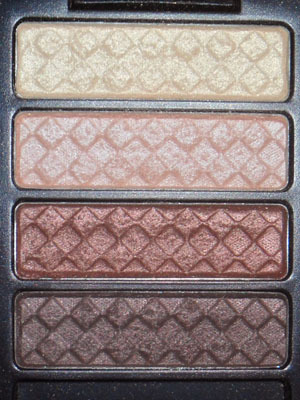
But one of my favorites is Copper Spice, which consists of a champagne, a peach, a coppery-russet, and a dark cocoa. Nude Elements is popular, but I find it a little duller and less flattering than Copper Spice.
But here’s what I do with 3-4 color palettes to get maximum mileage out of the shades.
image
—-
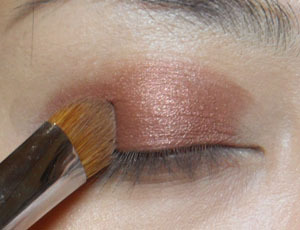
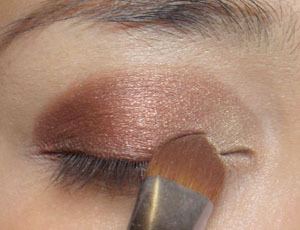
Step 1: Apply the 3rd shade, the coppery-russet, onto the outer 2/3 of the lids. Having a good base and using a flat brush to pack the color on will give you more intensity.
image
—-
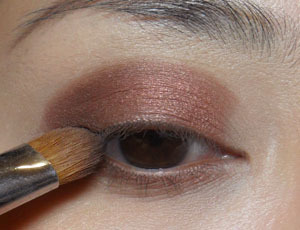
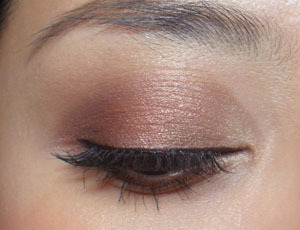
Step 2: Apply the dark cocoa along the lower lash line and outer corners of the upper lids for definition. If you have mono-lids, go ahead and sweep along the hollow of the eye socket a little.
image
—-
Step 3: Apply the palest champagne-gold to the inner corners of the lids, and downwards on the inner corners of the lower lash line as well. Then use a soft brush to blend out any harsh lines overall.
image
—-
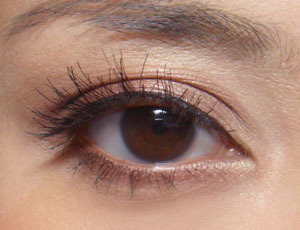
Step 4: Apply black liquid liner to the upper lash line, and then black mascara to top and bottom lashes. Put on fake lashes if you need a little extra oomph. This is a look that transits well between day and night.
image
image
—-
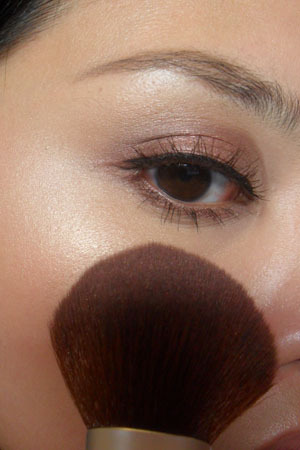
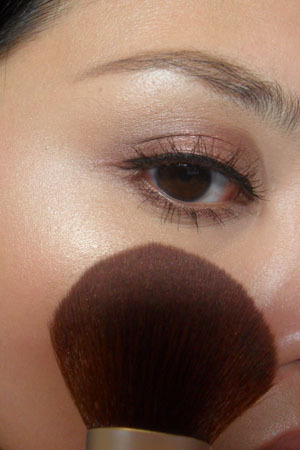
Step 5: Here comes the multi-tasking step you can take with most neutral-to-warm eyeshadow palettes. With a big fluffy brush, apply the two palest highlight shades to your cheekbones as highlighter. (Yes, it doesn’t ALWAYS have to go onto your brow bone. And I DO recommend sticking with one spot, not both, if you don’t want to overdo it.)
This gives a lovely sheen and coordinates with your eye look. 
image