Friday, August 10, 2012

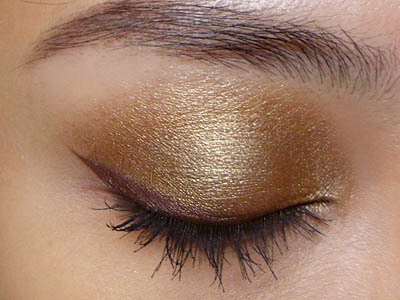
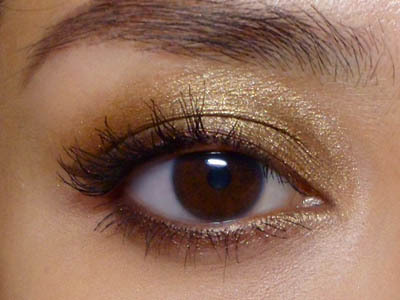
Low-cost Burnished Bronze Look for Work/Schoool: Coastal Scents Bungalow Gold

The entire look was done using extremely affordable products. I'm featuring some of my favorite products today. The images on the site aren't often accurate so I swatched them above for viewing.

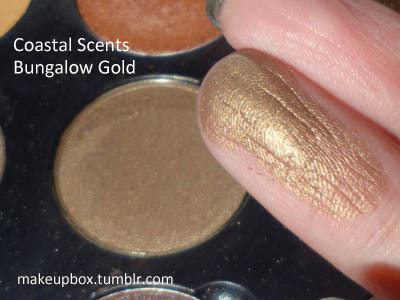


  • Coastal Scents Hot Pot in Bungalow Gold - this is one of the newer Hot Pots, a beautiful shimmery metallic-bronze shade
  • Coastal Scents Hot Pot in Chocolate Brown - also known previously as S35, this is a deep taupe shade with a faintest hint of plum; often compared to MAC Satin Taupe, although this is deeper and has more grey
  • I also used Maybelline's Gel Liner in 02, which is a shimmery chocolate.

Step 1:  Begin by first using a flat angled brush to line the upper lash line from outside in using a deep taupe shadow, angling diagonally downward so there is a slight wing. Run in along the outer half of the lower lash line as well.


Step 2: Use a soft blending brush to buff a rich bronze shadow over the entire lid. Blend up beyond the socket line. Then use the angled brush to run the bronze shade all along the lower lash line as well. 


Step 3: Now for the liner. Since you've already laid down an angled line earlier using the dark brown shadow, it should be a piece of cake going over it with the brown gel liner now. 

This should give you a very neat but not-too-harsh line.


Step 4: Finish by curling your lashes and applying black mascara. I'm using Maybelline Great Lash Black. Any black mascara you like will do.

Sunday, August 5, 2012

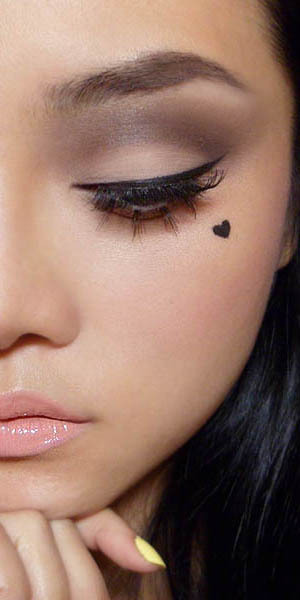
Marina and The Diamonds Nude Lip Look: Retro with a Twist


This is a rather Classic look which would suit anybody. 


You would just need to adjust the colors you use depending on how pale or deep your skin tone is. You would need:
  • 2 matte shadows: a pale beige (you can use a pressed powder) and a dark brown (Revlon Rich Sable)
  • black gel liner (Maybelline is a good option)
  • 2 sets of false lashes; a natural-looking full-strip for the top lashes, and a strip of separated clusters on a clear strip, like below
  • a soft beige-pink blush (NYX Angel) or anything that doesn't really stand out too much on your skin
  • a nude lipstick (I used Lime Crime Coquette)
  • a pale mauve-pink glass (Revlon Colorburst in Crystal Lilac)

Step 1: Apply the pale beige all over the entire lid from lash line to brown bone.


Step 2: Apply the deep brown shadow along the hollow of the socket line. 


Step 3: Smoke the brown upwards towards the brow. Leave just the brown bone clean. Wing it out slightly at the outer corners. If the beige on the mobile lid (near the lashes) has been muddied, simply reapply the pale shade again.


Step 4: Apply your gel liner along the upper lash line and end it in a flick. Follow the lashes all the way, down and then out in a soft curve at the outer corners. Marina's flick starts quite low so the look is more retro and isn't that "catty".


Step 5: Marina doesn't have any skin showing below her lashes, which means you will need to run the gel liner along the tightline, under the upper lashes. Make sure you don't see any skin there.
Then run a matte beige (Nars Rue Bonaparte) or white liner along the lower lash line.


Step 6: Apply full strip lashes to the upper lash line. (I used Ardell 120 Demis, as usual.)


Step 7: The fun bit is the lower lashes. You can buy a box of clusters, but it is far easier (and looks nicer) to cut up the full strip of cluster lashes above, so you have individual chunks with a wide, flat base rather than a point or a knot.
Begin from the outside and work your way in, pasting the lash clusters top-down over your natural lash line. If you need to shift any clusters so they're spaced evenly, just reapply glue and place them back on. Don't paste them them on the waterline itself.


Step 8: Apply a nude lipstick to your lips and then blot lightly.


Step 9: Top your lips with a pale pink-mauve gloss just for a bit of a cool-toned sheen.


Step 10: Using your liner brush and the gel liner again, draw a V to place the base of Marina's signature "heart"-shaped beauty mark on the left side of your face. It's easier that trying to draw a heart from the bow shape at the top.


Step 11: Simply fill in, and you're done! If you need to edit any mistakes, use a tiny lip brush dipped in a little oil-free makeup remover and gently clean up the edges.

Saturday, August 4, 2012

Fight for a Fair Beauty Price Petition


Kudos to Illamasqua for stepping up and admitting that pricing has been very unfair for those in the Pacific. Founder Julian Kynaston explains why this has been so, and why the company is now reducing its prices in Australia by 30% across the board.
View the campaign video here.

(I also selfishly hope any positive changes would spill over to other regions, especially the greater part of Asia, where average spending power is lower than the West.)
I don't really mind price differences between brands. We LIKE having a variety of brands. That's a fact of life, and like it or not, we do choose higher-priced brands for reasons other than quality and quantity.

What I DO NOT understand is prices being very different within the SAME brand. Even adjusting for currency fluctuations and import costs, a MAC lipstick should not cost double or more in Asia-Pacific as it does in the US.

If you are at all annoyed, frustrated, mystified by this, then take a moment to sign this petition here!

This isn't going to solve world hunger or end terrorism but I see it simply as a step forward for consumers everywhere who may not be able to afford a ton of expensive products. If I don't like the fact that a L'oreal lipstick here can cost more than a MAC lipstick in the US, I can always purchase online or ask a friend to help me bring it back. But not everyone has the option.

As a case in point, A BOTTLE OF REVLON COLORSTAY FOUNDATION is about S$30 (US$24) here; even more in Australia.


Monday, July 30, 2012

How many Uses or Applications can I get out of a jar of pigment or a pan of eye shadow?


This is a really hard question to answer because our lid sizes, eye shapes, application techniques, brushes, and shadow formulations differ.
I decided to do a little snooping anyway. 
This is by no means scientific, but it's a fun (and hopefully informative) FYI for you!

The Equipment:
  • Micro-scale (measures down to 0.01g)
  • The Body Shop Eye shadow brush (found the most "medium" brush I could; medium length 1.5cm/0.6" bristles, medium-softness or -spread so it's not extremely fluffy or packed)
  • 0.22g of loose pigment (0.02g as buffer for "fallouts" and debris in the brush). Typically, 1.5g of pressed shadow should last you longer than 1.5g of loose pigment.
  • Silicone oil to prime my skin surface
  • Cotton pads and makeup remover

Each "Application":
  • I wanted to make sure my applications were "generous", so each "application" (covering two lids) was represented by approximately 2.5" x 0.7" strip of skin.
  • I had to assume this would be equal to or greater than the average person's lid space, from lash-to-brow, of both lids combined.
  • The shadow is applied as a wash, over silicone-oil primed skin, in order to maximise pigment adherence from the brush. Again, this should mean I am applying equal amounts of or more pigment than the average person would typically. 
  • I allowed fallout and drop-off of pigments because this is typical of the average application. 
  • I did a manual count using a notepad, to see how many times I could repeat the application before depleting the 0.2g of pigment.
The results?

0.2g (0.007oz) of powder pigments would give you at least 24 full applications typically. This is not bad at all because if you are like most people and apply your shadows or pigments only to your eyes, instead of all over your face, cheekbones, shoulders, body, etc, you will get quite a lot of uses out of your product.
  • This means 1g of powder can give you 120 applications and a typical 1.5g pan of shadow can last you about 180 applications (6 months of once-daily use) depending on how you use it.
  • L'oreal Infallible Coleur Shadows should be able to give you about 420 applications because of how densely packed the 3.5g of pigments are, though it might LOOK a lot smaller compared to a MAC jar.
  • 4.5g of pigment in a MAC's new jars can give you about 540 applications. This means it should least you for about 1.48 years of daily use unless you have tons of fallout during application.
  • 7.5g of pigment in the old MAC pigment jars, however, can give you around 900 applications, so that's the reason why so few people ever seem to finish their old jars.

Important Disclaimers:
  1. If you are using a very fluffy brush like a MAC 217 or 224 versus a flatter brush, you will tend to "lose" more product because the bristles are designed for blending and sheering out (i.e. pick up and dust off). If you want a lot of color intensity, instead of applying layers and layers of shadow, wear a good primer so the first coat of pigment goes on and stays on.
  2. If you are using a very matte or very glittery shadow or pigment, you will "lose" more product to your brush bristles and to fall-out, because matte shadows don't tend to adhere as well to the skin as metallics and pearls.
  3. Please remember that powders vary in texture and weight. Some finer powders will settle and be packed densely, which is why some MAC pigments might look only 1/2 full when they are new. A dense pigment will still give you as many applications as a looser one, so don't worry over-much about the container not being "full".
  4. This whole experiment was done in good fun, and because this is something I've been wondering about for years. Findings are approximate and may not be representative of everyone. Individual results will definitely vary based on the above 3 points!


For Buyers Online:
  1. For those of you buying samples, note that most sellers sell by volume (quarter-teaspoon for example) rather than weight. If you're getting a more sparkly, gritty pigment like MAC Rose, you WILL be getting less product by weight than a 1/4 tsp of dense pigment like Copper Metal, Rose Gold, etc.
  2. If you are buying anything in pressed form, the difference will usually be negligible between shades and textures (as long as they are well-pressed).
  3. Is it better to purchase pigments by weight or by volume? It's hard to make a call because you may not know the texture/density a pigment is going to be beforehand.  In general, if you are buying something very glittery and fluffy (e.g. Kitchmas, Blue Brown, Green Brown, Copper Sparkle, Rose, Naked pigments for example), go by weight or opt to buy them in pressed form. If you are buying something that is very metallic and dense (More fine-grained pigments like Silver Metal, Copper Metal, etc) go by volume (spoon sizes, jar sizes etc).

The fairest and most consistent way to buy and sell loose pigments is to go by weight because that is how the raw ingredients are costed for. Unfortunately, it's easier and cheaper to buy a measuring spoon than it is to get a digital micro-scale,  so most sellers continue to sell by volume instead of weight.

Silver Smoke: MAC Electra


I think every makeup collector should "shop their own stash" once in awhile, as a way of rediscovering and digging out items that they have forgotten.

Electra was one of the very first shadows I ever bought from MAC (along with Vex) and my first pan has been with me years and years because I've worn it probably less than 10 times.

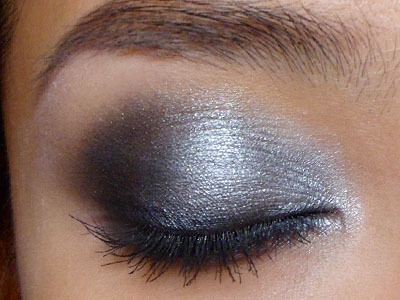
It's a steely silver that has enough depth and sheen to still look dimensional when worn alone on the lids, while playing well with other colors. The main reason I haven't used this much in the past is probably because it's not exactly a subtle shade to wear on a daily basis. 

Beautiful it certainly is though.

Classic smoky eye shades (L-to-R): MAC Carbon, Knight Divine and Electra


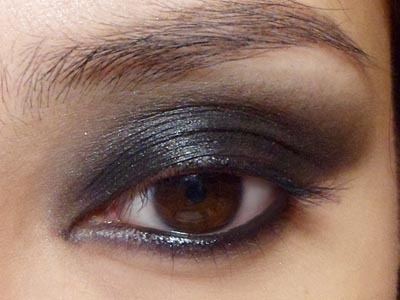
I'm bringing out the sheen and texture by pairing it with a matte black and a darker charcoal grey. If you have any silver-grey-black palette you will be able to recreate this look. (Maybelline Charcoal Smokes and L'oreal Blackened Smokes would both work. Just avoid picking any silver that is too white/platinum unless you are extremely fair-skinned.)

Step 1: First apply black cream shadow or base over your entire lid and along the lower lash line as well. This is a step that can help to intensify the whole look. If you don't have black cream shadow, just use black pencil or kajal to get the same look.

Step 2: Begin by packing the bright silver shade over the inner 2/3 of the lid, leaving just the outer corner and socket area dark.

Step 3: Using a dark charcoal grey (if you don't have anything this dark, mix a black with the silver you used earlier) and apply that in the outer corner and along the lower lash line where there isn't any silver shadow.

Step 4: Run black pencil or kajal along the inner rims of the lash line, and then use a flat angled brush to run black matte shadow along the upper lash line. This adds definition to the lash line. These 2 steps intensify the lash line without an overly-defined line that a pencil or liquid liner would give.

Step 5: Finish by curling your lashes and applying black mascara. If your silver shadow has faded a bit by now, you can always touch up a bit more. Make sure you add a little silver to the inner corner of the lower lash line as well.

Cheeks and Lips:
This look works fab with softer lips and cheeks like nudes or soft pinks and peaches. I'd just avoid anything overly metallic on the lips since you don't want to distract from the strong-textured eyes.

You CAN apply a strong red lip as well for a look that's a little more 70s/80s. Totally up to you!


Tuesday, July 24, 2012

Beauty Find: Stick Kajals / Khols

Shahnaz Husain Herbal Eye Kajal

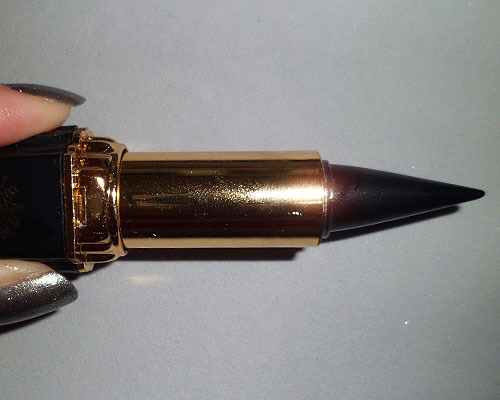
For those who may not be aware, "kajal" (South Asian) is simply another word for "khol" (Arabic), an eye cosmetic used to darken the lids and lash line for centuries in parts of Asia and Africa, and heralds back to the Protodynastic periods of Egypt.

Besides being a beauty aid, it was believed to guard from harsh rays of the sun, had components that treated eye ailments, and was also used to "strengthen the eyes" and guard against evil spirits.

I personally LOVE khols and kajals for their abiilty to go on jet black, or smudge out to the perfectly-smudged "last-night's makeup" look, all the while retaining that slightly glossy, creamy finish. This is by far the best way to get that sexy, smoky under-eye. (Think of the divine Eva Green in Kingdom of Heaven and as Vesper Lynd in James Bond.) 


Premium brands like Guerlain have done their own exorbitant versions of it, but you can get great-quality products from for just a few dollars (Under $7 PLUS SHIPPING) from reputable sellers on eBay.
  • Good kajals should go on very smooth and build to a dense jet black in about 2 strokes/coats.
  • You should not notice any smell.
  • It should not contain any lead (lead sulfide) so make sure you get it from brands that specifically say "No Lead"

I previously first got into the traditional pyramid/lipstick-shaped kajals via a Limited Edition collection by The Body Shop a couple of years ago, and I loved it so much for the waterline and as a smudgy base that I bought a backup before they discontinued it. 

(Don't you hate how drugstores and high-street brands tend to create products, bring it in, discontinue it, bring it in, then discontinue it again?)

I have not tried the stick/applicator versions (a la L'oreal HiP khols), but I'd imagine kajal sticks will give you much more intensity as you're applying the product directly onto your skin instead of via an applicator.


Application:
  • These obviously can't be sharpened, and you shouldn't need to. 
  • You are supposed to use the sides rather than jab the very tip right into your eyes.
  • Press the kajal to the inner rim of your lower lids, with the tip pointed inwards toward your tear duct. Then close your eyes on the tip and gently pull the kajal outwards to the outer corners. This should place the color right along your lashes without poking your eye balls out.
  • This gives a messier, smudgier line than if you use just the tip for application, but you will be doing "self-sharpening" by using the sides.
  • As you get right down to the end of the tubes, you may need to start using a brush to apply the color (but these are so affordable that you might as well just get a new tube).
Buying:
I'm no expert in terms of the many brands and options available from the Middle East and India, but one of the most accessible and reputable that I've heard of is Shahnaz Husain. They do not use any lead in their product, and include herbal extracts that are supposed to condition/treat your lashes and skin.


I can't verify the treatment claims, but so far, the kajal has performed exactly to expectations. It's rich, dark, smooth, and will be a splendid (and cheaper!) replacement for my Body Shop kajal. *Note that if you're in a very cold and dry climate, kajals, like any other cream product, may perform a little differently.

There are a few top-rated sellers on eBay selling Shahnaz Husain Herbal Eye Kajals for very good prices. Make sure you look for those who INCLUDE FREE SHIPPING in the cost. The total cost (as of mid-2012) should be under US$7 per tube.


Shahnaz Husain kajals come in plastic trays with foam wrapping to prevent shipping accidents, and should be sealed with a holographic brand sticker at the side, with date of manufacture and expiry printed on the bottom for quality assurance.

Each stick should stay good for about 3 years at least.