Sunday, January 27, 2013

Soft Purple and Neutral Eye for Hooded Lids


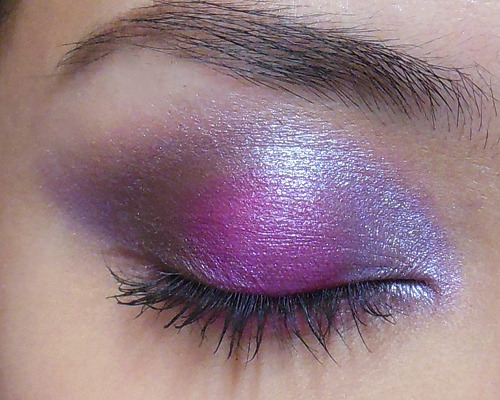
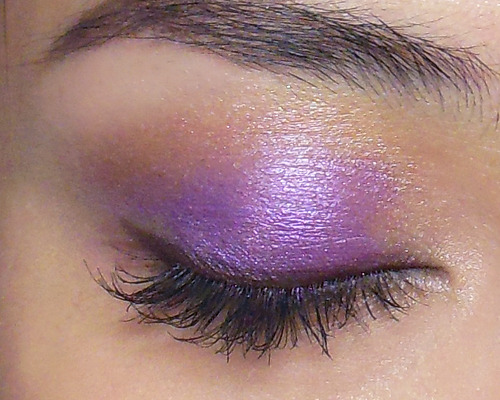
Purple is a flattering color for most skin tones and eye colors, but here is a subtler way to wear if it you would like to add a little color into your day.
Great for:
  • Hooded Lids
  • Those with a wide space between lash line and brow
  • Brown, Hazel, Green eyes
You will need:
  1. [Optional] a pale shimmery cream shadow
  2. A purple shadow (may be shimmery or matte)
  3. A matte medium-brown (use a contouring powder if you have one; you don't have to buy a separate brown shadow)
--
Step 1: (Optional) Apply a creamy base in a pale silver or champagne shade. This will intensify the violet. A regular primer will do as well.


Step 2: Use a soft brush to buff a bright medium violet (try MAC Parfait Amour or I Nuovi Purple Funk) into the center of the lids, leaving the outer corner and inner corner bare.


Step 3: Using the matte brown contouring powder or shadow (I actually used TheBalm's Bahama Mama powder) and a finer/smaller brush,  run the brown along the socket line above the violet. Don't drag the brown too far out and down.
IMPORTANT: You do NOT want to connect the arc to the outer corner of your eye if you have hooded or a slightly downward-dropping lid. Just stop above it and don't bother darkening the outer corners of your lid 


Step 4: Using the same brown, define the outer 2/3 of the lower lash line lightly. Don't use a dark shade here as a strong line there can make a slightly downward drooping shape look worse. You just want a tiny bit of definition.


Step 5: For definition at the lash line, simply apply a stroke of brown pencil or gel liner. You can add a short flick at the outer corner, but try to keep it short and simple as a lid that is folded low might cause excess liner to melt and smudge.


Step 6: Curl lashes and apply black mascara. 

Saturday, January 26, 2013

Twilight-Bloom: Intense Pink, Lavender and Cocoa Eyeshadow Tutorial (88 Shimmer Palette)


This color combination just reminded me of some exotic, poisonous bloom surrounded by dark woods.

 Good for:
  • All eye colors
  • Medium-fair to Dark skintones
  • Double-lids (it could still work for some mono-lids if you have quite a bit of lid space, but otherwise it might not be as flattering)
  • Those with little lines/dryness around the eye area (those with more mature skin can swop to completely-matte shades in similar colors)

You will need:
  • A brown base (pencil, cream shadow or gel liner would work)
  • A rich hot-pink or fuchsia shadow 
  • A medium lavender
  • A deep chocolate brown
  • Mascara


Step 1: First use your finger to apply a light layer of brown base over the entire lid. Don't blend it out too far or pack it on too thick. It's just meant to deepen and provide an adhesive base to the colors.


Step 2: Pack the intense hot pink onto the center of the lid, right in the middle of the brown base. 


Step 3: Using the same brush, just flip to the other side and pick up some of the lavender. Pack that onto the inner 1/3 of the lid, beside the pink, and then sweep it lightly up along the arc of the socket line, to the center of the eye. (If you have mono or hooded lids, leave out the lavender upward-arc.)


Step 3: To add some definition and contour, use a dark brown on the outer 1/3 of the lids, and then follow the socket line once again, arcing inwards to the center of the eye.
On the lower lash line, run a little of the fuchsia shade along the lash line, keeping it soft and hazy. (If you want a less dramatic look, leave this out or use the brown instead of pink.) 


Step 4: Finish by picking up a little of the lavender from earlier and then using that to extend the outer edges of the brown into a very soft wing. Be very light-handed with this. If you want the look to be a little more subtle, leave out this step.


Step 5: [Optional] Line the lower lash line with brown. This gives definition if you are used to lining your lower lash line. You don't need to. Leaving this step out keeps the look more hazy and dreamy. 

Monday, January 21, 2013

Quick Nail Tutorial: Creating Ombre nails with a Sponge!


For some of you nail experts, this won't be anything new, but for those of us who are kinda just starting out with it, this is the simple method for getting nice ombre nails in the convenience of your own home!

This works with all types of polish although I don't think it's necessary if you're using glitter polish (you just add layers straight from the bottle). With a regular polish, it's not that simple because there's no way to get an ombre effect with your brush.
You'll need: 
  • 2 nail polish shades (best if the layer that goes on top is opaque)
  • a piece of cosmetic sponge
  • base and top coat
I used Sally Hansen Complete Manicure in 404 Greige Gardens and Revlon Nail Enamel in 925 Gold Coin (fine golden flecks in a metallic gold base).
Step 1: First apply 2 layers of your base color after priming/prepping with base coat.


Step 2: Preparing the sponging. You need a piece of regular cosmetic sponge. You will need to switch sides/surfaces after a few uses once drying polish spoils the porous texture of the sponge. 
Just apply a thick swatch of polish to the tip. You won't need too much.


Step 3: Apply the sponge to the tip of the nail first and stipple, stipple, stipple. This ensures you apply the most color to the tips. Work in a zig-zag motion inwards towards the center of the nail. 


Step 4: If you need, add a little more polish to the sponge and apply more on just the tips of the nails to intensify the color there. Then let it set for a few minutes before applying clear top coat to finish.

Wednesday, January 16, 2013

Tips and Tricks: What To Do with a Blue Lip Mix!


The idea of blue lips always sounds so ridiculous. Until you actually wear it and realize it looks pretty cool.
I'm demonstrating with Obsessive Compulsive Cosmetic's Rx Lip Tar, which is a rich creme cobalt blue. It's quite deep and strong in real life, but for some reason in white fluorescent light, it looks bright blue.


In 2 of the images, I applied Lime Crime's deep indigo-blue glitter, Aquarius, over the Lip Tar. The glitter is darker than the gloss, so it created a deep metallic-looking effect. To see the intensity/depth of the final color, check out the low-light image above. (I apologize for the unfocused image; for some reason my camera doesn't want to focus without light. I probably should have tried an indoor setting.)
If you're taking photographs with it, remember 2 things will happen:
  1. In indoor light, the sharp contrast of the blue against your skin color is going to create a dark border right around the lip color. 
  2. In flash, the blue is going to GLOW.


Tools and Tips:
  • Use a small concealer brush. There is no way you are getting this on using your fingers or directly from the tube. You will need plenty of precision because any streak, smear, or uneven lines is going to show up instantly.
  • It's best to apply a lip primer or clear liner first. This is because lip tars will rapidly bleed into fine lines around your lips (as you can see from the slight fuzziness on some of the images above).
  • For an extra precise lip, pick up a little concealer on a small brush after you apply your blue lip, and then go around the border of your lips just to clean up and get an ultra-neat line.
  • OCC Lip Tars AND MAC Lip Mixes will go on glossy, but eventually set to a matte finish. If you want to apply any glitter to it, do it quickly while it is still glossy, because once it sets it goes matte and it will no longer be as tacky.

Some Ideas for Mixing
Wearing a cobalt blue lip isn't practical for everyone. So what else would you find useful in a Lip Tar or blue lipstick?
Color adjusting/mixing!

A strong blue can do 2 things:

1. Add cool tones to a color that you find a little too warm (yellowish, orange) for your liking. Adding this to a basic red lipstick allows you to make it almost berry-ish or blood-colored. Very cool if you're going for a glam look or have deeper skin and find most reds showing up orange on you.

When added to a pink or mauve, it intensifies the bright magenta/violet tones so you can add a twist to your regular bright pink lipstick.

2. It adds depth to an already-deep color. Try adding a dot into a dark plum or liver colored lipstick. Instant Noir. This works the same way that a translucent blue-toned hair dye can turn brown hair black. 


Final reminder:
Don't over-apply when you're using it as a lipmix! The color is extremely pigmented and can overtake the original lipstick you're trying to adjust. 
How much do you need?
This little. That's ALL I used for the 3 lip color adjustment swatches above. One tube is probably going to last you for years if you're only using it on yourself.

Saturday, January 12, 2013

Absinthia: Green Fairy Eye Tutorial


There was a phase in my life when I wore NOTHING but green eyeshadow. I just thought it was such a sexy and flattering color. All you need for a sultry, smoky eye that stands out is a deep, vibrant green like MAC Humid or a discontinued pigment called Green. (I used that for this tutorial because I still have my large 7.5g jar from years ago, but use Humid or Antique Green pigment if you don't have it.)
I also added a touch of golden lime (MAC Golden Olive pigment) and a deep emerald green glitter called Capricorn. Now, in direct light, this glitter looks like a straight dark emerald green, but when the light shifts or when you're in the shade, it has a teal-blue shift. That's probably my favorite glitter out of the Zodiac range from Lime Crime, but a regular green would work anyday.


image
Step 1: I used black gel liner to create a slight cat-eye flick at the outer corner. This was done by drawing a line from the outer part of the lower lash line outwards, and then a second line from the outer corner fading in towards the center of the upper lid.
Don't worry about it looking too neat and precise. This acts as a sort of guiding line for the look.


image
Step 2: Using a flat brush, I blended the vibrant emerald green shadow all over the lid, JUST past the hollow of the socket line. For more drama, you can foil the shadow with a little Fix+, eye drop, or sealing liquid so it's more metallic. 
Be careful if you are using pressed shadows. You should add the moisture to the brush AFTER you pick up the shadow. Introducing fluids into the pan can end up ruining your shadow, depending on its formula, even if you're just using water.
At the outer corner, your shadow should extend straight out a little past the black liner applied earlier.


image
Step 3: Using a pencil brush, apply the pale lime green shade to the inner corner of the eye, blending a little inwards on the upper lid. Then pull more lime green along the socket line, along the edge of the deeper green applied earlier. 
Pull it to the center of the eye and then stop.


image
Step 4: Glitter time. Dampen the fine brush with sealant or clear mascara and then pick up some glitter. Gently apply it along the lash line, and then out along the black liner. Extend out along the edge of the green shadow applied earlier. Go over with a second coat of glitter right along the lash line and flick, just to intensify the sparkle.
If you're not able to find a duochrome glitter and want a more dimensional look, you can opt to go for a dark blue or teal glitter as well. It won't be duochrome, but the overall look will permanently look like the daylight image above, rather than shifting between emerald and teal depending on the light.


Step 5: Carefully curl lashes and apply mascara to finish. As the glitter is most intense along the lash line, I find wearing false lashes will obscure the whole look, so if you must, wear only natural-looking half strips.

Saturday, January 5, 2013

Grey with a Lavender Twist: Duochrome Sparkle Eyeshadow Tutorial


Because Maybelline's Color Tattoo shadows were SUCH a great product to use as glitter base, I couldn't resist doing a second version in a slightly winged out kitten-eye shape. This time, I used a grey base (Audacious Asphalt) and a crystalline white glitter with a violet sheen on top.
I had a lot of trouble capturing the true color of the glitter (Virgo by Lime Crime) in flash. It kept showing up white in the camera, although it's a violet in real life.

You will need:
  • Black pencil
  • Grey cream shadow or base
  • Pale white glitter with lavender sparkle (you can actually use any pale glitter; it doesn't need to be a white with violet duochrome, but if you can get hold of some, it adds a twist to the look)
image
Step 1: First, I did a simple black liner swatch along the upper lid. Do it in a rough triangle so it's thick at the outer corners.


Step 2: Here's the fun step. You apply the grey shadow using a synthetic concealer brush, and you want to line it up exactly above the black liner you did earlier (overlapping a tiny bit is fine) and then drag it out past the outer corners of the eye. 
This actually scrapes the black and pulls it out into a nice sharp wing.
The grey should go up to the hollow of the socket line, so continue to apply if that stroke with the brush did not cover everything.


image
Step 3: The simple part is the glitter. Just quickly use the same brush to press a thin layer of pale white/violet glitter over the grey cream shadow.


Step 4: Finish with black mascara. Because the glitter doesn't really go down to the base of the lash line, you can easily wear half-strip lashes with this look for some extra drama.
It's quite a neutral look but there's just that bit of extra sparkle in a different color when your eyes catch the light.

image
To show you how the duochrome looks, I have an image taken in shaded interior lighting (daylight) as well. Grey, but not grey!